



Table of contents: Poly V-belt drive, additional units… ↓ Accessory Mount Bolt Tightening… ↓ Poly V-belt running ↓ Removal the poly V-belt ↓ Install ↓ Removal the bracket for additional… ↓ Install ↓
Poly V-belt drive, additional units bracket
- 1. Poly V-belt. Check the degree of wear. Do not bend. Risk of damage to a previously used poly V-belt when changing its running direction. For reinstallation, before removing the poly V-belt, mark its running direction with chalk or a felt-tip pen. When installing, ensure correct position on the pulleys
- 2. Intermediate roller. 20 Nm
- 3. Bolt. Replace. Lubricate the sealing ring with oil. 150 Nm + 90° turn. Use the counter support "T10355" to loosen and tighten. Risk of engine damage. In order not to adjust the timing phases, do not turn the crankshaft with the bolt removed
- 4. Sealing ring. Not a spare part, included in the scope of delivery of the bolt
- 5. Torsional vibration damper with poly V-belt pulley. Risk of engine damage. To avoid adjusting the timing phases, do not turn the crankshaft from the "TDC" position with the damper removed
- 6. Bolt. 40 Nm
- 7.Remove the V-belt tensioner with a key to unload the V-belt. Secure with the "T40098" retainer
- 8. Additional units bracket with oil filter and oil radiator
- 9. Generator
- 10-12. Bolt
- 13. Bushing
- 14. Vane pump
- 15. Air conditioning compressor. Do not unscrew/disconnect the coolant lines
- 16. Bolt
- 17. Air conditioning compressor guide bushing
- 18. Bolt
Accessory Mount Bolt Tightening Sequence
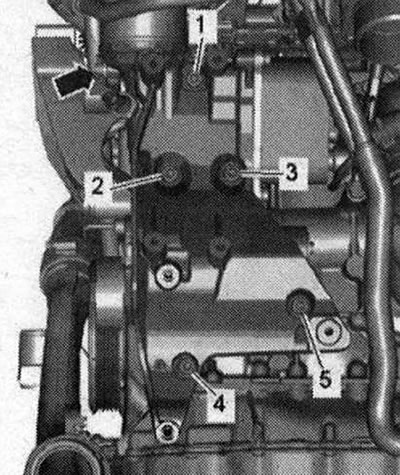
Install the bracket for additional units and first screw in bolt "4". Tighten the bolts in sequence "1...5" in 3 stages as follows:
- 1. Tighten the bolt completely.
- 2. Tighten the bolts to 20 Nm.
- 3. Tighten the bolts by 90°.
Poly V-belt running
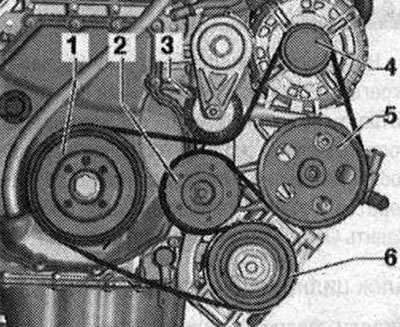
1. Torsional vibration damper; 2. Intermediate roller; 3. Poly V-belt tensioner; 4. Generator; 5. Vane pump; 6. Air conditioning compressor
Removal the poly V-belt
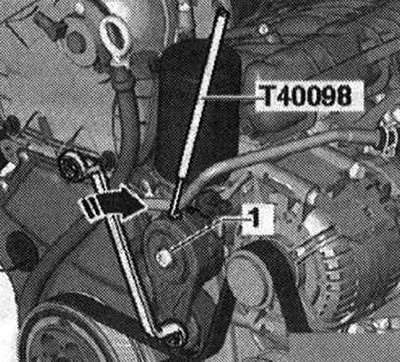
To loosen the poly V-belt, turn the tensioner in the "direction of the arrow". Secure the tensioner with the "T40098" lock. Remove the poly V-belt.
Install
Installation in reverse order, in this case it is necessary to install the generator and compressor before installing the poly V-belt. Install the poly V-belt as shown in the figure. Turn the tensioner in the "direction of the arrow" and remove the lock "T40098". Loosen the tensioner. Check the correct installation of the poly V-belt. Start the engine and check the correct running of the poly V-belt.
Removal the bracket for additional units
Drain the coolant. To loosen the poly V-belt, turn the tensioner in the "direction of the arrow". Secure the tensioner with the "T40098" lock. Remove the poly V-belt. Unscrew bolt "1" and remove the poly V-belt tensioner from the accessory bracket. Place a rag under the accessory bracket to collect any leaking oil. Disconnect connectors "1 and 4" from the oil pressure sensor "F22" and the low pressure oil pressure sensor "F378".
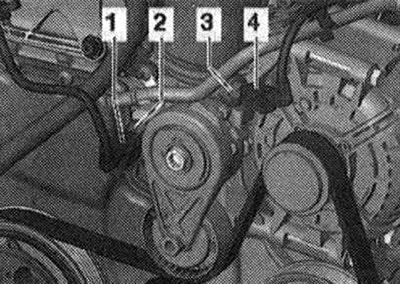
Release the clamps of the "arrow" hose and remove the air duct hose. Remove the generator.
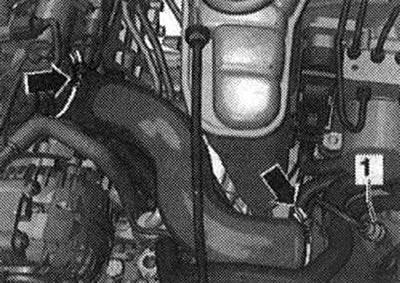
Disconnect the plug connector "1" of the electromagnetic clutch from the air conditioning compressor.
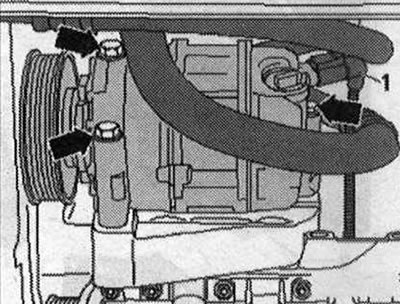
Unscrew the air conditioner compressor "arrow" bolts. Tie the compressor with the coolant hoses connected to the side member from above. The hydraulic lines of the common hydraulic booster pump remain connected. Unscrew bolts "1" through the belt pulley at the front, bolt "2" - at the back.
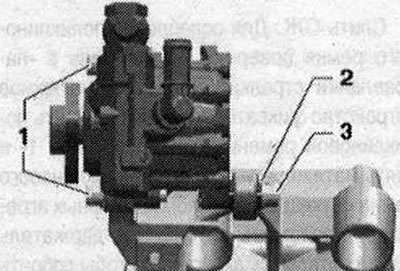
The figure shows the common hydraulic booster pump without a belt pulley and without hydraulic lines. Place the hydraulic booster pump with the hydraulic lines connected on the side member. Loosen the oil filter "arrow" with the key "3417" and remove it. Unscrew the bolt "arrow" of the oil dipstick guide tube.
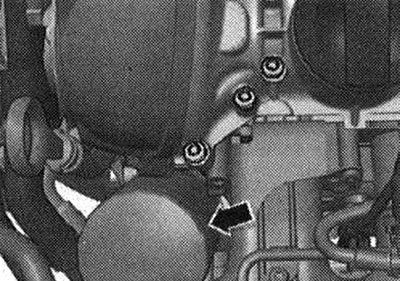
Unscrew bolts "1...5" and remove the bracket of additional units from the coolant pump housing.
Install
Install in reverse order, taking into account the tightening torque. Replace the bolts that were tightened with additional tightening. Replace the gaskets and O-rings. Moisten the O-rings "4" with concentrate, concentrate. Insert the connecting pipe "2" into the housing "3" of the coolant pump.
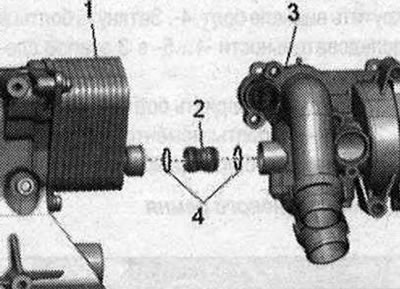
Slide the auxiliary unit bracket "1" onto the connecting pipe, insert the bolts and tighten, tightening sequence. Install the vane pump. Install the compressor. Install the generator. Install the poly V-belt. Fill with coolant. Check the oil level.
The full version is posted on the resource AUDImanual.ru