
Removal
1. Set the piston of cylinder No.1 to TDC.
2. Remove the timing belt sprocket from the camshaft.
3. Number the bearing caps of the distributor shaft with notches or chalk to avoid mixing them up during subsequent installation.
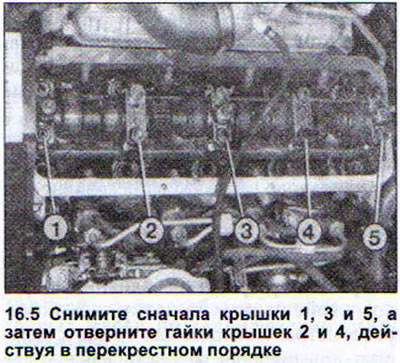
4. Remove covers 1,3 and 5 (see illustration 16.5).
5. Unscrew nuts of covers 2 and 4, acting in a crosswise order (see illustration).
6. Remove the camshaft. Installation
7. Lubricate all guide surfaces before installation.
8. Install the camshaft so that the piston cams of cylinder No.1 are uniformly facing upward.
9. Install bearing caps 2 and 4 first.
Caution! The hole in the cover is not centered. For this reason, ensure correct installation.
10. Tighten the nuts in a cross pattern to a torque of 20 Nm.
11. Install the remaining bearing caps, tightening to 20 Nm.
Warning! Do not start the engine for 30 minutes after installing the camshaft. When the camshaft was removed, the pressure on the hydraulic tappet springs was released and after installing the shaft, they took the uppermost position. This means that when starting the engine, the valves will be open so much at the first turns of the camshaft that the pistons will hit them. And only about half an hour after installing the camshaft, the pressure in the plate tappets will decrease and they will "sit". As a precaution, it is recommended to first turn the engine manually two turns to make sure that none of the pistons collide with the valves.
The original source of the article can be found on the website AUDIMANUAL.RU