
Table of contents: Steering Wheel Lock Switch - Check ↓ Rear window heating ↓
All work related to the removal, repair or replacement of the ignition switch must be performed in a workshop, because to remove the switch it is necessary to drill a hole in a certain place on its body. Only work related to the electrical part of the ignition switch is listed here.
1. Remove the instrument panel. This will provide access to the steering wheel shaft lock.
2. Remove the sealing wax that covers the two small screws that secure the steering wheel lock switch (see illustration).

3. Disconnect the switch. When installing a new switch, make sure the lock control pin fits into the groove on the switch.
Steering Wheel Lock Switch - Check
4. Pierce the insulation of the wire with the thin end of the tester's connecting probe with a test lamp to determine which wire is the power supply.
5. Find the appropriate electrical diagram. First, check if the switch is receiving power. To do this, turn on the ignition or headlights.
6. Make sure that the switch, when in a certain position, allows current to flow further into the circuit. Using the steering wheel shaft switch as an example, this looks like this.
7. Remove the instrument panel to gain access to the switch power wires.
8. Connect the tester with the test lamp to the ground (-).
9. Test the insulation of the wire being tested using a tester probe with a control lamp.
Voltage from the battery should be supplied to both terminals 30, to which the thick wire with red insulation is connected. Power is supplied to terminal P, to which the wire with gray-yellow insulation is connected, only in the "rest" state and is de-energized when the key is turned in the lock. Voltage is supplied to terminal X, to which the wire with black-yellow insulation is connected, only when the ignition is turned on. The same applies to the thin wire with red insulation for the sound signal and the radio receiver power supply.
Power is supplied to the black insulated wire of terminal 15 when the key in the ignition switch is turned to the "Ignition" position (for diesel engines, "Preheating") and "Start"
Power from terminal 50 to the wire with red and black insulation to the starter is supplied only when the key in the ignition switch is turned to the "Start" position.
An acoustic signal is given if the door is opened, the ignition key is removed from the lock, and the light is not turned off or the radio continues to work. This sound signal is given by the corresponding device in the small control unit of cars not equipped with the Auto-Check-System. In cars with the Auto-Check-System, the same rather squeaky and unpleasant sound comes from the block of additional relays, located on the left below the instrument panel (driver's side legroom). If this signal "gets on your nerves", it can be turned off by removing the corresponding acoustic signaling device, which looks like a relay, from position No.12.
Power is supplied to the cigarette lighter via the corresponding fuse. If the cigarette lighter does not work despite the fuse being OK, the contacts of the heating coil have become loose or it has burned out. The coil can be replaced.
Rear window heating
The rear window is heated via a switch on the instrument panel. Power is supplied to the switch when the ignition is on from the X terminal of the unloading relay via a wire with white-yellow insulation through a fuse. When the switch is turned on, current flows from it via a wire with white insulation to the filaments of the glass heater.
If the rear window defroster does not work, the reasons may be as follows.
- a) The fuse has blown.
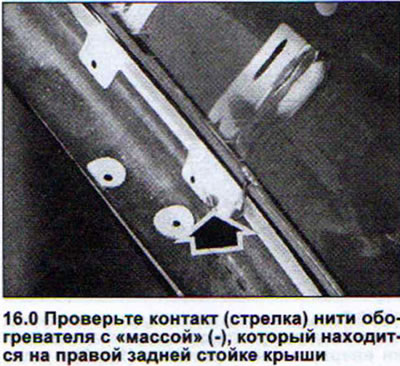
- b) The switch is faulty. Remove it and check with a tester with a warning light whether the voltage is applied to the white-insulated wire when the ignition is turned on and the switch is turned on. Check the heater contacts and make sure by connecting a tester with a warning light to the heater contact with a white wire that the heater threads are receiving power. Also check the contact of the heater thread with the "Ground" (-), which is located on the right rear roof post, by bending the post trim (see illustration 16.0).
- c) Damage to the filament. In this case, conductive silver-containing varnish, which can be purchased at auto parts stores, can help.
This article was copied from the website: AUDImanual