
Table of contents: Dashboard Speakers - Removal and… ↓ Radio antenna ↓
The following procedure applies to serially installed radio receivers.
1. Make sure that you know and write down the security code that your radio has.
2. Disconnect the battery.
3. Insert the supplied radio removal brackets into the holes on both sides of the panel and remove the radio (see illustration).
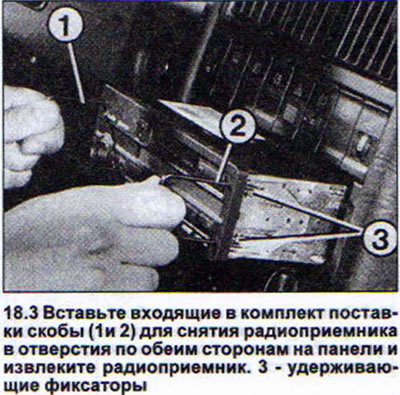
If there are no brackets, you can use suitable pins, inserting them into the holes in the radio panel in order to press the latches that secure the radio in the console.
4. Disconnect the radio power plug and antenna plug.
When installing the radio in place, hold it horizontally so that the retaining pin on the back of the radio fits into the hole. Once installed, push the radio forward slightly until the catches click into place.
5. Enter the security code into the radio if it is equipped with such a code.
Attention! The security code must be entered into the radio every time after disconnecting the battery from the vehicle electrical system, after replacing the radio fuse, or after turning off the power to the radio.
Dashboard Speakers - Removal and Installation
Speakers are installed on the top, right and left sides of the instrument panel.
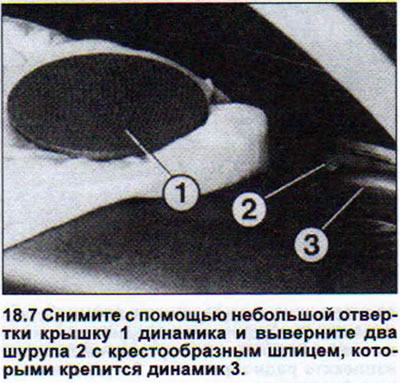
6. Carefully remove the speaker cover using a small screwdriver.
7. Remove the two Phillips-head screws that secure the speaker. When installing the speakers later, insert the tabs on them into the slots on the panel (see illustration).
The rear speakers are mounted behind the rear side door trim.
8. Remove the door trim.
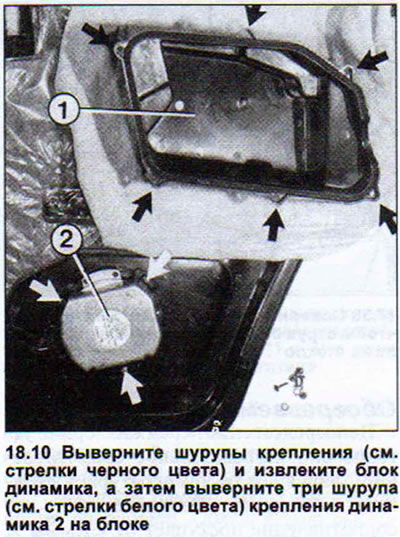
9. Remove the mounting screws and remove the speaker unit.
10. Remove the three screws securing the speaker to the unit and disconnect the speaker wire (see illustration).
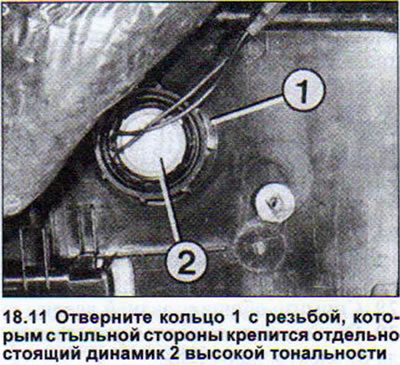
11. High-pitch speaker. Unscrew the threaded pin that holds the free-standing high-pitch speaker on the stylish side and disconnect its wire (see illustration).
Radio antenna
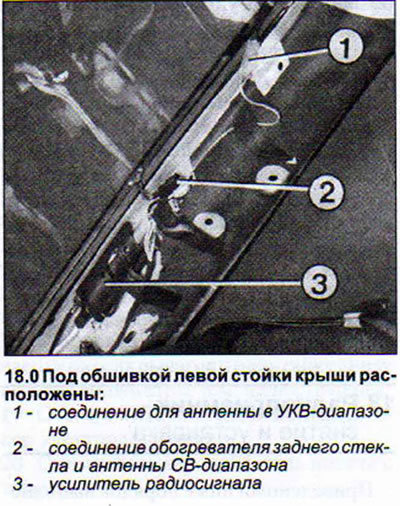
The rear window heater filaments serve as the radio antenna. The two upper filaments serve as the antenna for receiving medium wave transmissions, and the remaining filaments serve as the antenna for receiving VHF transmissions. A radio signal amplifier installed under the left rear roof pillar trim compensates for the insufficient height of such an antenna (see illustration 18.0).
If the radio antenna is defective, you must do the following to detect it.
12. Remove the trim from both roof pillars.
13. Check the ground (-) connection of the rear window heater. The same applies to the ground (-) connection of the radio signal amplifier.
14. Make sure that the heater filaments are not damaged. If damage is found, apply conductive varnish to the break or replace the rear door glass.
15. Disconnect the amplifier plug. Make sure that there is power. To do this, turn on the radio. If there is no power, check the wire.
16. Check the resistance of the amplifier itself with an ammeter. The ammeter should show a resistance of 30-50 mA. Otherwise, the amplifier is faulty and must be replaced.
17. Disconnect the lower rear window defroster wire to perform further testing.
18. Turn on the ignition and rear window heater and measure the voltage on the wire. The voltmeter should show battery voltage. Otherwise, the wiring or amplifier is faulty. To determine where exactly the fault is, disconnect the lower wire from the amplifier and measure the voltage with the ignition and rear window heater on. If the voltmeter shows battery voltage, the wiring is normal and the amplifier is not working. Otherwise, the situation is different.
(The original article is located on the online resource «AudiManual.ru»)