



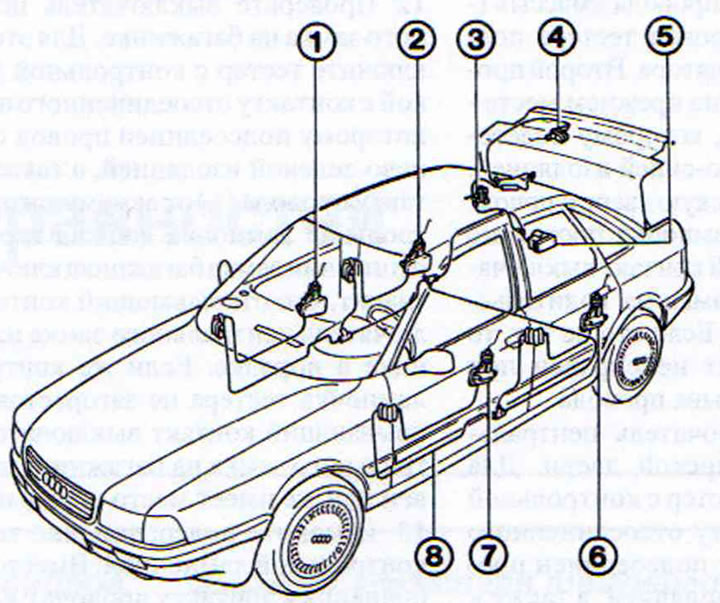
20.0 Central locking system components and hose routing
1 - passenger door central lock switch
2 - rear right door central lock switch
3 - central lock switch for fuel tank cap
4 - trunk central lock switch
5 - dual-function injection pump
6 - rear left door central lock switch
7 - driver's door central lock switch
8 - high/low air pressure hose
Attention! The trunk lock has its own characteristics. If the key hole in the lock switch is vertical, the trunk lock is locked and does not respond to the central lock. This is one of the ways to protect against thieves. If the hole in the switch is horizontal, the trunk lock "obeys" the central lock.
Central locking - check
1. Open or close the driver's or passenger's door lock or the trunk lock using the key. The central locking should operate when locking/opening any of these locks and after about two seconds all locks should be closed.
If the pump continues to operate for more than five seconds, the central locking system is leaky. In this case, the dual-function pump should operate for no more than 35 seconds. After this time, it should switch off.
Warning! If the central lock does not work, the door and trunk locks can be opened and closed with the key. The lock switch buttons can also be opened and closed manually.
If the injection pump when turning the switch of the lock of one of the doors (driver, passenger or trunk) does not work, then to check the electrical part of the central lock, do the following:
2. Check the corresponding fuse.
3. Remove the trim from the rear right side of the trunk.
4. Remove the central locking pressure pump and disconnect the multi-pin power plug for the central locking switches (see illustration).
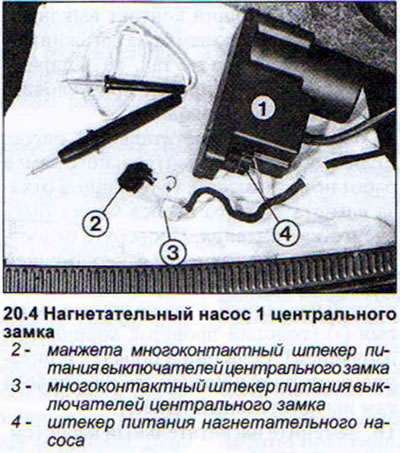
5. Loosen the clamp and remove the rubber cuff from the plug.
6. Check the central locking switch on the driver's door (see illustration).
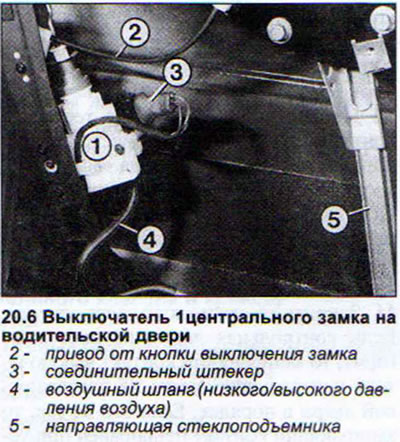
To do this, connect the tester with the control lamp to the contact of the plug to which the wire with green-blue insulation is connected, as well as to the contact of the "ground" wire (-) to the body. The control lamp should light constantly when the driver's door lock is unlocked with the key. This means that the opening contact of the central lock switch on the driver's door is OK.
If the tester's control lamp does not light, then the opening contact of the central lock switch on the driver's door is faulty or there is a break in the wire.
7. Change the connection of the tester with the control lamp. Instead of connecting to the contact of the "ground" wire (-), connect the connecting wire of the tester to (+) of the battery. The second wire of the tester remains in the same place - on the contact of the plug to which the wire with green-blue insulation is connected.
8. Lock the driver's door with the key. If the indicator lamp is constantly on, the locking contact of the central lock switch on the driver's door is OK. If not, the locking contact is faulty, provided that there is no wire break.
9. Check the passenger door central lock switch. To do this, connect the tester with the test lamp to the contact of the disconnected plug, to which the wire with yellow-blue insulation is connected, and also to the contact of the ground wire (-) to the body. The test lamp should light constantly when the passenger door lock is unlocked with the key. This means that the opening contact of the central lock switch on the passenger door is OK. If the tester's test lamp does not light, then the opening contact of the central lock switch on the passenger door is faulty or there is a break in the wire.
10. Change the connection of the tester with the test lamp. Instead of connecting to the contact of the "ground" wire (-), connect the connecting wire of the tester to (+) of the battery. The second wire of the tester remains in the same place - on the contact of the plug to which the wire with yellow-blue insulation is connected.
11. Lock the passenger door with the key. If the indicator lamp is constantly on, the locking contact of the central locking switch on the passenger door is OK. If not, the locking contact is faulty, provided that there is no wire break.
12. Check the central lock switch on the trunk. To do this, connect the tester with the test lamp to the contact of the disconnected plug, to which the wire with brown-green insulation is connected, and also to the contact of the wire (+) from the battery. The test lamp should light when the trunk lock is unlocked with the key. This means that the opening contact of the central lock switch on the trunk is OK. If the tester's test lamp does not light, then the opening contact of the central lock switch on the trunk is faulty or there is a break in the wire.
13. Change the connection of the tester with the test light. Instead of connecting to the terminal of the wire with brown and green insulation, connect the tester's connecting lead to the wire with brown and white insulation. Connect the second lead of the tester to the terminal of the (+) wire from the battery
14. Lock the trunk with the key. If the indicator lamp lights when the key is in the "Lock" position, the locking contact of the central locking switch on the trunk is OK. If not, the locking contact is faulty, provided that there is no break in the wire.
15. Check the injection pump. If the central lock switches work (see above), then the injection pump may fail due to a lack of power. Check the integrity of the thin wire with black and blue insulation and the thick wire with red and black insulation, as well as the ground wire (-) (thick wire with brown insulation). If they are OK and power is reaching the pump, then the injection pump itself is faulty.
16. Replace the injection pump (see illustration).
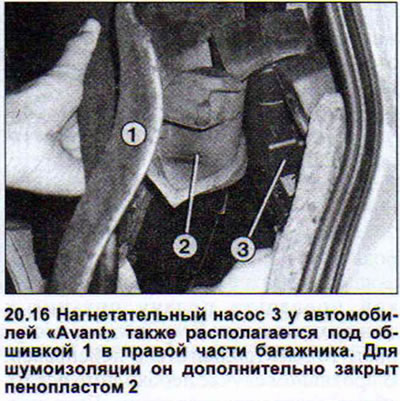
To eliminate the leakage of the central lock pneumatics, which manifests itself in the slow response of the central lock and too long operation of the injection pump, it is necessary to check all the pneumatic elements in order and especially the places of their connections.
17. Injection pump. Use pliers to clamp the hose near the pump and close one of the locks. If the injection pump runs for more than three seconds but not more than seven seconds when the central lock is activated, it is leaking.
18. Replace the injection pump.
19. Check the central lock switches on all doors and on the boot lid. To do this, disconnect all the hoses in order next to the switches. To provide access to the hoses, remove the corresponding trim. Having disconnected the switch hose, lock one of the doors. In this case, the injection pump should work for no more than 3 seconds, maximum 7. When disconnecting a hose with a defect, the injection pump will start working in normal mode, i.e. for less than 3 seconds.
20. Replace the faulty central locking element.