
Table of contents: Wheel removal ↓ Wheel mounting ↓
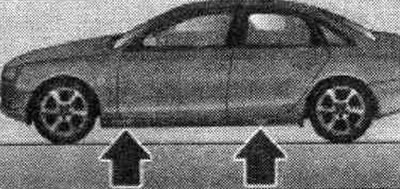
Changing a wheel: jack installation locations.a
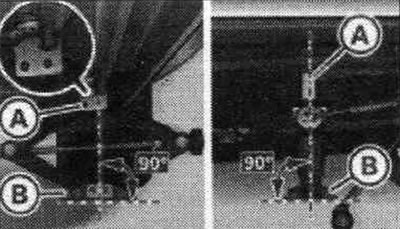
Wheel change: jack.
To remove the wheel, you need to lift the car with a jack. The location of the jack sockets is indicated by a recessed mark on the underbody of the vehicle. Apply the parking brake to prevent the vehicle from moving unintentionally. Engage first gear (manual transmission) or move the gearshift lever to position "P" (automatic transmission). Locate the jack socket on the lower frame member closest to the faulty wheel. Rotate the flywheel to raise the jack until its "A" arm completely covers the underbody rib. Align the jack so that its "A" arm covers the rib and its "B" heel rests completely against the base. The movable heel "B" should be positioned vertically under the socket "A". Install the connecting rod for the jack: insert the connecting rod into the hole on the flywheel. Turn the connecting rod left or right to lock it. Raise the car by rotating the jack connecting rod until the faulty wheel is lifted off the ground. The jack may only be installed in the locations shown. There is only one socket for each wheel. Installing the jack in other places is prohibited. If the car is parked on an unstable surface, it may slip off the jack. Therefore, install the jack on a solid supporting surface. If necessary, place a wide, solid base under the jack heel. On a slippery surface (for example, facing tiles) place a non-slip base under the jack (for example, a rubber mat).
Wheel replacement: Allen key for turning bolts.
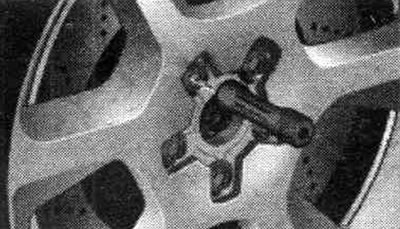
Wheel replacement: safety pin in the topmost hole.
Wheel dismantling/assembly consists of several stages. After loosening the wheel bolts and raising the car with a jack, replace the wheel in the following order.
Wheel removal
Loosen the highest wheel bolt completely using the tip of an Allen screwdriver (tool kit) and place it on a clean surface. Screw the safety pin included in the tool kit into the freed hole by hand. Then unscrew the remaining bolts as described above. Remove the wheel. The safety pin remains in the hole.
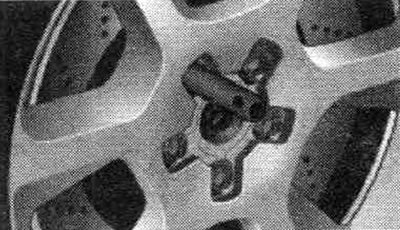
Wheel mounting
Place the spare tire on the safety pin. Insert the wheel bolts and tighten them lightly using an Allen key. Unscrew the safety pin and also slightly tighten the remaining wheel bolt. After replacing the wheel, perform the necessary work. Wheel bolts should be clean and thread easily. Check the mating surface of the wheel and hub. Remove any dirt from these surfaces before installing the wheel. Using the tip of an Allen screwdriver can help remove the wheel bolts from the rim more easily. For safety reasons, the reversible end of the screwdriver must be removed. When installing wheels with a unidirectional tread pattern, do not forget about the direction of rotation of the wheel. Do not use a hex screwdriver tip to loosen or tighten wheel bolts.
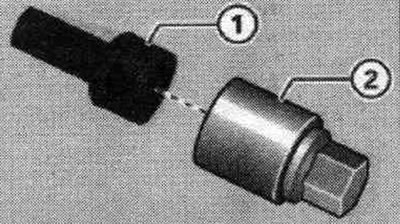
Locking wheel bolts with adapter.
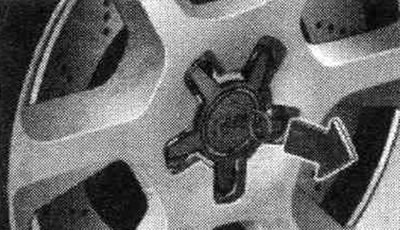
Wheel replacement: removing the decorative cap.
A special adapter is required to turn the locking wheel bolts. Insert the wire grip included in the tool kit into the hole in the decorative cap. Pull and remove the decorative cap. Insert adapter "2" into locking wheel bolt "1" until it stops. Install the wheel brace until it stops on adapter "2". Loosen/tighten the wheel bolt. It is recommended to always carry a locking wheel bolt adapter in your vehicle. Typically, the adapter is included with the tool under the towing eye. It should be kept in this place. The wheel bolt locking code number is stamped on the end of the adapter. At the Audi plant, a duplicate can be made if necessary based on this code number. Write down the wheel bolt lock code number and keep it in a safe place (not in the car).