
Table of contents: Removal the spare tire ↓ Laying down a faulty wheel ↓ Using a backup (emergency) wheels ↓ Snow chains ↓
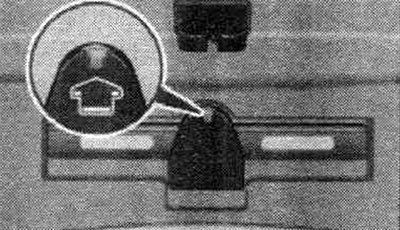
Warning triangle in the tailgate.
The factory-fitted warning triangle is located in the tailgate. To remove the warning triangle, press the latch in the direction of the arrow and fold the mount down. Only a specially designed warning triangle, which is included in the original car accessories range, can be placed in the trunk lid. If you wish to equip your car with a warning triangle, please contact Audi.
The factory-fitted fire extinguisher is located under the front passenger seat. Familiarize yourself with the rules for using a fire extinguisher beforehand. The operating instructions are printed on the fire extinguisher. To keep the fire extinguisher in constant readiness for use, regularly (at least once every 2 years) check the fire extinguisher at the appropriate service station or with the fire department. After using the fire extinguisher, refill it and have it checked at a service station or by the fire department. When purchasing a new fire extinguisher, make sure it fits the holder. A set of tools and a first aid kit for tire repair are located under the trunk flooring.

Trunk: tool kit, tire repair kit and jack.
If you need to get the tool kit, tire repair kit or jack, you need to take out the spare tire and remove the cover. The kit includes the following tools: wire grip for decorative wheel covers, safety pin for changing a wheel, screwdriver with adjustable rod, auxiliary tool for changing incandescent lamps, replaceable nozzle (adjustable Torx socket for replacing incandescent light bulbs), jack connecting rod, wheel bolt locking adapter, jack, wheel brace, towing eye. Some of the listed items are included in the kit only for certain modifications or are installed upon request. Before placing the jack, set the lifting paw to its original lower position.
CAUTION! Do not use a hex screwdriver to tighten wheel bolts, as this will not achieve the required tightening torque and may cause an accident. The included jack is designed for changing wheels on a specific vehicle model only. When working under a vehicle, it must be securely supported using suitable supports - risk of injury!
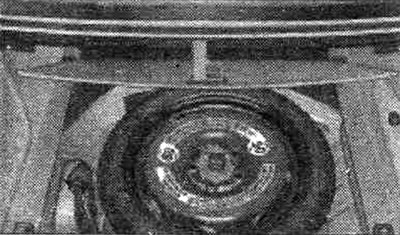
The spare tire is located under the trunk flooring. It is intended for short-term use only.
Removal the spare tire
Lift the deck by the handle. Secure the handle to the trunk seal. Unscrew the handwheel by turning it counterclockwise. Remove the spare tire. Before closing the trunk, the flooring must be lowered.
Laying down a faulty wheel
Place the wheel in the spare wheel well and secure it with the handwheel. Before closing the trunk, the flooring must be lowered.
Using a backup (emergency) wheels
The emergency wheel is intended for use in an emergency and is installed to allow you to reach the nearest workshop. Therefore, it is necessary to replace it with a standard wheel as soon as possible. There are some restrictions on the use of the emergency wheel. The emergency tire is designed specifically for a specific vehicle model. Therefore, it cannot be replaced with a spare tire from a different vehicle model.
Snow chains
For technical reasons, it is not permitted to fit snow chains to the emergency wheel. If you still need to drive with snow chains and the puncture is on the front wheel, install the emergency wheel instead of the rear wheel. Place anti-skid chains on the freed wheel and install it in place of the damaged front wheel.
CAUTION! After installing the spare tire, check the air pressure in the tire as soon as possible. The air pressure in the spare tire should be 4.2 bar. Do not drive faster than 80 km/h. Avoid accelerating with the accelerator pedal fully depressed, braking abruptly, and turning. It is prohibited to drive with more than one emergency wheel. Standard or winter tires cannot be mounted on the special spare wheel rim.