
Table of contents: Equipment features ↓ Jacking mode ↓ Features of using a compact spare… ↓ Jacking up with a standard and… ↓ Hanging a car ↓
Equipment features
Depending on the version, the car is equipped with a spare wheel or a tire repair kit. Both are stored under the luggage compartment floor covering. The spare wheel can be either full-size or compact (acquiring normal size after pumping). A low-frequency speaker may be embedded in the spare wheel disc. To the right of the spare wheel well is stored a set of on-board tools (4 in illustration 3), and a jack can be stored underneath it. If you have a tire repair kit, a container of sealant is stored in front of the on-board tool kit.
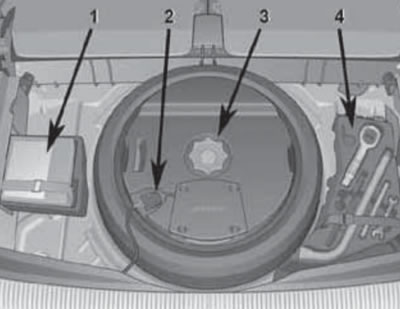
3. Parts under the luggage compartment floor covering:
1. A compact spare tire compressor or a tire repair kit compressor;
2. Subwoofer connector;
3. Woofer mounting nut;
4. On-board tool kit and jack (under the set).
To access the above components, fold the luggage compartment floor covering toward the rear seat back using the handle.
On models with a subwoofer, it must be removed to access the spare tire: squeeze the clips (1 in illustration 4), disconnect the connector (2), remove the nut (3 in illustration 3) and carefully remove the speaker from the wheel rim.
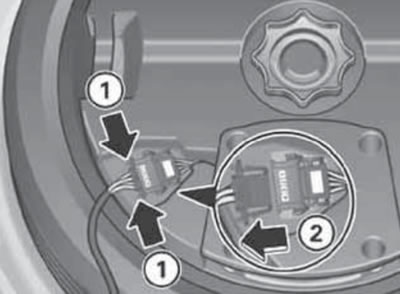
4. Disconnecting the subwoofer connector.
Note: The speaker installation is done in reverse order; the "FRONT" inscription on the installed speaker must be on the front.
The tire repair kit includes a compressor and a container with sealant, which allows you to repair damage to the tire with objects up to 4 mm in diameter (without removing these items). Instructions for using the tire repair kit can be found on the compressor and the sealant container, and are also described in the vehicle's owner's manual. Note: Check the expiration date of the sealant periodically. Do not use the tire sidewall repair kit. After repair, drive at a speed of no more than 80 km/h, avoid abrupt driving and replace the wheel repaired with the kit as soon as possible.
Depending on the configuration, the on-board tool kit may include:
- Wire grip for removing wheel caps;
- Plastic clamp for removing wheel bolt caps;
- Wheel wrench;
- Safety pin for changing a wheel;
- Reversible screwdriver;
- Open-end wrench 10x13;
- Towing eye;
- Adapter for wheel bolts-secrets.
Jacking mode
(models with air suspension)
To prevent the automatic air suspension adjustment process from making it difficult to lift the vehicle with a jack, select the maximum suspension height and enable the jacking mode. To turn on/off the jacking mode, select accordingly "ein"/"aus" ("on"/ "off") in the menu "Car → adaptive air suspension → Setup>adaptive air suspension → Wagenhebermodus" mMI display.
When the jacking mode is activated, the corresponding indicator lamp in the instrument cluster lights up (see the "Controls" chapter). At speeds above 15 km/h, the jacking mode is automatically deactivated.
Features of using a compact spare tire
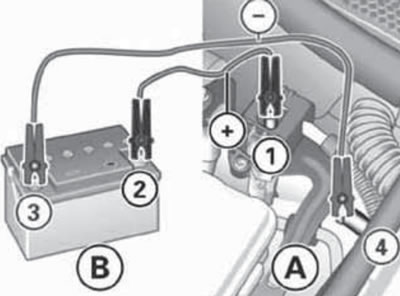
The compact spare tire only reaches its full diameter after inflation. A compressor is used for inflation (1 in illustration 3), connected directly to the terminals for emergency starting of the engine (see illustration 12): the red terminal of the cable is to the positive terminal, and the black one is to the negative terminal. Make sure that the compressor cable does not touch moving parts in the engine compartment. The compact tire should be inflated to 3.5 bar, but not more. The compressor operating time should not exceed 8 minutes to avoid overheating; allow the compressor to cool for a few minutes before turning it back on.
The compact spare tire takes on its folded shape only after several hours of being deflated (unscrewing the valve spool). Only after this can the wheel be placed in the niche intended for it and securely fixed.
The following are restrictions that must be observed when using a compact spare tire:
- The compact spare tire can be used multiple times as long as it is not damaged or worn down to the wear indicators.
- A spare tire that is more than 6 years old should only be used in an emergency and with extreme caution and a correspondingly cautious driving style.
- The compact spare tire is intended for occasional and short-term use only and should be replaced with a regular tire as soon as possible.
- Do not exceed 80 km/h, avoid accelerating with the gas pedal fully depressed, sudden braking and fast cornering.
- Do not operate your vehicle with more than one compact spare tire.
- For technical reasons, it is not permitted to install snow chains on the compact spare wheel.
- The compact spare tire is specially designed for a specific car model. Therefore, it cannot be used on other models of vehicles. It is also not possible to use compact spare wheels from other brands of vehicles.
- The compact spare wheel rim cannot be fitted with standard or winter tyres.
Jacking up with a standard and rolling jack, changing a wheel
Attention: When using a rolling (garage) jack, it should not rest on the ribs of the side members, like a standard jack, but on the support points for hanging the car (see subsection below).
The jack is intended only for short-term lifting of the car when changing a wheel; before performing any work under the vehicle, it must be installed on special reliable supports. Do not use the jack to lift heavier vehicles or other loads. When changing a wheel, there should be no people in the car and the engine should be turned off. Before using the jack, make sure that it is not damaged or deformed, and that its threaded parts are lubricated and free of foreign contaminants.
Stop the car in a safe place, if possible on a level, horizontal area with a hard surface. If necessary, turn on the hazard warning lights and put up the emergency stop sign. Set the front wheels in the straight-ahead position and apply the parking brake. Set the selector lever to position "P".
On models with air suspension, turn on the jacking mode (see the relevant subsection above).
Turn off the ignition and ask passengers to exit the vehicle and move to a safe place. If you have a trailer, detach it and ensure it does not create an obstruction or hazard. If the luggage compartment is loaded, remove the cargo.
Take out the spare tire. To do this, fold the luggage compartment floor covering toward the rear seatback using the handle and remove the subwoofer (if equipped; see the "Equipment Features" section above). Then, unscrew the spare tire mounting nut and remove it from the recess using the strap (see illustration 5).
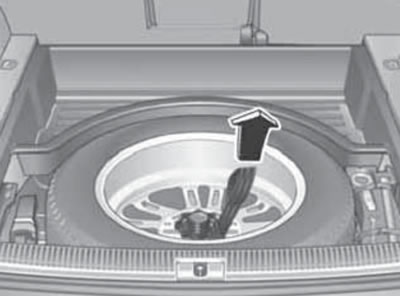
5. Removing the spare wheel.
If using a compact spare tire, inflate it to its full diameter (see subsection above).
Take out the organizer with the on-board tool kit and the jack (see the "Equipment Features" subsection above).
Support the wheel diagonally opposite the one to be replaced on both sides with wheel chocks or other suitable objects.
Note: When performing the procedure on a slope, wheel chocks should be placed on the downhill side under both wheels of the serviceable axle. Make sure the wheel chocks will not slide on the ground.
Depending on the configuration, to access the wheel mounting bolts you need to remove the wheel cap or wheel bolt caps. To remove the wheel cap, insert a wire puller into its hole (see illustration 6a) and pull it in the direction of the arrow.
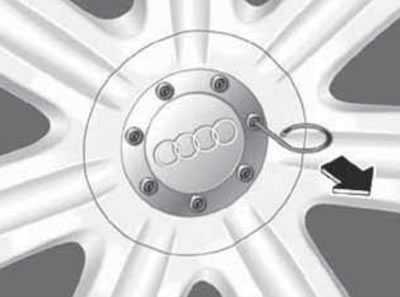
6a. Removing the wheel cap.
To remove the bolt cap, slide the plastic clip onto it until it locks into place (see illustration 6b) and pull it in the direction of the arrow.
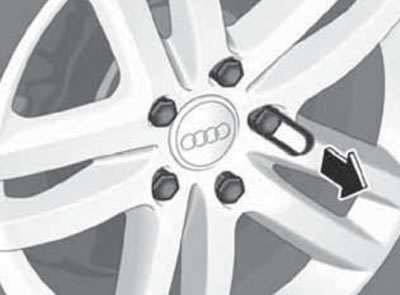
6b. Removing the wheel bolt cap.
Using a wheel brace, loosen the bolts securing the faulty wheel by one turn. To unscrew the anti-theft bolt, first install the adapter from the on-board tool kit between it and the wheel brace.
Note: Wheel rims and wheel bolts are structurally compatible with each other, so when installing other rims, use the corresponding wheel bolts: the correct length and with a suitable thrust surface shape. The reliability of the wheel fastening and the operation of the braking system depend on this.
Note: There is a number stamped on the end of the adapter for the anti-theft bolt. Write down this number and keep it in a safe place so that if you lose the adapter, you can order a duplicate.
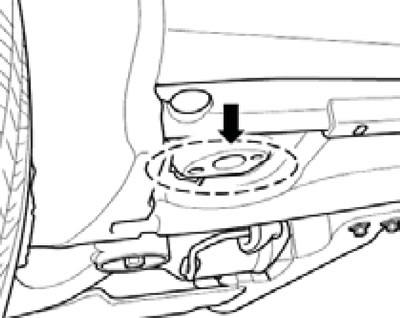
Place the jack head under the jacking point closest to the damaged wheel (see illustrations 7a-b). The front/rear jacking point is located at a distance of 20 cm or 15 cm from the corresponding wheel arch, respectively.
7a. Jacking points.
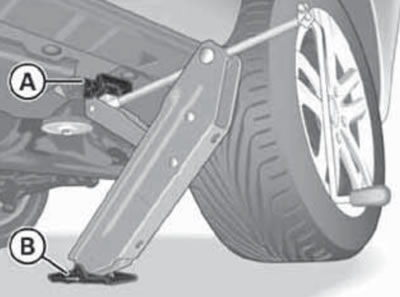
7b. Installing the jack.
When using the standard jack, make sure that the support (And in illustration 7b) its lifting paw gripped a vertical rib on the underside of the spar. Also, make sure that the jack is positioned strictly vertically and that its heel (B) rests on the ground with its entire surface. If the ground is loose, place a suitable pad under the heel of the jack (in winter it is useful to have a piece of wide board in the car). When using a trolley jack, install a special jig between its paw and the body, which fits into the recess on the threshold.
Attention: Regardless of the presence of a slope, the jack must always occupy a strictly vertical position!
Using the jack handle, lift the car so that the damaged wheel does not touch the ground.
Note: If the vehicle is raised too high on the jack, the vehicle's stability will be reduced and it may easily slip off the jack.
Remove the wheel bolts completely and place them on a clean surface to prevent contamination of their threads. First, remove the top bolt and insert the safety pin from the on-board tool kit in its place (see illustration 8).

8. Safety pin in the upper mounting hole of the wheel.
Then remove the remaining bolts and pull the wheel off the safety pin (the finger remains in the hub). Alternatively, to prevent the wheel from falling, you can remove the top bolt last while holding the wheel. Remove the damaged wheel.
Note: Do not place the removed wheel with the alloy rim on the asphalt with the outer side down, so as not to damage the paintwork of the rim.
Clean the mating surfaces of the hub and wheel from dirt and grease, and (if necessary) wheel bolts and hub holes. Do not lubricate the bolts or threaded holes in the hubs.
Install the serviceable wheel through the safety pin and tighten its bolts (except the top one), remove the safety pin and tighten the top bolt. When installing a directional tire, ensure that the arrows on the tire point in the direction of wheel rotation when the vehicle is moving forward. If the arrows point in the opposite direction, drive the tire at low speeds and for a minimum distance; the tire should be replaced at the first opportunity.
Lower the car to the ground. Check the inflation pressure of the installed wheel and make appropriate adjustments if necessary.
Finally, tighten the wheel bolts evenly in several passes in a crosswise pattern (star pattern) with a force of 160 Nm.
Clean and place the removed wheel in the spare wheel well, and put the jack and tool organizer back in their places: securely fix them. Before putting the jack back in place, return its lifting arm to its original lower position. When stowing a regular spare tire, secure it with the nut and then place the strap around the spoke, threading the large loop through the small loop. The compact spare tire fits into the recess only a few hours after the air has been released from it.
Disable jacking mode (see the relevant subsection above). If you have a tire inflation pressure monitoring system, after replacing a wheel or changing the tire inflation pressure, enter the inflation pressure values into the system memory. To do this, go to the menu "Car → Systeme → Reifendruck-Kontrollsystern" mMI display select the item accordingly "Radwechsel".
Have the removed wheel repaired as soon as possible.
Hanging a car
Note: Place suitable rubber or wooden spacers between the support points and the lifting device to prevent damage to the body.
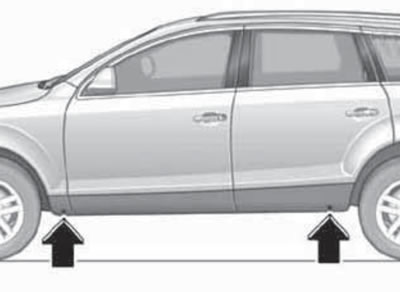
The support points for the trolley jack and the lift legs are shown in Illustrations 9a-b.
9a. Front jacking point when using a lift and a trolley jack.
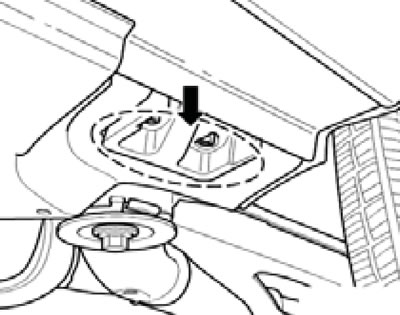
9b. Rear jacking point when using a lift and trolley jack.
Do not place lifts under the engine oil pan, transmission, or front or rear suspension. When jacking up the rear of the vehicle, make sure that the lift arm does not rest on the rear suspension trailing arm bracket, otherwise the suspension may be damaged.
(The original article is located on the online resource «AudiManual.ru»)