
Table of contents: Cylinder head. Petrol engine 1.6 l… ↓ Cylinder head. Petrol engine 1.8 l ↓ Cylinder head attachments. 1.8 l… ↓
Cylinder head. Petrol engine 1.6 l ALZ
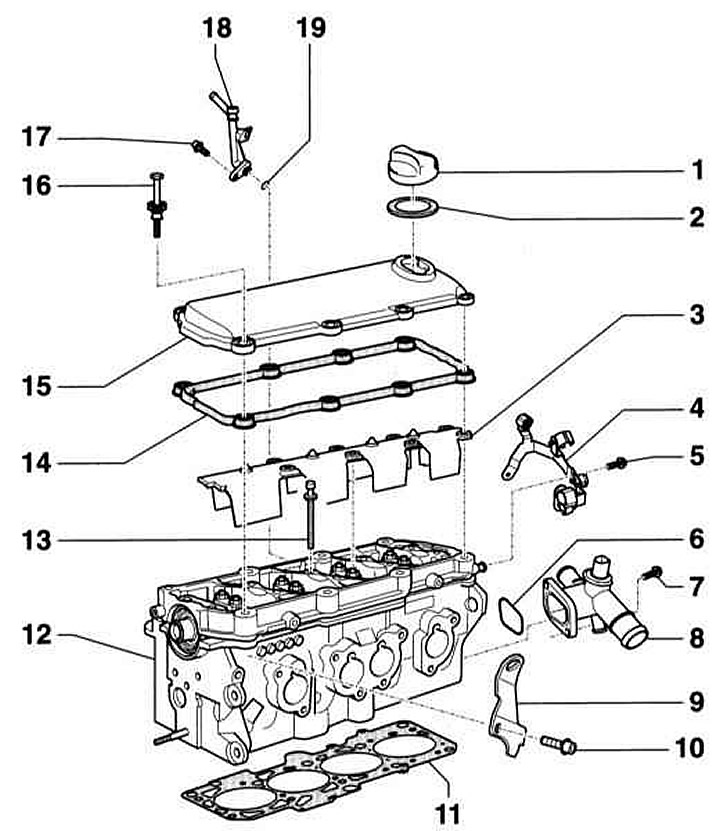
- 1 - Lid
- 2 — Seal. Replace if damaged
- 3 - Oil separator
- 4 - Holder
- 5 - Screw, 10 Nm
- 6 - Seal. Be sure to replace
- 7 - Screw, 10 Nm
- 8 — Connecting pipe
- 9 — Eye
- 10 - Screw, 20 Nm
- 11 — Cylinder head gasket. Be sure to replace. After replacing the gasket, you must replace the coolant.
- 12 — Cylinder head. Check for deformations. Permissible non-flatness: 0.1 mm. After replacing the cylinder head, it is necessary to replace the coolant. Minimum height after processing: 132.6 mm.
- 13 — Cylinder head mounting bolt. Be sure to replace. Polydrive bolts are unscrewed and screwed in using the AUDI-3452 or HAZET 2779-9 tool. Follow the sequence of unscrewing and tightening the bolts.
- 14 — Sealing gasket. Replace if damaged.
- 15 — Cylinder head cover
- 16 — Bolt with spacer sleeve, 10 Nm. Tightening sequence from inside to outside, crosswise
- 17 - Screw, 10 Nm
- 18 — Ventilation connection to the expansion tank
- 19 - O-ring. Be sure to replace. This process requires some experience. Therefore, only the most important instructions intended for an experienced mechanic are described here.
General instructions
Be sure to replace the cylinder head bolts, self-locking nuts, torque wrench bolts, O-rings and gaskets.
If a replacement cylinder head is being installed, all contact surfaces between the bearing elements, roller levers and sliding surfaces of the camshaft cams must be lubricated before installing the cylinder head cover.
Plastic gaskets for protecting open valves may only be removed before installing the cylinder head.
If the cylinder head is replaced, the coolant must be replaced.
Removal instructions
1. The cylinder head is removed only on a cold engine (not higher than body temperature).
2. Remove the V-belt and tensioner.
3. Remove the timing belt, refer to Section Removal and installation the timing belt.
4. The fuel system is under pressure! Before disconnecting the hoses, cover the connection with a thick rag. Then, carefully unscrew the hose, relieve the pressure.
5. After opening the fuel lines, close the holes to prevent dirt from entering the fuel system.
6. Remove the intake manifold.
7. When removing the exhaust pipe, make sure that the connecting element in the exhaust pipe is not bent more than 10°.
8. Loosen the cylinder head cover mounting bolts crosswise.
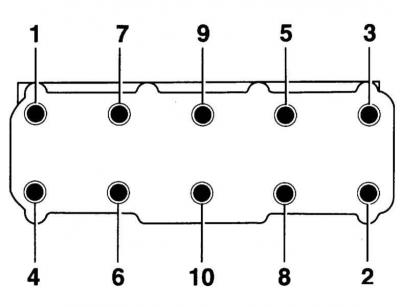
9. Loosen the cylinder head mounting bolts in sequence 1 through 10, first by half a turn, and then completely in the same sequence.
Installation instructions
1. If there are cracks between the valve seats or between the seat and the threaded hole for the spark plug, the cylinder head can be used further if the width of the cracks does not exceed 0.3 mm or only the first 4 threads are affected.
2. There must be no oil or coolant in the blind holes for the cylinder head mounting bolts in the cylinder block. Remove the oil or liquid with a rag and screwdriver.
3. Remove the new cylinder head gasket from its packaging only immediately before installation.
4. Handle the sealing gasket with extreme care. Damage to the gasket will result in loss of sealing.
5. Carefully clean the sealing surfaces of the cylinder head and block. Make sure that there are no grooves or scratches of great length on the surfaces (when using sandpaper, its grain size should not exceed 100 units.).
6. Carefully remove any remaining sandpaper.
7. If the crankshaft was turned during the work, set the piston of the first cylinder to the TDC position and turn the crankshaft back a little again, refer to Section Removal and installation the timing belt.
8. Before installing the cylinder head, set the crankshaft and camshaft to the TDC position of the first cylinder, refer to Section Removal and installation the timing belt.
9. For centering, insert the AUDI-3450/2A or HAZET 2571-5 guide mandrel into the front outer hole for the cylinder head mounting bolts.
Caution: Before installing the cylinder head, check whether the guide mandrel can be pulled out upward. If necessary, slightly grind the notch on the guide mandrel.
10. Install the new seal so that the inscription on it (part number) could be read.
11. Install the cylinder head, insert the remaining 8 mounting bolts and tighten them by hand.
12. Unscrew the guide mandrel through the bolt holes, turning it to the left.
13. Insert the remaining 2 cylinder head mounting bolts and also tighten them by hand.
14. Tighten the cylinder head bolts in the sequence 1 through 10 given in Specifications efforts.
15. Further installation is carried out in the reverse order of removal.
16. Install the timing belt and adjust the valve timing.
17. Install the V-belt and tensioner.
18. Replace the coolant.
Cylinder head. Petrol engine 1.8 l
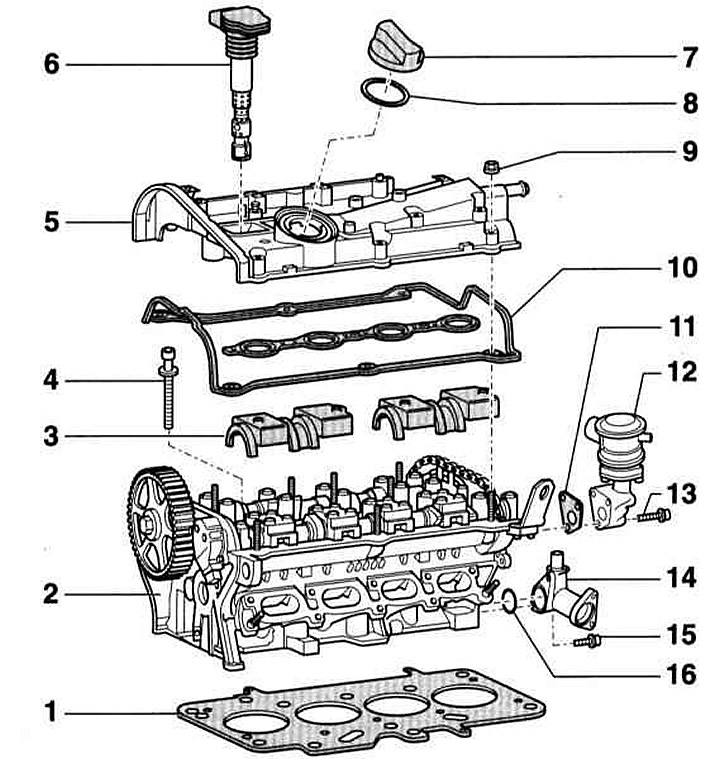
- 1 — Cylinder head gasket. When installing, the spare part number must point towards the cylinder head. After replacing the gasket, it is necessary to replace the coolant
- 2 — Cylinder head. After replacement, it is necessary to replace the coolant. Minimum height: 139.20 mm.
- 3 - Oil separator
- 4 — Cylinder head mounting bolt
- 5 — Cylinder head cover
- 6 — Ignition coil
- 7 — Lid
- 8 — Seal. Replace if damaged or leaking
- 9 - Nut, 10 Nm. First tighten the inner nuts, then the outer nuts, tightening crosswise
- 10 — Cylinder head cover seals. If damaged or leaky, replace. Seal transitions with AUDI sealant before installation "AMV 174 004 01".
- 11 - Seal. Be sure to replace
- 12 — Combined secondary air supply valve, with branch pipe
- 13 - Bolt, 10 Nm
- 14 — Flange with coolant temperature sensor
- 15 - Bolt, 10 Nm
- 16 — O-ring. Be sure to replace
Cylinder head attachments. 1.8 l petrol engine
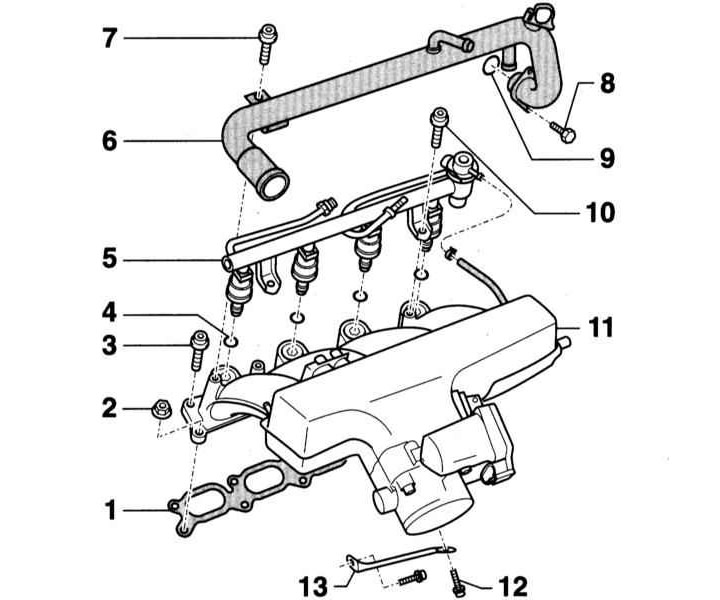
- 1 — Sealing gasket. Observe the correct installation position. Be sure to replace
- 2 - Nut, 10 Nm
- 3 - Bolt, 10 Nm
- 4 — Injector sealing ring. Be sure to replace it
- 5 - Fuel distribution line with injectors
- 6 - Upper coolant pipe
- 7 - Bolt, 10 Nm
- 8 - Bolt, 10 Nm
- 9 — Upper coolant pipe sealing ring
- 10 - Bolt, 10 Nm
- 11 — Inlet manifold
- 12 - Bolt, 20 Nm
- 13 — Intake manifold support
The general instructions are the same as for the ALZ 1.6L petrol engine. The illustrations show the AVJ/BFB petrol engine. The design of the 2.0L petrol engine is similar.
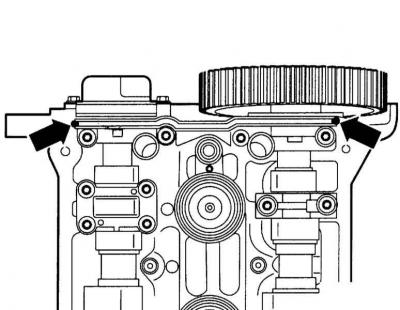
Sealing the mating points of the double bearing cover/cylinder head
1. 1.8L Engine: Lubricate the areas indicated by the arrows on the upper sealing surface of the cylinder head with a small amount of sealant, for example, AMV 174 004 01.
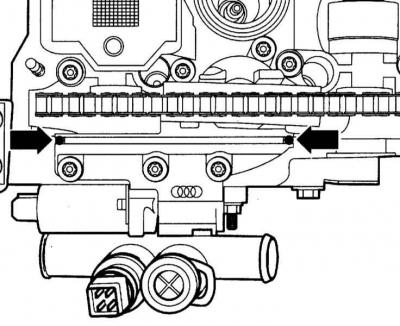
Sealing the mating points of the camshaft adjustment mechanism and the cylinder head
1. 1.8L Engine: Apply a small amount of sealant, such as AMV 174 004 01, to the areas indicated by the arrows on the upper sealing surface of the cylinder head.
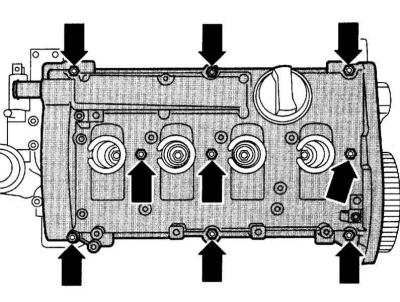
Disconnecting the cylinder head cover
1. Unscrew the nuts (arrows in the accompanying illustration) cylinder head cover fasteners and remove the cover.
Tightening the cylinder head bolts
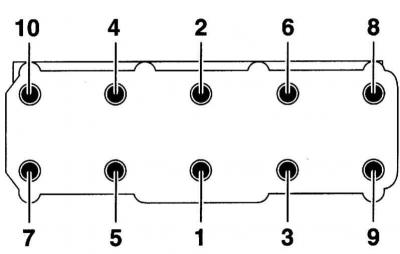
1. When tightening the cylinder head bolts, the sequence is the reverse of disconnection, i.e. from 10 to 1.
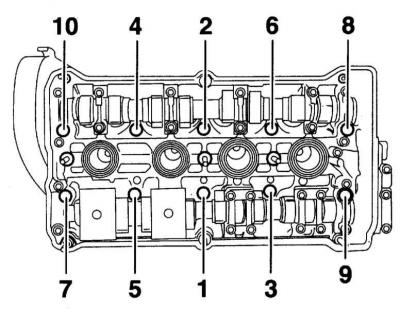
2. Tighten the cylinder head bolts in the sequence 1 through 10 shown in Specifications efforts.
(The article is a reprint of material from: AudiManual.ru)