
Table of contents: Removal coolant ↓ Diesel engine 2.5 l ↓ Filling the system with coolant ↓ Engines 2.0L (ALT), 2.4L and 3.0L ↓ 2.0L engine (ALT) and 1.9L diesel… ↓ Engines 2.4, 3.0 l ↓ Diesel engine 2.5 l ↓ All engines ↓
The coolant must only be replaced if the engine cooling system has been repaired and the coolant has been drained. The coolant is not intended to be replaced as part of maintenance. If the cylinder head, cylinder head gasket, radiator, heat exchanger or the engine itself has been replaced during repairs, the coolant must be replaced in any case. This is necessary because the corrosion-protective components of the liquid are deposited on the light alloy engine components during the running-in process and thus form a long-term corrosion protection. In the case of used coolant, the corrosion-protective components have already been largely used up and cannot provide sufficient protection on new parts.
Warning: Drained coolant must not be reused. Coolant is poisonous and must not be disposed of with household waste.
Removal coolant
Warning: For 2.0, 4.2 l engines (AWA, BBK), the cooling system is filled with liquid at the service station using a vacuum pump. If necessary, air is removed from the cooling system at the service station.
1. Remove the lower engine compartment cover, refer to Section Removal and installation the upper engine cover/lower engine compartment protection/subframe.
Warning: When opening the expansion tank on a hot engine, cover the tank with a thick cloth to prevent hot liquid and steam from escaping. The cap may only be removed when the liquid temperature is below + 90°C.
2. Open the expansion tank cap.
3. Place a container under the radiator.
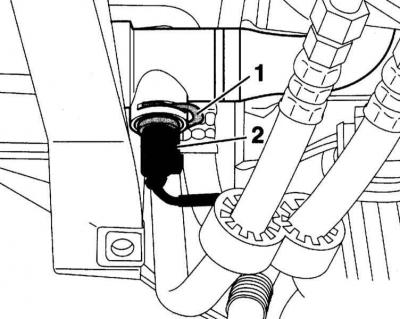
4. Engines 1.6, 1.8, 1.9, 2.5 l and 2.0 l ALT engine: Completely drain the coolant from the radiator. To do this, remove the retaining clip (1) of the coolant temperature sensor (2) from the lower hose and remove the sensor.
5. Engine 1.9, 2.4, 3.0 l: If the radiator has a drain plug (2), turn it to the left and drain the coolant.
Caution: To direct the coolant to a specific location, attach an auxiliary hose to the drain nipple. If there is no drain plug, drain the coolant through the temperature sensor hole (3). To do this, remove the side retaining clip and then remove the temperature sensor.
6. All engines except 2.0 l FSI (AWA), 4.2 l (VVK) and 2.5 l diesel: Loosen the clamp and move it all the way back. Remove the hose from the radiator (arrow on the accompanying illustration) and drain the remaining liquid. Then immediately put the hose back on and secure it with a clamp.
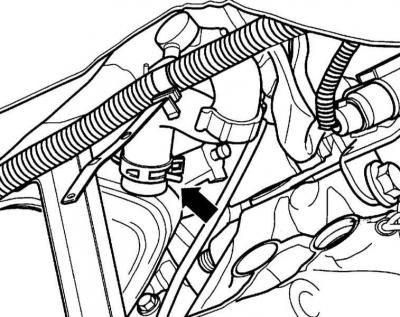
Warning: Illustration shows a gasoline engine.
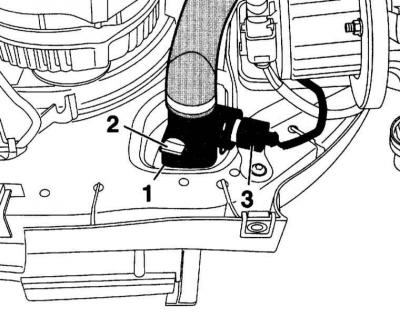
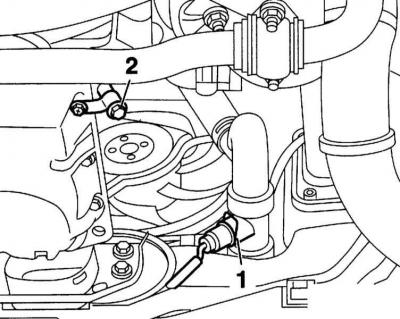
7. 2.0L AWA Engine: Open the drain plug (1) on the radiator pipe and drain the remaining coolant. Then close it immediately. (2) - fastening nut, (3) - oil filter.
Diesel engine 2.5 l
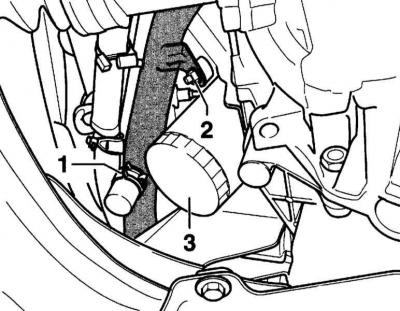
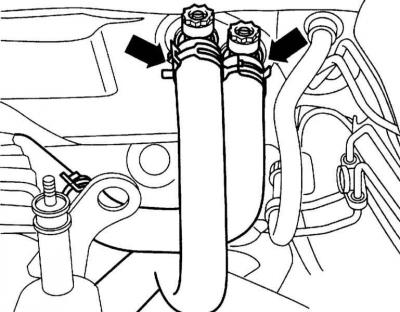
1. Drain the coolant from the engine. To do this, unscrew the drain plug (2 on the accompanying illustration). (1) – locking bracket for thermal switch (the switch is already removed).
2. Remove the coolant hose on the radiator on the left side of the engine. To do this, open the clamp (1) with pliers, e.g. HAZET 798-5, and move it all the way to the rear.
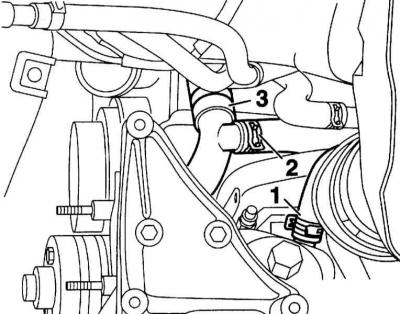
Warning: Hoses (2) and (3) do not need to be removed.
3. Engine 4.2 l VVK: Remove the drain plug on the thermostat housing and drain the coolant completely.

4. After all the fluid has drained, reinsert the coolant temperature sensor into the lower hose and secure it with the retaining clip. On engines 1.9, 2.4, 3.0 l tighten the drain plug.
5. Place the hose on the radiator and secure it with a clamp.
Filling the system with coolant
1. Prepare a coolant from 50% drinking water and 50% VW/AUDI antifreeze and corrosion protection agent.
2. Remove the lower engine compartment cover, refer to Section Removal and installation the upper engine cover/lower engine compartment protection/subframe.
3. Lower the car onto its wheels.
4. Fill the system with coolant through the expansion tank.
Engines 2.0L (ALT), 2.4L and 3.0L
1. Screw the AUDI 1274/9 fitting with an auxiliary hose Ø 42 mm and a length of 100 mm or AUDI 1274/8 (B) with an extension 1274/10 (A) onto the expansion tank.
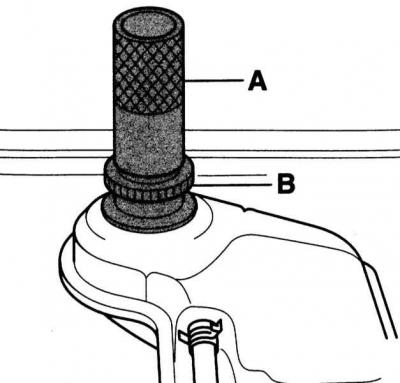
Warning: The nipple serves to prevent the fluid from overflowing after starting the engine. If the specified nipple is not available, you can make one yourself. Instead, you can also remove the expansion tank from the holder, raise it to a height of 10 cm with the hoses attached and secure it in this position with wire.
2. Remove the cover of the water collection compartment, refer to Section Removal and installation the water collection compartment cover.
2.0L engine (ALT) and 1.9L diesel engine
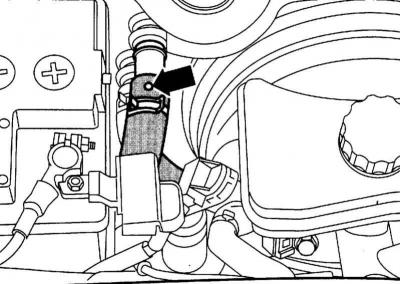
1. Loosen the upper hose clamp and slide it back. Slide the heater hose back so that the vent in the hose (arrow on the accompanying illustration) was not closed by the connecting nipple.
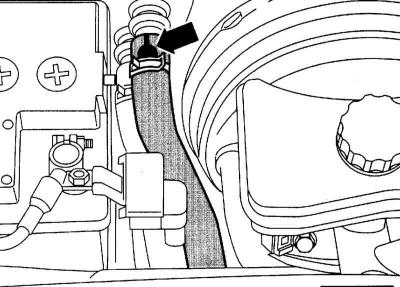
2. Open the ventilation plug (arrow on the accompanying illustration) on the coolant pipe.
3. Fill the system with liquid so that it comes out through the vents.
4. Close the air bleed points in the coolant outlet sequence.
Engines 2.4, 3.0 l
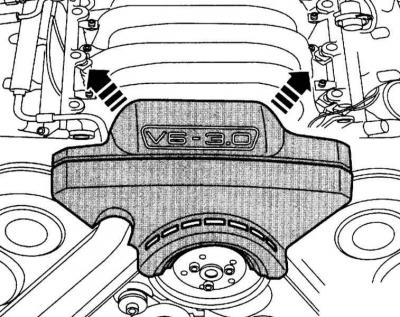
1. Remove the front engine cover (arrows in the accompanying illustration).
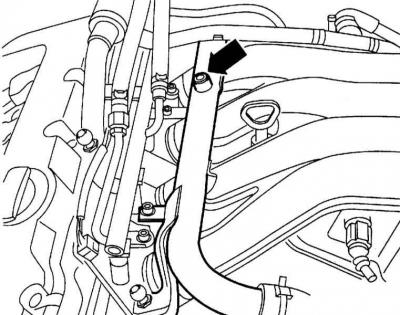
2. Unscrew the ventilation plug (arrow on the accompanying illustration).
3. Fill the system with coolant until it comes out at the vent.
4. Screw in the vent plug with a new sealing ring and tighten it to torque 15 Nm.
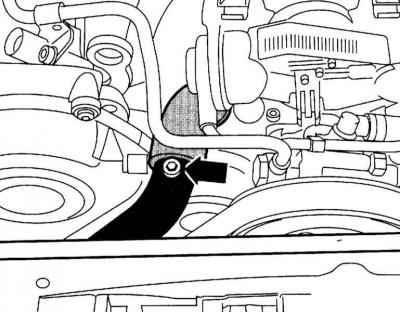
5. Open the clamp on the upper heater hose and move it back. Pull the heater hose back until the vent in the coolant hose (arrow on the accompanying illustration) was not closed by the connecting nipple.
Diesel engine 2.5 l
1. Loosen the air bleed nipples on the engine compartment wall by about 2 turns to remove air from the heater hoses (arrow on the accompanying illustration).
2. Fill the system with coolant until it comes out at the bleed nipples. Squeeze the thick upper hose with your hands several times. This will help release the air. Tighten the bleed nipples.
All engines
1. Close the expansion tank.
2. Start the engine and set it to 2,000 rpm for about 3 minutes.
3. Then let the engine idle until the lower radiator hose warms up.
Warning: When opening the expansion tank on a hot engine, cover the tank with a thick cloth to prevent the release of hot liquid and steam. The cap may only be removed when the liquid temperature is below +90°C.
4. Check the coolant level and, if necessary, top it up to the MAX mark.
5. When the engine is warm, the fluid level should be at the MAX mark; when the engine is cold, it should be between the MAX and MIN marks.
6. Stop the engine.
Information obtained from this resource: AUDIMANUAL.ru