
Rear final drive

1. Subframe.
2. Bolt: 95 Nm.
3. Bolt: 55 Nm.
4. Left drive shaft.
5. Bolt: 20 Nm.
6. Heat shield.
7. Rear final drive.
8. Cardan shaft.
9. Right drive shaft.
Removal
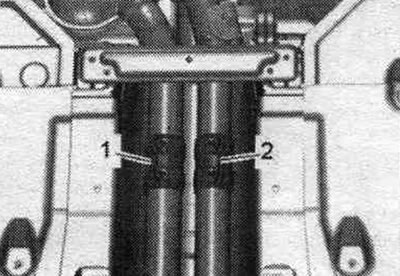
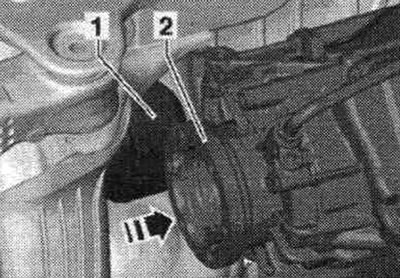
Place the car on a lift. Remove the decorative cap from the rear. left wheel, for alloy wheels, remove the protective cap (puller in the on-board tool). Remove the rear wheels. Loosen the mounting bushings "1" and "2" and disconnect the system. exhaust pipes. Secure the front exhaust pipes to the side of the vehicle's underbody.
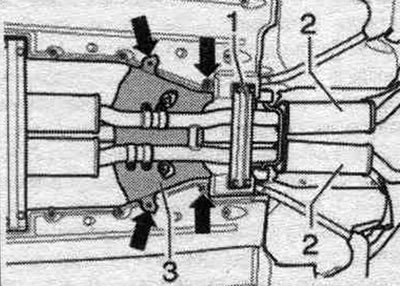
Remove the rear cross member "1". Remove the rear part of the system. exhaust outlet "2". Remove the propeller shaft.
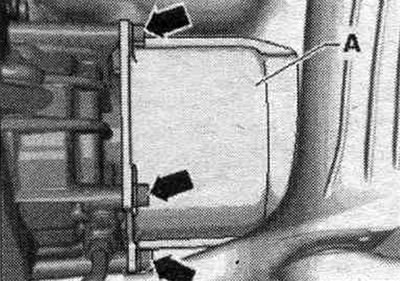
Remove the heat shield "A" of the left drive shaft from the rear. main transmission "Arrows".
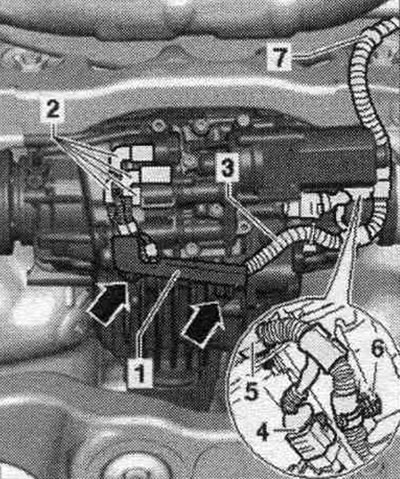
Unscrew the "arrow" bolts and remove bracket "1" from the rear main gear. Mark connectors "2" for the pressure and temperature sensors, oil, and clutch valves. Remove connectors "2" from the pressure and temperature sensors, oil and clutch valves. Remove connector "4" from the floor pump. drive "V415". Then unfasten the wiring harness "3" from the main transmission and subframe -pos. 5...7- and tie it from above.
Unscrew the left "1" and right "3" drive shafts with the key. transmission. Loosen bolts "2" by about 3 turns. Unscrew bolt "4".

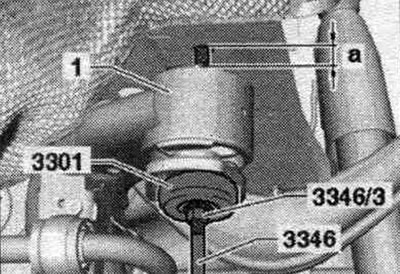
Lower the subframe "1" to the rear as follows. Unscrew the ass. right bolt securing the subframe to the body. Screw the lead screw "3346" with the nut "3346/3" and the thrust bearing from the assembly into this threaded hole. device "3301". Then unscrew the back. left bolt securing the subframe to the body. Lower the subframe by dimension "a" = 40 mm. While doing this, hold lead screw "3346" and turn nut "3346/3" counterclockwise.
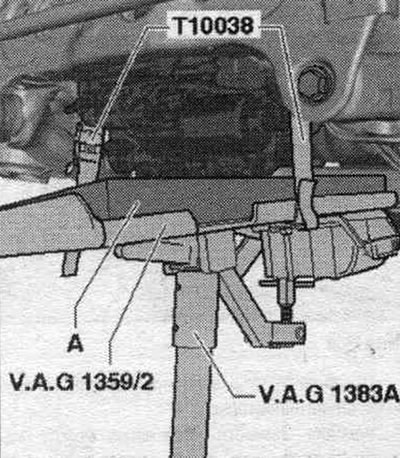
Install a tilter with a universal grip "VAG 1359/2" and a corresponding rubber mat or a plate of rigid foam "A" under the rear head. transmission. A rubber mat or a rigid foam plate is necessary to prevent damage to the rear clutch valves. main gear. Secure the rear main gear from falling. transmission using the "T10038" harness. Unscrew the 2 rear mounting bolts. main transmission to the subframe.
For subsequent actions to remove the rear. the second mechanic is required for the main transmission. The second mechanic must now press the rear main transmission. gear in the direction of the arrow towards the right side of the vehicle. Next, move the left drive shaft "1" upwards from the shaft with flange "2" of the main gear. Then remove the right drive shaft and tilt the rear head. gear down. Together with the 2nd mechanic, carefully lower the main gear. transmission, while paying attention to the subframe.
Installation
Installation in reverse order. After replacing the rear. the main transfer requires additional work. works. Carefully lift the rear head. transfer using a tilter and with the 2nd mechanic install it on the subframe in mont. position. "A" = rubber mat or rigid foam plate. Insert the right drive shaft into the flange shaft. transmission. The 2nd mechanic should now press the reverse gear. gear in the "direction of the arrow" to the right side of the car. Then insert the left drive shaft "1" into the shaft with flange "2" of the main gear. Screw in the bolts "2" of the rear mounting by hand. main transmission to the subframe. For greater clarity, the figure shows a lift for the engine and gearbox with a universal support for the gearbox "VAG 1359/2" not shown. Next, tighten bolt "4" to the tightening torque and, finally, bolts "2" to the tightening torque. Remove the engine and transmission jack from under the final drive. Install the left "1" and right "3" drive shafts. Then secure the subframe "1" to the rear of the body as follows. First, screw in the nut "3346/3" clockwise until the subframe is flush with the body, while holding it with the lead screw "3346". Then screw in the rear. the left bolt securing the subframe to the body and tighten to the required tightening torque. Then remove the lead screw "3346" and screw it back in. the right bolt securing the subframe to the body and tighten to the required tightening torque. Install the left drive shaft heat shield "A" to the rear. main gear "arrows". Secure wiring harness "3" to the main gear and subframe - pos. 5...7-. Attach connectors "4" and "2", paying attention to the markings applied before removal to ensure they correspond to the pressure and temperature sensors, oil sensors, and clutch valves. Risk of damage to wiring harness. When installing bracket "1" to the rear main gear, ensure that wiring harness "3" is not pinched. Install bracket "1" on the rear head. transmission, tighten the arrow bolts to the specified tightening torque. Correspondence of connectors for pressure and temperature sensors, oil and clutch valves.
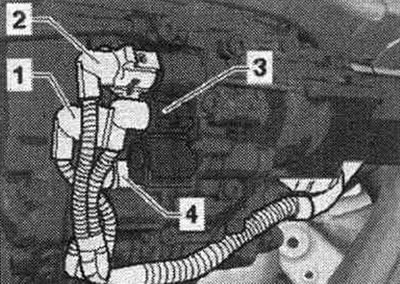
"1" = connector for oil pressure and temperature sensor 2 "G640".
"2" = connector for oil pressure and temperature sensor "G437".
"3" = connector for clutch valve 2 for pol. drive "N446".
"4" = connector for clutch valve for pol. drive "N445".
Install the driveshaft, aligning the marks and observing the tightening sequence. Check the oil in the rear. main gear. Check ATF in rear main gear. Install rear exhaust system. and align without fur. stresses. Install the rear wheels and tighten the wheel bolts. After replacing the rear. the main transfer requires additional work. works.