
Table of contents: Necessary tool ↓ Necessary spare parts and consumables ↓ Oil filter ↓ Removal engine oil ↓ Replacing the oil filter ↓ Gasoline engine ↓ Diesel engine 1.9 l ↓ Diesel engine 2.5 l ↓ Filling the system with engine oil ↓
Warning: Prolonged skin contact with used engine oil is quite dangerous. Use barrier cream and wear gloves during this procedure. Change oil-soaked clothing immediately.
Warning: Frequent engine oil changes are the most important preventative maintenance procedure available to the amateur mechanic. Over time, oil is susceptible to dilution and contamination, leading to premature engine wear.
Engine oil can be pumped out using a special probe (available at gas stations) through the oil dipstick tube. After this, it is usually necessary to fill the system with oil.
Do not dispose of used oil with household waste or in any other way. This may cause environmental pollution.
When changing the oil, it is advisable to attach a tag to the engine with the oil brand and its viscosity.
The use of oils of different types has an adverse effect on engine operation. It is also not recommended to mix different brands of oils. Engine oils of the same type and brand, but of different viscosity, can be mixed if necessary, particularly in the off-season.
Necessary tool
- Inspection pit or hydraulic lift with supports (if the oil is not sucked out).
- Head for unscrewing the drain plug.
- Special tool for unscrewing the filter (filter wrench, strap wrench or tool HAZET 2171-1).
- oil collection container (if the oil is not sucked out) capacity of at least 6 liters.
Necessary spare parts and consumables
- Only if oil is not sucked out: aluminum or copper sealing ring for drain plug (sometimes supplied with an oil filter).
- Oil filter.
- For the required amount of engine oil approved by the manufacturer, please refer to Specifications.
Oil filter
There are filters with replaceable paper elements on sale. Their advantage is that only the filter element is subject to replacement.
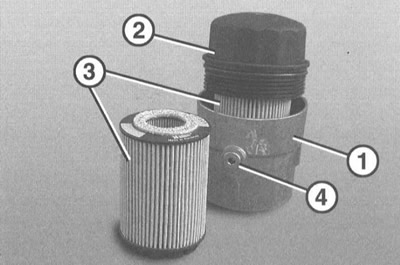
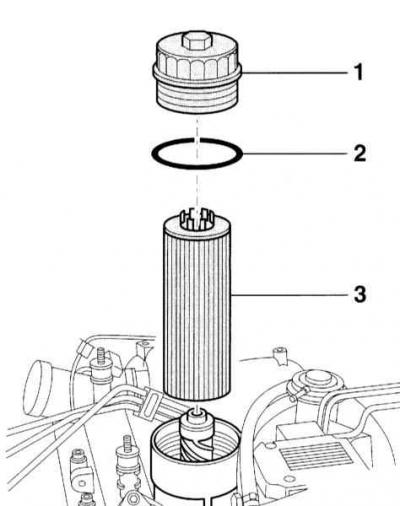
The oil filter consists of a housing (1), a cover (2) and a filter element (3). The oil filter housing is bolted to the cylinder block instead of the previous oil cartridge. Depending on the manufacturer, there may be a drain plug (4) on the filter housing. Filter elements from different manufacturers are interchangeable regardless of the cartridge used.
Removal engine oil
Engine oil can be removed by suction, through the dipstick hole, or drained from the oil pan.
A suitable pump is required for suction, and care must be taken to ensure that the hose fits the opening and is long enough.
1. Diesel engine: Unscrew the cap on the filter housing so that the oil can drain from the filter housing into the pan.
2. Suck out or drain the oil. To do this, lift and place the car horizontally on stands or place the car over an inspection pit.
3. Remove the lower engine compartment cover, refer to Section Removal and installation the upper engine cover/lower engine compartment protection/subframe.
4. Place a container for used oil under the drain plug. Make sure that hot oil does not get on your hands when unscrewing the drain plug. Therefore, keep your hand horizontal when unscrewing the plug.
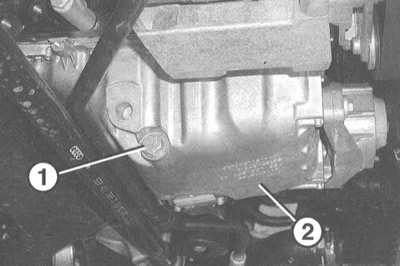
5. – Remove the drain plug (1) from the oil pan (2) and completely drain the used oil.
Caution: If the used oil contains large amounts of metal shavings and wear products, this indicates the presence of scoring, for example, in the crankshaft bearings and connecting rod bearings. To avoid unwanted consequences of repair, it is necessary to thoroughly clean the oil passages and hoses. In addition, it is necessary to clean the oil cooler, if there is one.
6. Finally, tighten the drain plug with a new sealing ring. Do not exceed the specified tightening torque, otherwise it may cause leakage and damage.
7. Lower the car onto its wheels.
Replacing the oil filter
Warning: Used filters or filter elements are special materials and must be disposed of in a special manner.
Gasoline engine
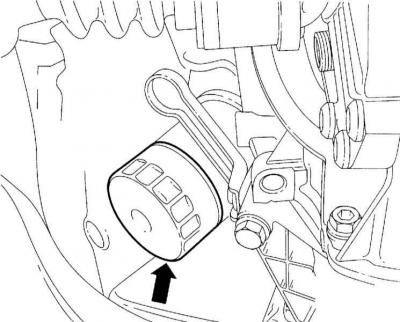
1. Disconnect the oil filter. Special tools are available for this, such as a strap wrench or the HAZET 2171-1 tool. Wipe off any leaked oil with a rag. The accompanying illustration shows the oil filter of a 4-cylinder engine.
2. Clean the oil filter flange on the cylinder block with fuel. Remove any remaining sealing gasket.
3. Lubricate the rubber sealing ring on the new filter with a thin layer of clean engine oil.
4. Tighten the new oil filter by hand. When the seal is seated against the cylinder block, turn the filter an additional 1/2 turn. If there are instructions on the filter housing, follow them.
2.4, 3.0 L engines: After replacing the oil filter cartridge, check that the hoses from the oil cooler to adjacent parts pass freely and, if necessary, adjust the position of the oil cooler.
Diesel engine 1.9 l
1. Unscrew the cover using a filter wrench, for example HAZET 2169 or VW/AUDI-3417.
2. Replace the sealing rings and filter element.
3. Tighten the cap with a filter wrench to the torque 25Nm.
Diesel engine 2.5 l
1. Unscrew the filter cover (1) using a 32 mm filter wrench, e.g. HAZET 2169-2. Replace the filter element (3) and the sealing ring (2) on the filter cover.
2. Screw the filter cover onto the housing and tighten it with torque 25Nm.
3. Reinstall the engine top cover, refer to Section Removal and installation the upper engine cover/lower engine compartment protection/subframe.
Filling the system with engine oil
Warning: When starting a diesel engine for the first time after changing the oil, make sure that the engine initially only runs at idle speed until the oil pressure control lamp goes out. Only then will the oil pressure reach its full value and you can give the engine gas. If you give gas when the pressure control lamp is on, the turbocharger may be damaged due to insufficient lubrication.
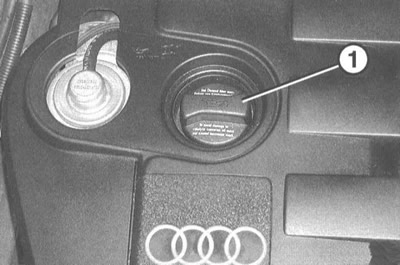
1. Open the cover (1) and fill in new oil through the filler nipple of the cylinder head cover.
Warning: It is recommended to first pour in 0.5 l less oil than the required volume, start the engine, warm it up and after a few minutes check the oil level with the indicator. If necessary, add oil. Excess oil should be sucked out, otherwise the engine seals and catalytic converter may be damaged.
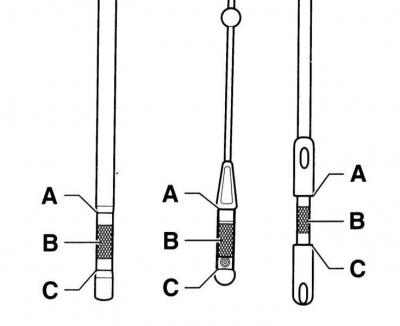
2. The oil level is normal if it is in range (B). If the oil level is in range (C), oil must be added to the level of range (B). The accompanying illustration shows various versions of level indicators used in AUDI A4 engines. If the oil is in range (A), it should not be added.
3. Drive the car and check the tightness of the drain plug and oil filter, if necessary, carefully tighten the plug.
4. After 3 minutes from stopping the engine, check the oil level again and adjust if necessary.
5. Install the lower engine compartment cover, refer to Section Removal and installation the upper engine cover/lower engine compartment protection/subframe.