
Table of contents: Visual inspection of leaks ↓ Engine oil ↓ Checking the oil level with a… ↓ Engine oil consumption ↓ Engine coolant ↓ Brake fluid ↓ Power Steering Fluid ↓ Windshield washer fluid ↓
Warning: The procedures for checking fluid levels every 1000 km run, monthly, and before each long-distance trip are described below. Other fluid level checks can be described later in the Sections on specific maintenance procedures. Regardless of the scheduled check intervals, do not allow fluid to leak under the vehicle, as such leaks indicate a malfunction that should be corrected immediately.
Fluids are an integral part of the lubrication, cooling, braking and windshield washer systems. Due to the gradual consumption and/or contamination of fluids during normal vehicle operation, they should be replaced periodically. See the "Types and Volumes of Lubricants and Fluids Used" section in Specifications, before adding liquid to any of the listed components.
Warning: Whenever checking the fluid level, the vehicle must be parked on a level surface.
Visual inspection of leaks
1. Remove the top engine cover, refer to Section Removal and installation the upper engine cover/lower engine compartment protection/subframe.
2. Remove the lower engine cover, refer to Section Removal and installation the upper engine cover/lower engine compartment protection/subframe.
3. Visually inspect the following pipes, hoses and connections for leaks, abrasions, cracks and damage:
- Fuel lines;
- Cooling and heating system hoses;
- Brake lines and hoses;
- Power steering hydraulic lines;
- Air conditioning lines.
Engine oil
1. If the engine is oily and there is a high oil consumption, check for leaks. To do this, check the following places:
- Open the filler cap and check the gasket for cracks or damage.
- Crankcase ventilation: For example, the ventilation hose from the cylinder head cover to the air intake hose.
- Cylinder head cover gasket.
- Cylinder head gasket.
- Oil drain plug (round ring).
- Oil filter gasket: filter fits to flange.
- Oil pan gasket.
- Front and rear crankshaft oil seals.
2. Since the oil is spread over a large surface area of the engine when there is a leak, it is difficult to immediately identify the leak location. To detect leaks, proceed as follows:
3. Wash the engine as follows: cover the generator with a plastic bag. Spray the engine with a regular cold cleaner and after a short time wash it with water at a car wash.
4. Sprinkle the outside of the mating areas and seals on the engine with lime or talc.
5. Check the oil level and top up if necessary.
6. Take a test drive. Since oil in a hot engine reduces its viscosity and appears faster in leak areas, it is necessary to take a test drive of about 30 km on a high-speed highway.
7. Finally, examine the engine with a lamp and locate the leaks, eliminating the faults.
Checking the oil level with a dipstick
Checking the oil level is an important preventative procedure. Constant oil level drop indicates either the presence of leaks through damaged seals or loose connections, or its burning out (internal leaks through worn piston rings or through valve guides). In addition, you should pay attention to the condition of the oil itself. If the oil has milky color or you can see drops of water in it, this indicates a possible leak in the cylinder head gasket or a crack in the head or cylinder block. In this case, the engine should be repaired immediately. Each time you measure the oil level, before wiping the dipstick blade, run your thumb and forefinger over it. If you find any particles stuck to the probe dirt or metal particles, the oil should be replaced (refer to Section Changing engine oil and oil filter).
1. Drive the car to warm up the engine and stop the car on a level surface.
2. After stopping the engine, wait at least 3 minutes for the oil to drain into the pan.
3. Remove the engine oil level indicator and wipe it with a clean cloth.
4. Then insert the pointer into the hole until it stops and pull it out again.
5. The oil level is normal if it is in range (B). If the oil level is in range (C), oil must be added to the level of range (B). The accompanying illustration shows different versions of the level gauge. If the oil is in range (A), it should not be added.
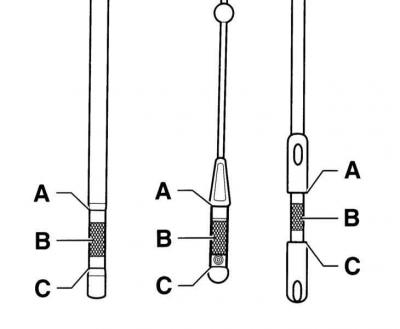
Warning: Excess oil (above range A) it is necessary to suck it out, because otherwise the engine gaskets or seals and the catalytic converter may be damaged.
6. Under increased engine loads, such as long-distance driving on the motorway in summer, towing a trailer or driving in mountainous areas, the oil level should be in the upper part of the range (B).
7. Fill the system with oil through the plug of the cylinder head cover. Use the required grade of oil, do not use additives, refer to the section Engine lubrication system.
Engine oil consumption
Max. 0.8 l/1000 km, depending on driving style.
The engine oil consumption can only be determined after driving a long distance. During the running-in period, it may exceed the specified value. Frequent driving with high engine speeds leads to increased oil consumption.
Engine coolant
Warning: Do not allow antifreeze to come into contact with your skin or the painted surfaces of your vehicle. If this does happen, rinse off the antifreeze immediately with plenty of water. Antifreeze is extremely toxic if ingested. Never leave it unattended in an open container or spilled on the floor; children or animals may be attracted by its sweet smell and may drink it.
All vehicles covered in this manual are equipped with a compensating positive pressure cooling system. The white plastic expansion tank is located in the engine compartment and is connected to the radiator by a hose. As the engine warms up during operation, the expanding fluid fills the tank. When the engine cools down, the fluid automatically flows back into the cooling system, which maintains a constant level.
The fluid level in the tank should be checked regularly, with the vehicle in a strictly horizontal position and the engine turned off.
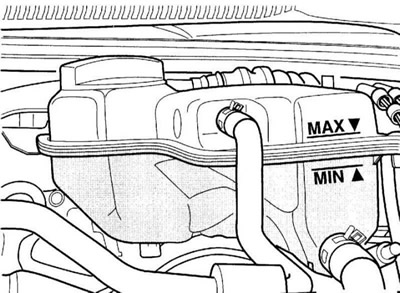
The coolant level with a cold engine (temperature about + 20°C) should be between the MAX and MIN marks on the expansion tank. With a warm engine, the liquid level may be slightly above the MAX mark.
Warning: Do not remove the expansion tank filler cap or radiator cap to check the fluid level until the engine has cooled down completely!
Run the car and measure the fluid level again. If only a small amount needs to be added to the required level, then clean water can be used. However, frequent additions of water will dilute the antifreeze. In order to ensure a normal ratio (40%/60%) antifreeze and water, always top up to the correct level with the correct mixture of ethylene glycol and water based antifreeze specified in the Specifications.
Add large volumes of cold coolant only when the engine is cold to avoid engine damage.
If the fluid level drops regularly, there may be a leak in the system. Inspect the radiator, hoses, filler cap, drain plugs and water pump (refer to Section Checking the condition and replacing engine compartment hoses, localizing leaks). If no leaks are found, check the tightness of the expansion tank cap and radiator at a service station.
If you need to remove the cap, wait until the engine has cooled down completely, then wrap a thick rag around the cap and unscrew it to the first stop. If steam or liquid starts escaping from under the cap, allow the engine to cool down a little more before removing the cap.
It is also necessary to check the condition of the fluid. It should be relatively clean. If the fluid is brown or rusty, it should be drained, the system flushed and filled with a new mixture. Even if the fluid looks normal, the corrosion inhibitors in its composition lose their effectiveness over time, so it should be replaced at certain intervals.
To check the frost resistance of the coolant, it is necessary to use a hydrometer (refer to the illustration and Specifications).
Brake fluid
Warning: Brake fluid can cause eye damage and damage painted surfaces, so use extreme caution when handling it. Do not use brake fluid that has been open for a long time or that is more than one year old. Brake fluid tends to absorb moisture from the air, which can lead to a dangerous loss of braking efficiency. Use only the recommended type of brake fluid. Mixing different types of fluid may cause brake failure.
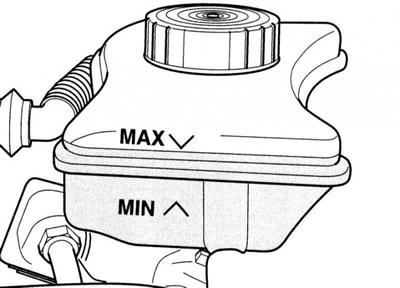
The brake fluid reservoir is located at the rear left of the engine compartment. It has two chambers, each for its own brake circuit.
The brake fluid level is checked visually, using the marks on the plastic reservoir mounted on the master cylinder. With the cap closed, the brake fluid level should be between the MAX and MIN marks. If the level is below the acceptable level, first wipe the top of the reservoir and the cap with a clean rag to prevent dirt from getting into the system after removing the cap. Top up to the required level with the recommended fluid, but do not overfill.
While the reservoir cap is off, check the fluid and master cylinder reservoir for contaminants. If there are rust particles, dirt or water droplets, the system should be drained and new fluid added.
After filling the reservoir to the correct level, make sure the lid is installed level to prevent liquid leakage and/or dirt ingress.
The fluid level in the master cylinder will drop slightly as the brake pads wear. There is no need to top it up as long as the level remains near the "MIN" mark; it will rise after replacing the linings. A very low level may indicate worn brake pads. Check them for wear (refer to Section Checking the brake system. Adjusting the parking brake).
If the brake fluid level drops consistently, immediately check the entire system for leaks. Inspect the brake lines, hoses and fittings, along with the calipers, wheel cylinders and master cylinder (refer to Sections Checking the brake system. Adjusting the parking brake, Checking the condition and replacing engine compartment hoses, localizing leaks).
If the reservoir is empty or nearly empty when checking the fluid level, the brake system should be checked for leaks and bled (refer to Chapter Brake system).
Power Steering Fluid
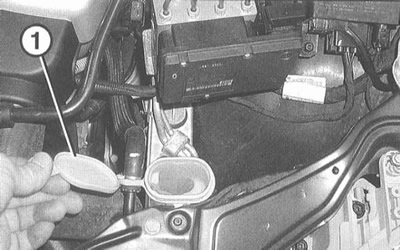
The power steering hydraulic reservoir is located at the rear of the engine compartment. Refer to Section Checking the power steering fluid level.
Windshield washer fluid
Glass cleaner concentrate is highly flammable.
When handling glass cleaning concentrate, the use of fire, open flame and smoking are prohibited.
Open the lid and visually check the liquid level.
If necessary, top up with a mixture of glass cleaner concentrate and drinking water.
The capacity of the tank is given in Specifications.
In temperate climates, the system can be filled with plain water, but it is recommended to add glass cleaner to the water. The reservoir should be no more than two-thirds full to allow for expansion of the water when it freezes. In cold climates, a special windshield washer antifreeze should be used to lower the freezing point of the liquid, which can be purchased at any auto accessory store. It is usually sold in concentrated or ready-made form. If you purchased concentrated antifreeze, mix it with water according to the manufacturer's instructions on the package.
Warning: For models with heated nozzles, the mixture is generally frost-resistant to -10°C.
Warning: Do not use antifreeze in the cooling system - it will damage the painted surfaces of the vehicle.
Check the jet adjustment, refer to Section Removal and installation the windshield washer nozzle.
(Text provided by the online resource AudiManual.ru)