
Repair Chevrolet Repair Toyota Repair Honda Repair AvtoVAZ Repair Mercedes-Benz Repair BMW Repair Opel
Home  |  Contacts  |  Sitemap  |    
English Русский
Български
Беларускі
Український
Српски
Hrvatski
Română
Polski
Slovenský
Magyar
AudiManual.ru


  • AUDI 80
  • AUDI 100
  • AUDI A3
  • AUDI A4
  • AUDI A6
  • AUDI A8
  • AUDI Q
  • OTHER
  • ARTICLES
B4 (1991-1996) B3 (1986-1991) B3 (1986-1991, petrol) B2 (1979-1986)

Torque Converter — Checking and Draining Fluid (Audi 80 B3)

  • Home
  • Audi 80
  • B3 (1986-1991, petrol)
  • Transmission
  • Automatic transmission
  • Torque Converter — Checking and Draining Fluid
            0
1. The torque converter is a welded unit, if faulty it must be replaced. Only the bushing can be replaced separately.

2. Check the condition of the bushing. A bore gauge is required to check for wear; measure the bore's internal diameter and check if it exceeds the wear limit given in Specifications.
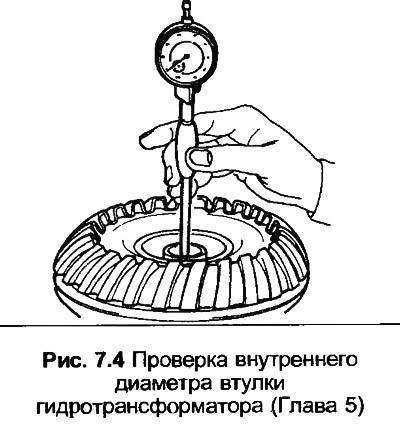
2. Check the condition of the bushing. A bore gauge is required to check for wear; measure the…


3. A special tool and a sliding hammer are required to remove the bushing. After installing a new bushing, the diameter must be within the specified limits. Expansion of the bushing is not allowed.

4. Check that the cooling blades on the converter are securely fastened.

5. Install the turbine shaft into the converter and check that the turbine rotates freely.

6. If the fluid was dirty when drained from the pan, drain the fluid from the torque converter before installing the automatic transmission.

7. Prepare a container with a capacity of about 2 liters, a bottle and a tube with an outer diameter of no more than 8 mm.

8. Place the torque converter on a bench, supporting it so that it lies slightly inclined.
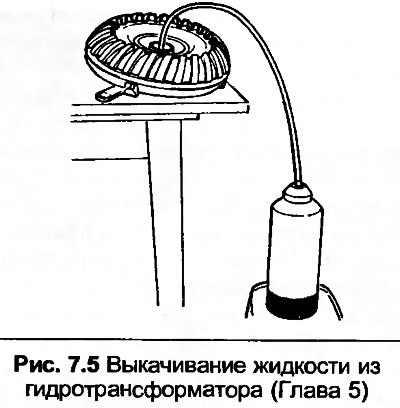
8. Place the torque converter on a bench, supporting it so that it lies slightly inclined.


9. Cut one end of the plastic tube at an angle so that it will not be blocked if it hits a flat surface, push this end into the torque converter hub until it touches the bottom.

10. Connect a plastic bottle to the other end of the tube, position the bottle below the level of the torque converter and squeeze it. Fluid will be sucked into it, and once the fluid starts to flow out, pull the end of the tube out of the bottle and point it into a large container. Suck out as much fluid as possible from the torque converter. Once assembled and installed, the converter will fill with fluid as soon as the engine starts.

[The full version is posted on the resource: Audimanual.ru]
The article was checked by auto expert Timur Bazhenov
This article is available at russian, bulgarian, belarusian, ukrainian, serbian, croatian, romanian, polish, slovak, hungarian

Share information:
Previous articles
Audi 80 B3: Automatic transmission
Next articles

Automatic transmission — removal and installation
Transmission fluid — replacement
Automatic transmission maintenance
General description and precautions
Automatic transmission — disassembly and assembly
Main Gear Housing — Maintenance
Regulator — removal and installation
Shift and accelerator cables (089) — removal, installation and…


Similar articles on other Audi car models:
Torque Converter — Checking and Draining Fluid Audi 100 C3 (1982-1990, diesel)
Checking fluid levels, leak control Audi A3 Type 8L (1996-2003)
Checking the fluid level in the servo control system Audi A4 B5 (1994-2001, petrol)
Checking hoses for leaks and searching for fluid leaks Audi A6 C5 (1997-2004)
Checking the brake fluid level Audi A8 D2 (1994-2002)
Checking fluid levels, leak control Audi Q7 Typ 4L (2005-2015, diesel)
Cooling system — checking and refilling fluid Audi A2 (1999-2005)
Link to this page in different formats


Visitor comments

No comments yet


How much will 29 + 44 =


80(B4, 1991-1996) 
  • General information
  • User manual
  • Maintenance
  • Troubleshooting
  • Power unit
  • Engine
  • Cooling system
  • Heating and ventilation
  • Petrol injection
  • Diesel fuel system
  • Fuel system
  • Exhaust systems
  • Ignition system
  • Transmission
  • Clutch
  • Car gearbox
  • Chassis
  • Brake system
  • Suspension and steering wheel
  • Body
  • Body and trim
  • Electrical equipment
  • Electrical system
  • Electrical circuits
 
80(B3, 1986-1991) 
  • General information
  • Repair characteristics
  • Maintenance
  • Power unit
  • Gasoline engine
  • Diesel engine
  • Engine lubrication system
  • Fuel system (gasoline)
  • Injection system (gasoline)
  • Fuel system (diesel)
  • Ignition system
  • Cooling system
  • Heater
  • Exhaust system
  • Transmission
  • Clutch and gearbox
  • Chassis
  • Steering
  • Brake system
  • Car suspension
  • Body
  • Body elements
  • Electrical equipment
  • Power devices
  • Lighting and appliances
  • Electrical circuits
 
80(B3, 1986-1991, petrol) 
  • General information
  • User manual
  • Maintenance
  • Power unit
  • Engine 4-cylinder
  • Engine 5-cylinder
  • Cooling system
  • Fuel and exhaust systems
  • Ignition system
  • Transmission
  • Clutch
  • Mechanical transmission
  • Automatic transmission
  • Drive shafts
  • Chassis
  • Brake system
  • Suspension
  • Steering
  • Body
  • Exterior
  • Interior
  • Electrical equipment
  • Equipment and devices
  • Electrical circuits
 
80(B2, 1979-1986) 
  • General information
  • User manual
  • Power unit
  • Engine FZ
  • Engine EP, YP, YZ, DT, DS, DZ
  • Transmission
  • Clutch
  • 4 speed gearbox
  • 5 speed gearbox
  • Front wheel drive
  • Chassis
  • Front suspension
  • Rear suspension
  • Steering
  • Brake system
  • Electrical equipment
  • Equipment and devices
  • Electrical circuits
 
AudiManual.ru © 2017-2026 · Mobile version · Feedback · Sitemap: EN BG BY UA RS HR RO PL SK HU · Site search · News and articles
80 B2 · 80 B3 petrol · 80 B3 · 80 B4 · 100 C3 diesel · 100 C3 petrol · 100 C3 · 100 C4 petrol · 100 C4 · A3 Type 8L · A4 B5 petrol · A4 B5 · A4 B6 petrol · A4 B6 · A4 B7 · A4 B8 · A6 C4 · A6 C5 · A6 C5 Allroad · A8 D2 · Q5 Type 8R · Q7 Typ 4L · Audi A2 ·
This site uses cookies 🍪. Click the button to accept this fact.