



2. Secure the wheels on the opposite side from rolling (with wheel chocks, bricks, etc.).
3. Remove the hubcap. A wheel removal tool is included in the tool kit. On some light alloy wheels, you will need to remove the plastic caps from the wheel mounting bolts.
4. Loosen up (one turn) all wheel mounting bolts. The disk must be handled with care, the wheel disk is covered with a layer of transparent varnish, which protects it from rust. If this layer is damaged, correct it with transparent varnish.
5. Raise the vehicle. The jack may only be used in designated areas. Place the jack against the door channel rebate and insert the retainer into the groove.
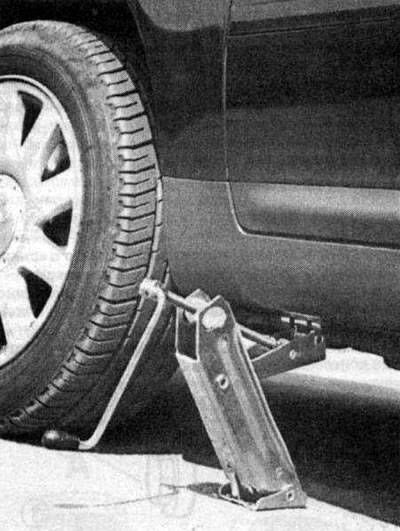
The head of the horizontally applied jack should be precisely fixed at one of the designated points. Otherwise, when lifting the car, the channel may be pressed through.
6. Mark the wheel so that it can be installed in the same position when reinstalling. First, remove one bolt and replace it with a plastic mounting pin. This pin is included in the tool kit and makes it easier to install the new wheel. Remove the remaining bolts.
7. Remove the wheel. Before installing the new wheel, apply a thin layer of grease to the wheel centering pin relative to the hub - this will prevent the wheel from rusting.
8. Turn the wheel on the hub so that the bolt holes in the rim are opposite the threads on the hub.
9. Screw in the bolts and tighten them as tightly as possible using a special socket wrench. Do not lubricate the bolts with oil or grease. Also, make sure that the bolts and wheel rims fit together. Do not screw in bolts of the wrong length or with a different contact area with the rim, otherwise the brake function may be impaired or the wheel may not fit properly.
10. Lower the vehicle and tighten the wheel mounting bolts. The tightening torque should be 120 Nm. Do not hit the nuts with an extended socket wrench, otherwise the brake discs will bend, which may result in uneven braking action and tire wear.
11. Put on the cap(s).
12. After driving a few kilometers, be sure to check whether the wheel nuts are tightened correctly.
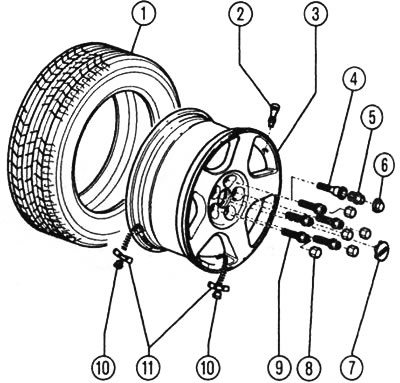
A wheel with "secret" nuts provides certain advantages (with theft-proof bolts): 1 - tire, 2 - valve, 3 - wheel, 4 - locking bolt, 5 - bolt adapter, 6 - cap, 7 - cap, 8 - cap, 9 - wheel mounting bolt (120 Nm), 10 - locking spring for balancing weights (in case of adhesive weights it is eliminated), 11 - adhesive balancing weights (no more than 60 g per wheel rim edge).
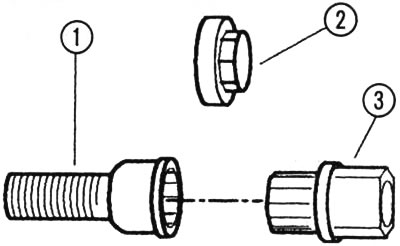
Wheel mounting bolt with anti-theft protection ("secret"): 1 - bolt, 2 - cap, 3 - bolt adapter