Repair Chevrolet Repair Toyota Repair Honda Repair AvtoVAZ Repair Mercedes-Benz Repair BMW Repair Opel
Home  |  Contacts  |  Sitemap  |    
English Русский
Български
Беларускі
Український
Српски
Hrvatski
Română
Polski
Slovenský
Magyar
AudiManual.ru


  • AUDI 80
  • AUDI 100
  • AUDI A3
  • AUDI A4
  • AUDI A6
  • AUDI A8
  • AUDI Q
  • OTHER
  • ARTICLES
B8 (2007-2015) B7 (2004-2008) B6 (2000-2006) B6 (2000-2006, petrol) B5 (1994-2001) B5 (1994-2001, petrol)

Injectors — general information, removal and installation (Audi A4 B5)

  • Home
  • Audi A4
  • B5 (1994-2001)
  • Power unit
  • Fuel system (diesel)
  • Injectors — general information, removal and installation
            0
Table of contents: General information ↓ Removal ↓ Installation ↓
Application: Before starting work, read the warnings contained in paragraph 1.


Attention! Under no circumstances should diesel fuel come into contact with the cooling system hoses - wipe up any accidental leaks immediately. If a hose has been in contact with fuel for a long time, it must be replaced. The diesel fuel system is particularly sensitive to dirt, air and water. When working with the fuel system, pay special attention to cleanliness. Before disconnecting the fuel system components, wipe the area around it clean. Store the removed components in a tightly closed container so that even condensation from the atmosphere does not accumulate in it. Use only lint-free rags for wiping.


General information


1. Injectors under normal operating conditions should not require repair or replacement for about 100,000 km. Proper inspection, maintenance and adjustment of injectors should be performed by a specialist. Defective injectors causing knocking or smoky exhaust can be found without removal as follows.

2. Start the engine and let it idle. Place a rag around the fuel line connections to the injectors to collect the fuel. Disconnect the injectors one by one by carefully unscrewing the connecting nuts. When you loosen the nut on the defective injector, the knocking and smoke will disappear.

Removal


Note: Do not allow dirt to enter the fuel system during the operation. Do not drop the injectors to avoid damaging the shut-off needles. The injectors are precision products that require delicate handling.


3. Cover the generator with a rag to avoid washing it down with fuel.

4. Thoroughly wipe the areas around the injectors and connecting pipes. Disconnect the return fuel hoses from the injectors.

5. Wipe clean the pipe connections and loosen the nuts securing them to the injectors and high-pressure fuel pump (the tubes are removed in one piece). When loosening the union nuts on the fuel injection pump nipples, hold the nipples with an open-end wrench to prevent them from being unscrewed from the pump. Remove the fuel pipes. Plug the pipes and nipples to prevent dirt from getting into the system.

6. Disconnect the wiring from the needle stroke sensor on injector #3.

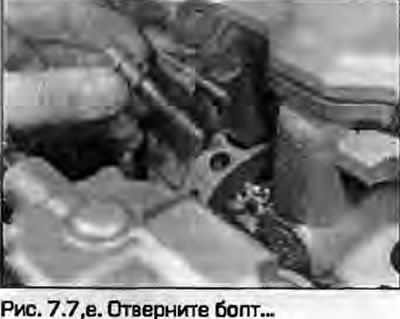
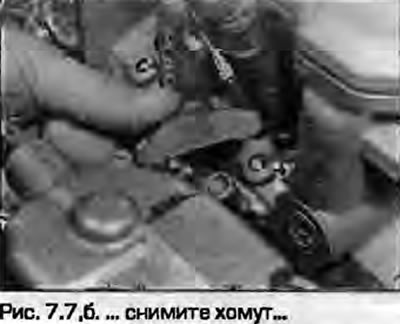
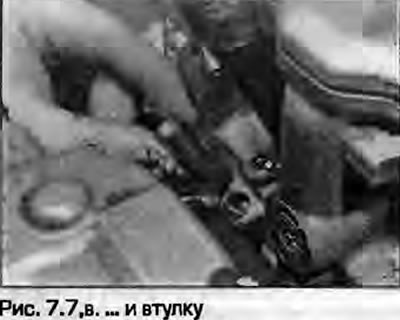
7. Unscrew the nuts (or bolts) securing the injector clamps. Remove the washers, cybvbnt clamps and bushings (fig. 7.7, a-c).

7. Unscrew the nuts (or bolts) securing the injector clamps. Remove the washers, cybvbnt clamps and…

7. Unscrew the nuts (or bolts) securing the injector clamps. Remove the washers, cybvbnt clamps and…


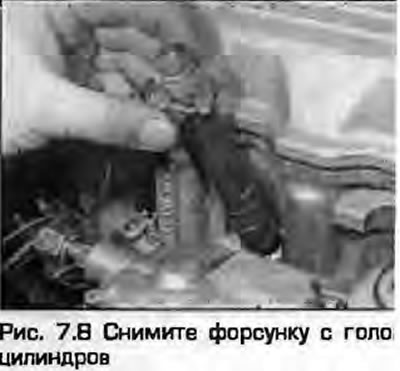
8. Remove the injectors from the cylinder head (Fig. 7.8). If the injectors are tightly seated, loosen them by rotating the flats with an open-end wrench. If this does not help, Audi specialists use a reverse hammer screwed to the thread of the injector connection with the tube. Note that the second injector from the back is higher than the others (third injector in 4-cylinder engines). It contains a needle lift sensor that transmits a signal to the engine control unit.


8. Remove the injectors from the cylinder head (Fig. 7.8). If the injectors are tightly seated,…


9. Using a screwdriver, remove the copper flame arrestor washers from their sockets in the cylinder head. New washers are required for installation.
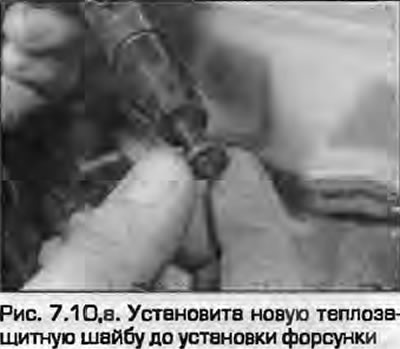
Installation


10. Carefully insert the injectors into the sockets together with new sealing washers. The injector with the needle lift sensor is installed in the third cylinder (fig. 7.10, a, b).

10. Carefully insert the injectors into the sockets together with new sealing washers. The injector…

11. Install the mounting bushings and clamps, secure them with bolts (or nuts) with washers, tightening to the specified torque.


12. Connect the wiring to the third injector needle lift sensor.

13. Install the stop beer tubes and tighten their connecting nuts to the specified torque.

14. Connect the return fuel hoses to the injectors.

15. Start the engine and make sure it operates normally.
The article was checked by auto expert Timur Bazhenov
This article is available at russian, bulgarian, belarusian, ukrainian, serbian, croatian, romanian, polish, slovak, hungarian

Share information:
Previous articles
Audi A4 B5: Fuel system (diesel)
Next articles

High pressure fuel pump (HPFP) — removal, installation and…
Fuel tank — removal and installation
Fuel pump and fuel level indicator sensor unit
Accelerator Pedal Position Sensor — Removal, Installation and…
Diesel Engine Management System Components — Removal and…
Turbocharger — General information, removal and installation
Intercooler — removal and installation
Intake manifold — removal and installation


Similar articles on other Audi car models:
Injectors — removal and installation Audi 80 B4 (1991-1996)
Injectors — general description, removal and installation Audi 100 C3 (1982-1990, diesel)
Removal and installation of fuel lines and injectors (petrol) Audi A3 Type 8L (1996-2003)
Removal and installation valve injectors Audi A6 C4 (1994-1997)
General information about the 2.8L petrol engine Audi A8 D2 (1994-2002)
Removal and installation of injectors and fuel lines Audi Q7 Typ 4L (2005-2015, diesel)
Removal and installation of wiring harness for pump-injectors… Audi A2 (1999-2005)
Link to this page in different formats


Visitor comments

No comments yet


How much will 48 + 48 =


A4(B8, 2007-2015) 
  • General information
  • Operating instructions
  • Power unit
  • Petrol engines 1.8 l
  • Petrol engines 1.8/2.0 l
  • Petrol engines 3.0 l
  • Petrol engines 3.2 l
  • Fuel system (petrol)
  • Diesel engines 2.0 l (CA*)
  • Diesel engines 2.0 l (CJCB)
  • Diesel engines 2.7/3.0 l
  • Diesel engines 3.0 l
  • Fuel system (diesel)
  • Transmission
  • Manual gearbox 0B1
  • Manual gearbox 0B2
  • Manual gearbox 0B3
  • Manual gearbox 0B4
  • Automatic transmission 0B5
  • Automatic transmission 0B6
  • Automatic transmission 0AW
  • All-wheel drive system
  • Chassis
  • Front suspension
  • Rear suspension
  • Brake system
  • Steering system
  • Body
  • Exterior
  • Interior
  • Seats
  • Doors, locks and windows
  • Security system
  • Heating and air conditioning
  • Electrical equipment
  • Audio system
  • Power devices
  • Equipment and devices
  • Lighting and lamps
  • Electrical circuits
 
A4(B7, 2004-2008) 
  • General information
  • Introduction to manual
  • Troubleshooting
  • Operating instructions
  • Maintenance
  • Power unit
  • Petrol engines 2.0 (ALT)
  • Petrol engines 2.0 (TFSI)
  • Petrol engines 1.8 (MPI)
  • Diesel engines
  • Cooling system
  • Air conditioner
  • Fuel and exhaust system
  • Ignition system
  • Starting and charging
  • Transmission
  • Clutch
  • Manual gearbox
  • Automatic gearbox
  • Drive shafts
  • Chassis
  • Brake system
  • Front suspension
  • Rear suspension
  • Steering
  • Body
  • Exterior
  • Interior
  • Electrical equipment
  • Equipment and devices
  • Lighting and signaling
  • Windscreen wipers and washers
  • Electrical diagrams
  • Electrical diagrams (since 2007)
 
A4(B6, 2000-2006) 
  • General information
  • Vehicle Description
  • User manual
  • Maintenance
  • Power unit
  • Gasoline engine
  • Diesel engine
  • Lubrication system
  • Cooling system
  • Supply system
  • Injection system
  • Exhaust system
  • Ignition and control
  • Transmission
  • Gear box
  • Clutch and drive shafts
  • Chassis
  • Brake system
  • Car suspension
  • Steering
  • Body
  • Heating and ventilation
  • Exterior (external elements)
  • Interior (internal elements)
  • Electrical equipment
  • Power devices
  • Lighting and appliances
  • Electrical circuits
 
A4(B6, 2000-2006, petrol) 
  • General information
  • Introduction to the guide
  • Car care
  • Power unit
  • Engine repair
  • Lubrication system
  • Cooling system
  • Injection and control system
  • Ignition system
  • Power and exhaust system
  • Transmission
  • Clutch and drive shafts
  • Car gearbox
  • Chassis
  • Suspension and wheels
  • Steering
  • Brake system
  • Body
  • Interior
  • Exterior
  • Electrical equipment
  • Equipment and devices
  • Lighting and signaling
  • Power devices
  • Electrical circuits
 
A4(B5, 1994-2001) 
  • General information
  • Introduction to the guide
  • Car care
  • Maintenance (gasoline)
  • Maintenance (diesel)
  • Power unit
  • Gasoline engines
  • Diesel engines
  • Engine overhaul
  • Cooling system
  • Fuel injection (gasoline)
  • Fuel system (diesel)
  • Exhaust system
  • Ignition system
  • Transmission
  • Clutch
  • Mechanical gearbox
  • Automatic gearbox
  • Drive shafts
  • Chassis
  • Brake system
  • Car suspension
  • Steering
  • Body
  • Exterior
  • Interior
  • Doors, locks and windows
  • Heating and ventilation
  • Electrical equipment
  • Power devices
  • Equipment and devices
  • Electrical circuits
 
A4(B5, 1994-2001, petrol) 
  • General information
  • Vehicle description
  • Maintenance
  • Power unit
  • Engine repair
  • Turbocharging
  • Exhaust system
  • Cooling system
  • Ignition system
  • Fuel system
  • Motronic injection system
  • MPI and MPFI injection system
  • Transmission
  • Clutch
  • Gearbox and shafts
  • Chassis
  • Steering
  • Car suspension
  • Brake system
  • Wheels and tires
  • Body
  • Heating and ventilation
  • Body parts
  • Electrical equipment
  • Fuses and relays
  • Power devices
  • Lighting and lamps
  • Tools and devices
  • Electrical circuits
 
AudiManual.ru © 2017-2026 · Mobile version · Feedback · Sitemap: EN BG BY UA RS HR RO PL SK HU · Site search · News and articles
80 B2 · 80 B3 petrol · 80 B3 · 80 B4 · 100 C3 diesel · 100 C3 petrol · 100 C3 · 100 C4 petrol · 100 C4 · A3 Type 8L · A4 B5 petrol · A4 B5 · A4 B6 petrol · A4 B6 · A4 B7 · A4 B8 · A6 C4 · A6 C5 · A6 C5 Allroad · A8 D2 · Q5 Type 8R · Q7 Typ 4L · Audi A2 ·
This site uses cookies 🍪. Click the button to accept this fact.