



Table of contents: Removal ↓ Installation and adjustment ↓
Removal
1. To access the pedal assembly, remove the lower panels from the front panel under the steering column.
2. Disconnect the wiring from the accelerator pedal position sensor at the top of the pedal bracket.
3. Loosen the bolts and remove the sensor with the bracket from the floor.
4. Disconnect the control rod from the pedal, detach the pedal from the mounting bracket.
5. Having remembered the position of the control rod cam on the sensor axis, unscrew the nut and remove the washer, remove the cam.
6. Loosen the screws and remove the sensor from the bracket.
Installation and adjustment
7. Install the sensor on the bracket, screw in and tighten the screws.
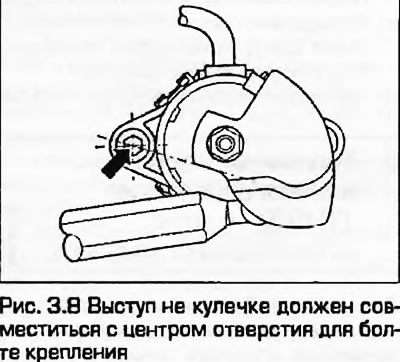
8. Install the control rod and cam on the axle, secure with a nut and washer. Check the correct installation of the cam. The protrusion on the cam should align with the center of the hole for the mounting bolt (Fig. 3.8).
9. Fasten the pedal to the mounting bracket, adjust the position of the sensor as described below.
10. Install the pedal stop so that the letters HS are visible on the outer surface of the stop. This applies to both manual and automatic transmission options.
11. Press the pedal until it touches the stop and adjust the length of the control rod so that you just reach the kickdown point. This can be adjusted by trial and error, disconnecting and reconnecting the rod ear. The kickdown point can be felt when the cam reaches its limit position.
12. On models with manual transmission, leave the pedal stop in its original position so that the letters HS are visible (Hand Shift - manual shift). On models with automatic GPG, rotate the fence 180° so that the letters AG are visible (Automatic Gearbox - automatic transmission).
13. After connecting the control rod to the pedal, install the pedal bracket to the floor panel and tighten the mounting bolts.
14. Reconnect the wiring.
15. Install the lower panels under the steering column.
The original source of the article can be found on the website AUDImanual.ru