
Repair Chevrolet Repair Toyota Repair Honda Repair AvtoVAZ Repair Mercedes-Benz Repair BMW Repair Opel
Home  |  Contacts  |  Sitemap  |    
English Русский
Български
Беларускі
Український
Српски
Hrvatski
Română
Polski
Slovenský
Magyar
AudiManual.ru


  • AUDI 80
  • AUDI 100
  • AUDI A3
  • AUDI A4
  • AUDI A6
  • AUDI A8
  • AUDI Q
  • OTHER
  • ARTICLES
B4 (1991-1996) B3 (1986-1991) B3 (1986-1991, petrol) B2 (1979-1986)

V-belt/ribbed belt — checking condition and tension (Audi 80 B4)

  • Home
  • Audi 80
  • B4 (1991-1996)
  • General information
  • Maintenance
  • V-belt/ribbed belt — checking condition and tension
            0
Table of contents: V-belt for water pump and power… ↓ Air conditioning compressor drive… ↓
1. Turn the engine and at the same time carefully inspect the belt. Often there may be one fairly deep crack on the belt adjacent to the pulley.

If there are cracks or fraying on the edges, the belt should be replaced.

Too tight a belt tension leads to its stretching and destruction of the base, as well as increased load on the bearings of the drive units. Too weak tension causes the belt to slip on the pulley, its strong heating and premature wear.

When pressing hard with your thumb on the belt in the section between the pulleys, the amount of belt deflection should correspond to the data in the table.

After installing a new belt, it is necessary to check its tension after a run of 100 km and, if necessary, tighten it.

Caution! When checking the tension of the V-belt on vehicles with four-cylinder engines produced since 10/91, the belt must be loosened and re-tensioned.


The tension of the V-belt of the generator of cars with six-cylinder and diesel engines is performed automatically and therefore does not require adjustment.

V-belt for water pump and power steering pump


Cars with four-cylinder engines

2. Remove the engine splash guard.

3. Loosen the clamp bolt on the power steering pump tensioner bar.

4. Turn the adjusting slotted nut until the belt is properly tensioned (see illustration).
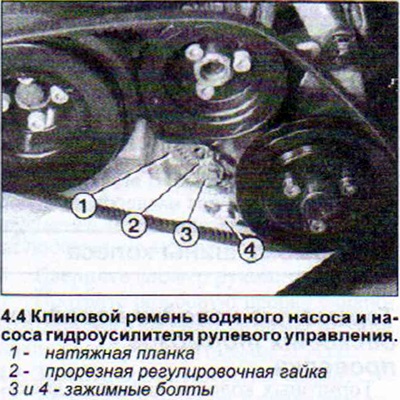
4. Turn the adjusting slotted nut until the belt is properly tensioned (see illustration).


5. Tighten the clamp bolt.


If the power steering pump does not move, then it is necessary to loosen the generator mounting bolt on the bracket.

Air conditioning compressor drive V-belt


Cars with four-cylinder engines

The tension of the air conditioning compressor V-belt is adjusted by removing or installing spacer washers between the front and rear of the V-belt pulley (see illustration 4.0).
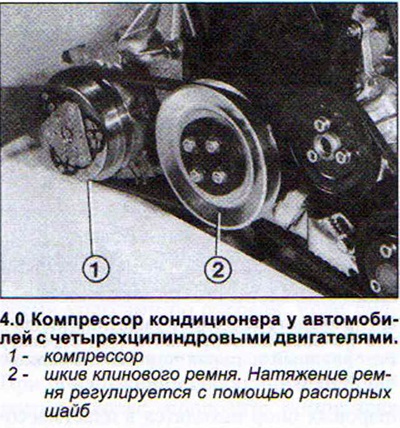
The tension of the air conditioning compressor V-belt is adjusted by removing or installing spacer…


A larger number of spacer discs between the pulley halves leads to a reduction in belt tension. Fewer spacer discs between the pulley halves leads to increased belt tension (see illustration 4.0a).
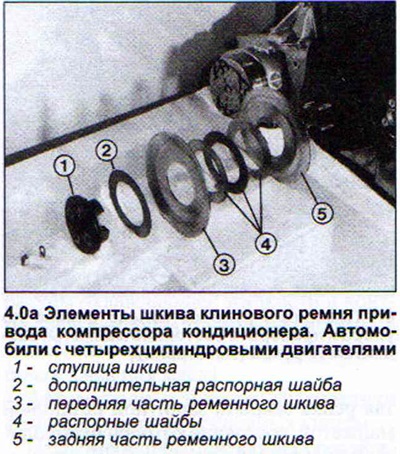
A larger number of spacer discs between the pulley halves leads to a reduction in belt tension.…


Additional spacer washers are installed between the pulley hub and its front part.

The pulley mounting nuts are tightened to a torque of 25 Nm. Make sure that the belt is not jammed between the pulley halves.


6. Turn the crankshaft 2 times.

7. Check the belt tension by pressing firmly with your thumb on the belt at the section between the crankshaft and the air conditioning compressor.

8. Start the engine and let it run for a while.

9. Check the belt tension and add or remove spacers if necessary.

When the belt tension is correct, tighten the assembly pulley mounting bolts again to a torque of 25 Nm (see illustrations 4.0b and 4.0c).
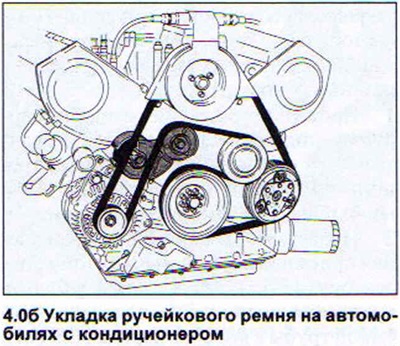
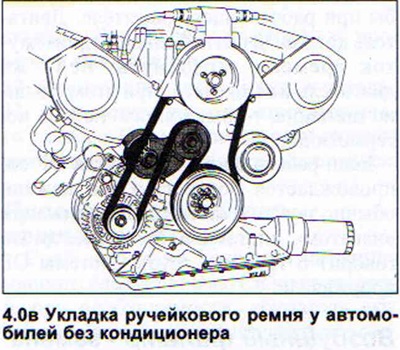
When the belt tension is correct, tighten the assembly pulley mounting bolts again to a torque of…


When the belt tension is correct, tighten the assembly pulley mounting bolts again to a torque of…


V-belt for power steering


Cars with five-cylinder engines

10. Unscrew the fastening nuts on the tension bar and on the pivot bracket.

11. Turn the adjusting bolt to the left side (unscrew) to tension the belt.

12. Tighten the mounting nuts.

Air conditioning compressor drive V-belt


Cars with five-cylinder engines


13. Remove the clamp bolts on the left and right sides of the air conditioning compressor bracket.

14. Turn the air conditioner compressor bracket together with the compressor to the right. Use a pry bar if necessary. When the belt tension is correct, tighten the clamp bolts.
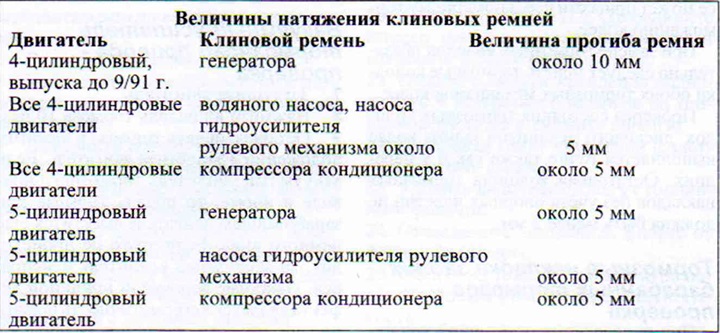
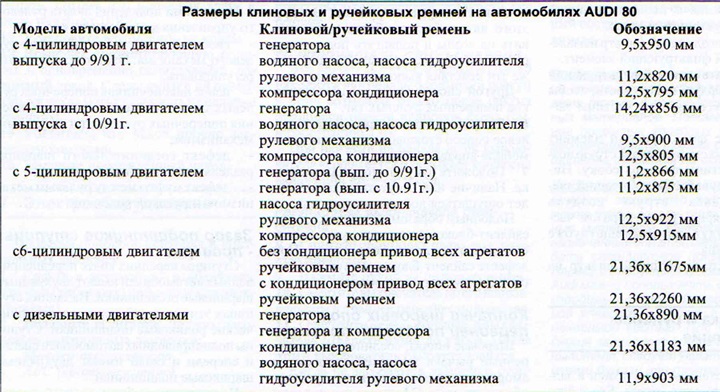
14. Turn the air conditioner compressor bracket together with the compressor to the right. Use a…


14. Turn the air conditioner compressor bracket together with the compressor to the right. Use a…


[Content source: the specified website: AudiManual]
The article was checked by auto expert Timur Bazhenov
This article is available at russian, bulgarian, belarusian, ukrainian, serbian, croatian, romanian, polish, slovak, hungarian

Share information:
Previous articles
Audi 80 B4: Maintenance
Next articles

Brakes, tires, wheels
Maintenance — works
Regular checks and constant monitoring
General information and maintenance periods
Exhaust gas system-check
Suspension and steering
Electrical equipment
Lubrication of rods, joints, hinges and locks


Similar articles on other Audi car models:
Checking the condition of a V-belt or poly V-belt Audi 100 C4 (1990-1994, petrol)
Checking the timing belt for damage, measuring wear Audi A3 Type 8L (1996-2003)
Checking the condition and tension of the toothed belt Audi A4 B6 (2000-2006)
Checking the condition of the poly V-belt Audi A6 C5 (1997-2004)
Checking the condition of the poly V-belt Audi A8 D2 (1994-2002)
Removal the tension element of the poly V-belt Audi Q5 Type 8R (2008-2017)
Poly V-belt — checking condition (petrol engines) Audi A2 (1999-2005)
Link to this page in different formats


Visitor comments

No comments yet


How much will 39 + 50 =


80(B4, 1991-1996) 
  • General information
  • User manual
  • Maintenance
  • Troubleshooting
  • Power unit
  • Engine
  • Cooling system
  • Heating and ventilation
  • Petrol injection
  • Diesel fuel system
  • Fuel system
  • Exhaust systems
  • Ignition system
  • Transmission
  • Clutch
  • Car gearbox
  • Chassis
  • Brake system
  • Suspension and steering wheel
  • Body
  • Body and trim
  • Electrical equipment
  • Electrical system
  • Electrical circuits
 
80(B3, 1986-1991) 
  • General information
  • Repair characteristics
  • Maintenance
  • Power unit
  • Gasoline engine
  • Diesel engine
  • Engine lubrication system
  • Fuel system (gasoline)
  • Injection system (gasoline)
  • Fuel system (diesel)
  • Ignition system
  • Cooling system
  • Heater
  • Exhaust system
  • Transmission
  • Clutch and gearbox
  • Chassis
  • Steering
  • Brake system
  • Car suspension
  • Body
  • Body elements
  • Electrical equipment
  • Power devices
  • Lighting and appliances
  • Electrical circuits
 
80(B3, 1986-1991, petrol) 
  • General information
  • User manual
  • Maintenance
  • Power unit
  • Engine 4-cylinder
  • Engine 5-cylinder
  • Cooling system
  • Fuel and exhaust systems
  • Ignition system
  • Transmission
  • Clutch
  • Mechanical transmission
  • Automatic transmission
  • Drive shafts
  • Chassis
  • Brake system
  • Suspension
  • Steering
  • Body
  • Exterior
  • Interior
  • Electrical equipment
  • Equipment and devices
  • Electrical circuits
 
80(B2, 1979-1986) 
  • General information
  • User manual
  • Power unit
  • Engine FZ
  • Engine EP, YP, YZ, DT, DS, DZ
  • Transmission
  • Clutch
  • 4 speed gearbox
  • 5 speed gearbox
  • Front wheel drive
  • Chassis
  • Front suspension
  • Rear suspension
  • Steering
  • Brake system
  • Electrical equipment
  • Equipment and devices
  • Electrical circuits
 
AudiManual.ru © 2017-2026 · Mobile version · Feedback · Sitemap: EN BG BY UA RS HR RO PL SK HU · Site search · News and articles
80 B2 · 80 B3 petrol · 80 B3 · 80 B4 · 100 C3 diesel · 100 C3 petrol · 100 C3 · 100 C4 petrol · 100 C4 · A3 Type 8L · A4 B5 petrol · A4 B5 · A4 B6 petrol · A4 B6 · A4 B7 · A4 B8 · A6 C4 · A6 C5 · A6 C5 Allroad · A8 D2 · Q5 Type 8R · Q7 Typ 4L · Audi A2 ·
This site uses cookies 🍪. Click the button to accept this fact.