
Table of contents: A car without a diagnostic unit for… ↓ Brake light switch ↓ Checking the protective coating of… ↓
Checking control devices and indicator lights.
1. Get into the car and make sure the watch is working (digital or electronic)
2. Turn on the ignition. The following indicator lights should light up:
- charging the battery,
- ABS (short-term),
- airbags (goes out after about 10 seconds), and with the handbrake on
- handbrake indicator light.
A car without a diagnostic unit for the functioning of the main systems
On the instrument panel light panel between the speedometer and tachometer, the coolant temperature indicator light and the brake system indicator light should flash, and the oil pressure indicator light should also be on.
Cars with a diagnostic unit for the functioning of the main systems On the light panel of the instrument panel between the speedometer and tachometer, when the ignition is turned on, the inscription appears "Bremslicht" (stop signal). After briefly pressing the brake pedal, the inscription "OK" (okay) should light up.
The fuel gauge and coolant temperature gauge needles move with a slight delay (only on a warm engine).
3. Turn on the direction indicators. Depending on the direction of the turn, the corresponding green indicator light should flash rhythmically.
4. Press the hazard warning switch button. The indicator lamp in the switch and both direction indicator lamps should flash.
5. Pull the headlight stalk lever toward the steering wheel. The high beam indicator light should come on.
6. Start the engine and make sure the tachometer is working.
7. Perform a test drive and ensure that the speedometer and coolant temperature gauge are working.
Brake light switch
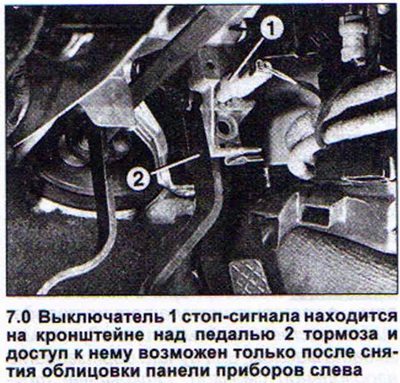
The brake light switch on the AUDI 80 is located above the brake pedal and can only be accessed after removing the instrument panel trim on the left (see illustration 7.0).
When you press the pedal, the switch rod extends and closes the brake light contacts.
Adjusting the brake light switch
8. Remove the trim on the left under the instrument panel.
9. Press the brake pedal with your hand.
10. Move the switch along its guides to the extreme forward position.
11. Release the brake pedal and pull the switch back to the stop. After this, the switch will self-set.
If the brake light bulbs of both rear lights do not light, check the switch.
12. Disconnect the switch plug.
13. Jumper the terminals of the disconnected plug. If the brake light bulbs light up, the switch is faulty.
Checking the protective coating of the bottom
The protective coating layer on the underbody of the car should be carefully checked and, if necessary, renewed. The car owner can do this on his own if he has a device for lifting the car (overpass or lift).
14. Wash the bottom thoroughly.
15. Illuminate the entire surface of the bottom with a sufficiently powerful lamp and identify damaged areas.
16. Clean the damaged protective layer with a spatula, scraper and metal brush to bare metal. Also clean rust spots to bare metal.
17. Apply a coat of paint containing zinc powder to the cleaned surface as a primer. The protective compound can be applied to flat or large surfaces with a brush. Apply the protective compound to hard-to-reach joints and corners with a sprayer.
Attention! Bitumen-based underbody protection should be repaired only with bitumen materials. Polymer wheel arch protection should be restored only with PVC-based protection.
Note: Only certain materials may be used when repairing the underbody protective coating. Materials not intended for this purpose will corrode the standard underbody coating. In addition to products from Volkswagen and Audi, Teroson products in aerosol cans and as a brush-on paste may be used. When applying the underbody protective coating with a spray, the brakes should be covered with paper or film.
(The original source of the article can be found on the website: AUDIMANUAL.ru)