
Repair Chevrolet Repair Toyota Repair Honda Repair AvtoVAZ Repair Mercedes-Benz Repair BMW Repair Opel
Home  |  Contacts  |  Sitemap  |    
English Русский
Български
Беларускі
Український
Српски
Hrvatski
Română
Polski
Slovenský
Magyar
AudiManual.ru


  • AUDI 80
  • AUDI 100
  • AUDI A3
  • AUDI A4
  • AUDI A6
  • AUDI A8
  • AUDI Q
  • OTHER
  • ARTICLES
B4 (1991-1996) B3 (1986-1991) B3 (1986-1991, petrol) B2 (1979-1986)

Rear Brake Caliper — Overhaul (Audi 80 B3)

  • Home
  • Audi 80
  • B3 (1986-1991, petrol)
  • Chassis
  • Brake system
  • Rear Brake Caliper — Overhaul
            0
1. Clean the outside surface of the caliper. Do not allow foreign objects to enter the hydraulic hose hole.

2. Clamp the caliper in a vice, piston facing up.

3. Remove the piston dust cap from the groove in the caliper.

4. On a Teves caliper, place the die in the caliper jaws against the piston, then use compressed air to blow the piston out of the bore. Feed air through the brake fluid inlet.
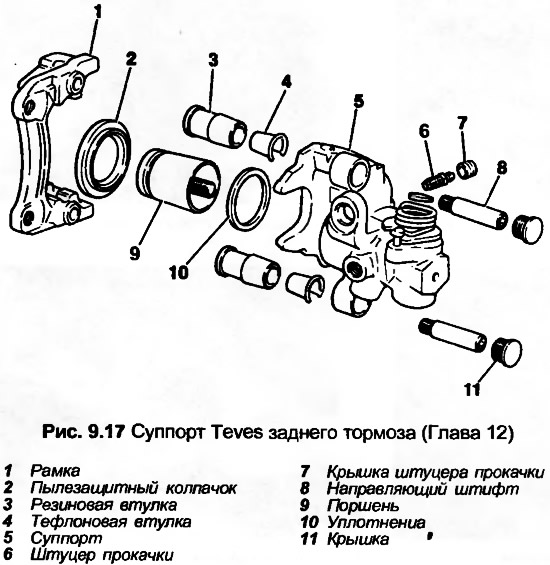
4. On a Teves caliper, place the die in the caliper jaws against the piston, then use compressed…


5. On the Girling caliper, use a socket wrench to unscrew the piston from the hole.
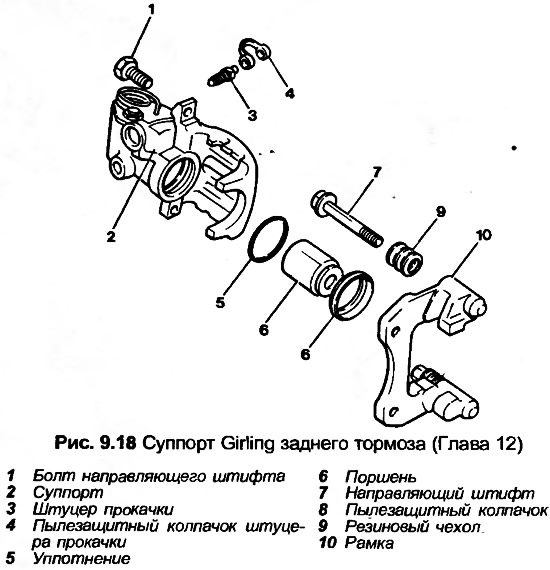
5. On the Girling caliper, use a socket wrench to unscrew the piston from the hole.


6. Remove the piston seal from the bore, being careful not to scratch the bore surface. Remove the dust cap from the piston.

7. Unscrew the bleed screw.

8. Clean all parts with methyl alcohol and let dry.

9. Check the condition of the piston surface and bore. Check the threads of the automatic adjuster. Check the caliper housing for signs of fluid leakage around the handbrake control lever. Check the wear of the guide pins, seals and bushings. Replace parts as necessary. On a Girling caliper, the suspension frame together with the guide pins is already lubricated.


10. If the caliper and piston are in good condition, prepare a repair kit of seals and paste for brake cylinders.

11. Apply the paste to the bore and piston surfaces.

12. Place the piston seal in the bore groove.

13. To install the piston on the Teves caliper, first press the clamp into the caliper until it stops, using a screwdriver. Place the dust cap on the smooth end of the piston, then place the piston on the caliper, turning it slightly so that the threads engage. Use a screwdriver to lift the dust cap into the groove in the caliper. Press the piston all the way into the hole, making sure that it goes straight in and does not damage the automatic adjuster. The Audi tool shown in Fig. 9.20 is used for this operation. A G-clamp can also be used for this purpose. Once the piston is in the hole, the dust cap will snap into the groove on the outer end of the piston.
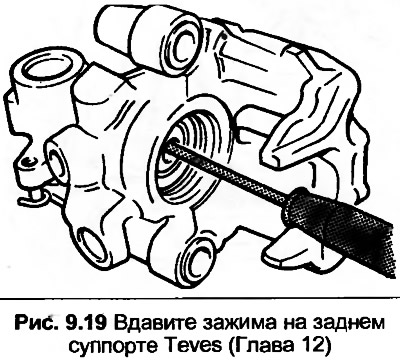
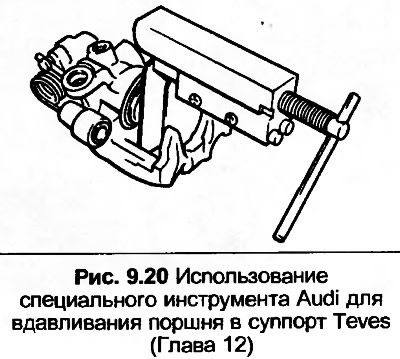
13. To install the piston on the Teves caliper, first press the clamp into the caliper until it…


13. To install the piston on the Teves caliper, first press the clamp into the caliper until it…


14. To install the piston on the Girling caliper, place the dust cap on the smooth end of the piston, then position the piston on the caliper. Use a screwdriver to lift the dust cap into the groove in the caliper. Use a socket wrench to screw the piston into the hole. The dust cap will snap into the groove on the outer end of the piston.


15. Install a new rubber cap on the bleeder nipple. Apply paste to the threads, then clamp the bleeder nipple into the caliper.

16. New Girling calipers are already filled with brake fluid. Audi also recommends filling and bleeding the Girling caliper after rebuilding. A similar procedure can also be performed on Teves calipers.

17. Clamp the caliper in a vice with the inlet hole facing up. Loosen the bleeder nipple and attach the brake fluid supply hose to it. Fill the caliper until the fluid is free of air bubbles, then tighten the bleeder nipple. Plug the inlet hole if necessary.

The original article is available on the website: AUDImanual.ru
The article was checked by auto expert Timur Bazhenov
This article is available at russian, bulgarian, belarusian, ukrainian, serbian, croatian, romanian, polish, slovak, hungarian

Share information:
Previous articles
Audi 80 B3: Brake system
Next articles

Rear Brake Caliper — Removal and Installation
Rear brake pads — checking, removal and installation
Brake drum — inspection and restoration
Rear wheel cylinder — removal, overhaul and installation
Master cylinder — removal and installation
Master Cylinder — Bulkhead
Brake pressure regulator — checking and adjustment
Brake system tubes and hoses — removal and installation


Similar articles on other Audi car models:
Rear Brake Pads — Checking and Removing Audi 100 C3 (1982-1990, diesel)
Removal and installation the brake disc / caliper Audi A3 Type 8L (1996-2003)
Rear Brake Caliper — Removal, Repair and Installation Audi A4 B5 (1994-2001)
Brake caliper — overhaul Audi A6 C5 Allroad (1999-2005)
Replacing rear brake pads Audi A8 D2 (1994-2002)
Removal the brake caliper and rear brake bracket Audi Q5 Type 8R (2008-2017)
Brake mechanism with floating caliper, rear brake disc Audi A2 (1999-2005)
Link to this page in different formats


Visitor comments

No comments yet


How much will 48 + 41 =


80(B4, 1991-1996) 
  • General information
  • User manual
  • Maintenance
  • Troubleshooting
  • Power unit
  • Engine
  • Cooling system
  • Heating and ventilation
  • Petrol injection
  • Diesel fuel system
  • Fuel system
  • Exhaust systems
  • Ignition system
  • Transmission
  • Clutch
  • Car gearbox
  • Chassis
  • Brake system
  • Suspension and steering wheel
  • Body
  • Body and trim
  • Electrical equipment
  • Electrical system
  • Electrical circuits
 
80(B3, 1986-1991) 
  • General information
  • Repair characteristics
  • Maintenance
  • Power unit
  • Gasoline engine
  • Diesel engine
  • Engine lubrication system
  • Fuel system (gasoline)
  • Injection system (gasoline)
  • Fuel system (diesel)
  • Ignition system
  • Cooling system
  • Heater
  • Exhaust system
  • Transmission
  • Clutch and gearbox
  • Chassis
  • Steering
  • Brake system
  • Car suspension
  • Body
  • Body elements
  • Electrical equipment
  • Power devices
  • Lighting and appliances
  • Electrical circuits
 
80(B3, 1986-1991, petrol) 
  • General information
  • User manual
  • Maintenance
  • Power unit
  • Engine 4-cylinder
  • Engine 5-cylinder
  • Cooling system
  • Fuel and exhaust systems
  • Ignition system
  • Transmission
  • Clutch
  • Mechanical transmission
  • Automatic transmission
  • Drive shafts
  • Chassis
  • Brake system
  • Suspension
  • Steering
  • Body
  • Exterior
  • Interior
  • Electrical equipment
  • Equipment and devices
  • Electrical circuits
 
80(B2, 1979-1986) 
  • General information
  • User manual
  • Power unit
  • Engine FZ
  • Engine EP, YP, YZ, DT, DS, DZ
  • Transmission
  • Clutch
  • 4 speed gearbox
  • 5 speed gearbox
  • Front wheel drive
  • Chassis
  • Front suspension
  • Rear suspension
  • Steering
  • Brake system
  • Electrical equipment
  • Equipment and devices
  • Electrical circuits
 
AudiManual.ru © 2017-2026 · Mobile version · Feedback · Sitemap: EN BG BY UA RS HR RO PL SK HU · Site search · News and articles
80 B2 · 80 B3 petrol · 80 B3 · 80 B4 · 100 C3 diesel · 100 C3 petrol · 100 C3 · 100 C4 petrol · 100 C4 · A3 Type 8L · A4 B5 petrol · A4 B5 · A4 B6 petrol · A4 B6 · A4 B7 · A4 B8 · A6 C4 · A6 C5 · A6 C5 Allroad · A8 D2 · Q5 Type 8R · Q7 Typ 4L · Audi A2 ·
This site uses cookies 🍪. Click the button to accept this fact.