
Note: Please also refer to the materials Chapter 5. The battery is located under the driver's seat.
Caution: Certain safety precautions must be taken when working with batteries. Battery cells always contain highly flammable hydrogen gas, so do not allow open flames near the battery. Battery electrolyte is a sulfuric acid solution that can cause serious injury if it comes into contact with eyes or exposed areas of the body. In addition, the acid corrodes clothing and paints. When disconnecting the battery, always disconnect the negative cable first and reconnect it last!
1. Battery maintenance is an important procedure that requires the right tools. Before starting any maintenance procedure, always first turn off the engine and all electrical equipment, then disconnect the negative battery cable (see Chapter 5).
2. The vehicles in question can be equipped with different batteries: maintenance-free (with charge and electrolyte level indicator) or serviced (without this indicator). In addition, batteries with absorption filling (AGM) without an indicator can be installed. In maintenance-free batteries, it is only necessary to check the electrolyte level, but there is no provision for adjusting its level.
3. The procedure for accessing the battery is described in Chapter 5.
4. Check the electrolyte level in each battery cell - it should be between the "MIN" and "MAX" marks on the battery case (see illustration 17.4a).
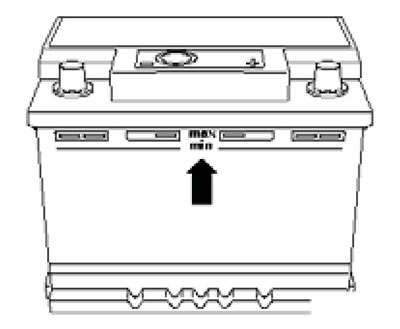
17.4a. Markings on the battery case.
If the marks are not visible, unscrew the plug on the battery being serviced and look inside - the electrolyte level should reach the plastic mark (1 in illustration 17.4b).
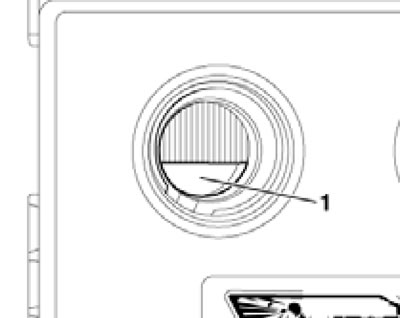
17.4b. Electrolyte level indicator plate.
Note: It is not possible to check the electrolyte level on AGM absorption batteries.
5. If the battery has an indicator (a round "eye"), the electrolyte level and/or charge can be checked by its color. There are two types of indicators: 2-color and 3-color. Batteries with a 3-color indicator are usually installed.
6. For a 2-color indicator, black indicates a normal electrolyte level, while a pale yellow or discolored indicator indicates a low electrolyte level (the battery should be replaced). For the 3-color indicator, a green color indicates a normal charge, a black indicator indicates a low charge (less than 65%), and a discolored or pale yellow indicator indicates a low electrolyte level.
7. If a refillable battery is used, if necessary, top up the electrolyte level to the required value for each section separately by adding distilled water through the plugged holes.
Note: Overfilling the cells may cause electrolyte to overflow during boost charging, causing corrosion and damage to components near the battery.
8. Make sure the battery terminal covers are not damaged and completely cover the terminal.
9. The battery should be periodically inspected for damage such as cracks in the casing.
10. Check the tightening force of the clamp nuts of the wire clamps on the battery terminals (see Chapter 5). Check each wire along its entire length for cracks, as well as abrasions in the insulation and conductive core. When connecting the wiring to the battery, apply the clamps to the terminals only by hand, do not use a tool. Check the integrity and patency of the ventilation hose (3).
11. If you find signs of corrosion, usually in the form of a loose white coating, disconnect the wires from the terminals (first - negative), clean them with a wire brush and reconnect (first - positive).
12. Make sure the battery retaining clip is securely tightened. If the battery was removed from the tray, make sure that there are no foreign objects in it during installation.
13. After disconnecting the battery, the trip computer readings are reset, and the engine may exhibit unusual dynamic characteristics for several kilometers (the engine parameters are being reconfigured). You may also need to perform the following procedures: deactivate the service mode of the telematics unit, enter the security code for the audio system, initialize the electric window lifter (see chapter "Governing bodies") and set the time on the clock. Various control lights may also be on, but should go out after driving a short distance at a speed of 15-20 km/h. If the battery has been disconnected for a long time, the maintenance due date may not be calculated or displayed correctly.
14. Further information on the battery and on starting the engine from an auxiliary power source can be found in Chapter 5 and in Introduction.