
Repair Chevrolet Repair Toyota Repair Honda Repair AvtoVAZ Repair Mercedes-Benz Repair BMW Repair Opel
Home  |  Contacts  |  Sitemap  |    
English Русский
Български
Беларускі
Український
Српски
Hrvatski
Română
Polski
Slovenský
Magyar
AudiManual.ru


  • AUDI 80
  • AUDI 100
  • AUDI A3
  • AUDI A4
  • AUDI A6
  • AUDI A8
  • AUDI Q
  • OTHER
  • ARTICLES
B8 (2007-2015) B7 (2004-2008) B6 (2000-2006) B6 (2000-2006, petrol) B5 (1994-2001) B5 (1994-2001, petrol)

Rear final drive 0BC — removal and installation (Audi A4 B8)

  • Home
  • Audi A4
  • B8 (2007-2015)
  • Transmission
  • All-wheel drive system
  • Rear final drive 0BC — removal and installation
            0
Table of contents: Main reverse gear ↓ Removal and installation of the… ↓

Main reverse gear
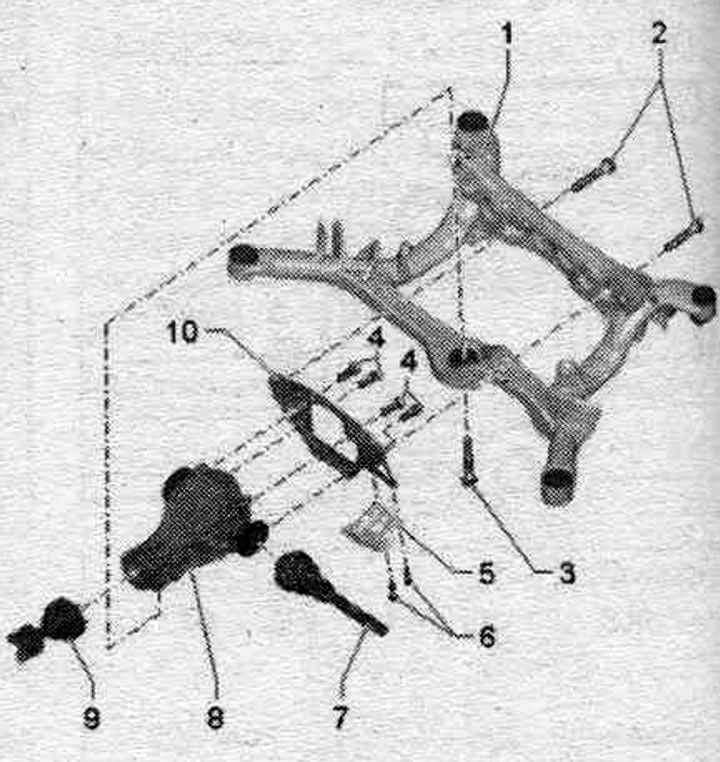


1. Subframe.

1. Subframe.
2. Bolt: 95 Nm.
3/4. Bolt: 55 Nm.
5. Heat shield.
6. Bolt: 20 Nm.
7. Drive shaft.
8. Rear final drive.
9. Cardan shaft.
10. Cross beam.


Removal and installation of the rear. head of transmission


Place the car on a lift. Remove the decorative cap from the rear. left wheel, for alloy wheels, remove the protective cap (puller in the on-board tool). Remove the left rear wheel.

Vehicles with 6-cyl. engine: Remove the rear crossmember "1". Remove the rear part of the system. exhaust pipe "2". Secure the rear cross member "1" to the body.

All


Remove the heat shield "3" from the body of the Strelka car.
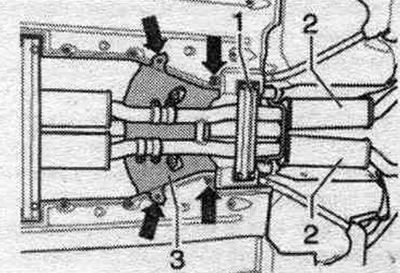
Remove the heat shield «3» from the body of the Strelka car.


Remove the propeller shaft from the rear. head of transmission.
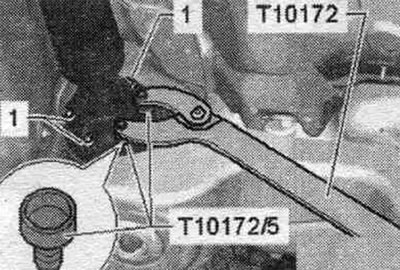


Remove the propeller shaft from the rear. head of transmission.


Place wooden block "A" (approx. 40 mm high) on the rear cross member "C" and thus fix the cardan shaft "B".
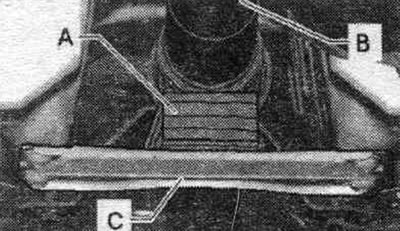
Place wooden block «A» (approx. 40 mm high) on the rear cross member «C» and thus fix the cardan…


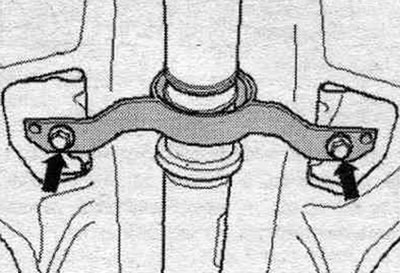
Unscrew the "arrow" mounting bolts of the intermediate support of the propeller shaft. Move the propeller shaft forward and at the same time disconnect it from the rear. ch. transfers. Tie the driveshaft to the side of the subframe.
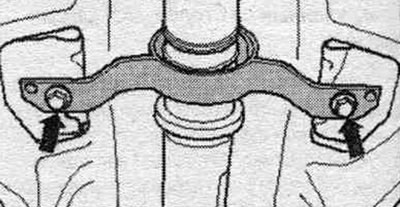
Unscrew the «arrow» mounting bolts of the intermediate support of the propeller shaft. Move the…


Remove the heat shield "A" of the left drive shaft from the crossmember/rear main transmission "arrow".
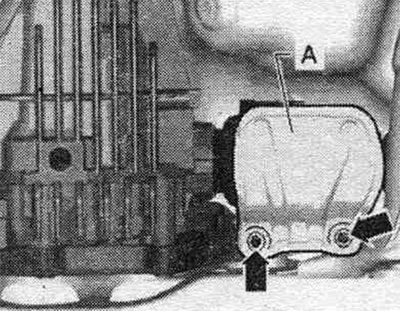


Remove the heat shield «A» of the left drive shaft from the crossmember/rear main transmission…


Unscrew the drive shafts on the left "1" and on the right "3". Loosen the bolts "2" by approximately 3 turns. Unscrew the bolt "4".
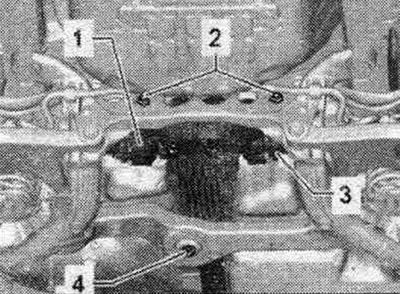
Unscrew the drive shafts on the left «1» and on the right «3». Loosen the bolts «2» by…


Install an engine and gearbox lift with a universal gearbox support "VAG 1359/2" and the corresponding wooden block "A" (height approx. 80 mm) under the rear depth. transmission. Make sure that the universal support for the gearbox - VAG 1359/2- does not rest against the fuel. tank. Unscrew bolts "1" (lower bolts securing the cross member to the rear. main transmission) and "2".
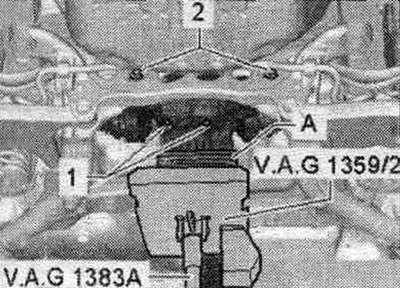
Install an engine and gearbox lift with a universal gearbox support «VAG 1359/2» and the…


Remove the 2 upper bolts securing the crossmember "B" to the rear final drive. Insert the socket wrench "T40154" through the holes in the subframe "A". If necessary, move the main gear slightly. gear left or right.
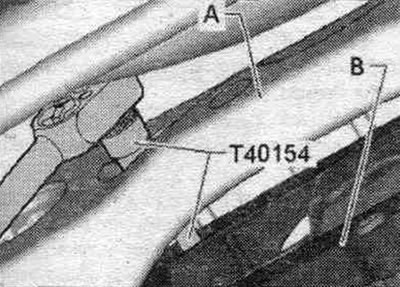


Remove the 2 upper bolts securing the crossmember «B» to the rear final drive. Insert the socket…


Then move the ch. gear "A" slightly forward. Turn the crossbar "B" to the left and down in the direction of arrow 1, while going around the head. gear "arrow 2" and remove. Before lifting the butt. attach the car to the lift arm using the T10038 tension belt on the left side of the suspension. Remove the engine and transmission lift from under the main transmission, while the second mechanic should hold the rear main transmission. transmission so that it doesn't fall. Insert the "T10149" support into the engine and gearbox lift.
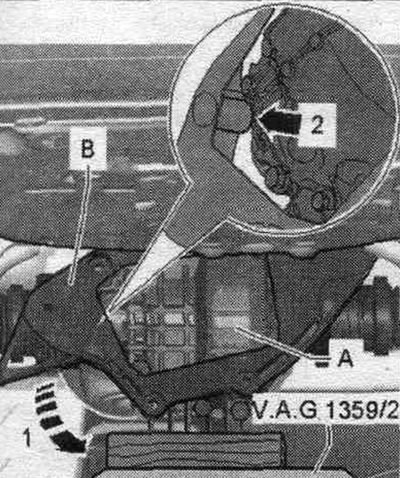
Then move the ch. gear «A» slightly forward. Turn the crossbar «B» to the left and down in the…


Screw the support "T10149" using the wheel bolt "arrow A" to the rear wheel hub. left suspension. Raise the rear suspension. left wheel using an engine and gearbox lift only enough so that the car begins to rise from paw "1" of the lift "arrow B".
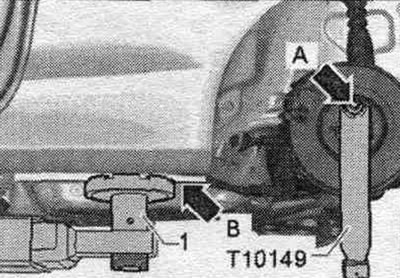


Screw the support «T10149» using the wheel bolt «arrow A» to the rear wheel hub. left suspension.…


The second mechanic should now press the rear ch. gear "1" in the "direction of the arrow" towards the left side of the vehicle. Next, move the right drive shaft "5" upwards from the shaft with flange "4" of the main gear. Then remove the left drive shaft "3" and remove the main. transmission with the participation of 2 mechanics back from subframe "2".
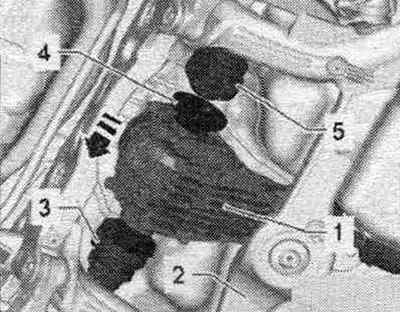
The second mechanic should now press the rear ch. gear «1» in the «direction of the arrow» towards…


Installation


Installation in reverse order. Install the rear ch. gear "1" with the participation of the 2nd mechanic to the subframe "2" in the mounting position. Insert the left drive shaft "3" into the flange shaft g. transmission. The second mechanic should now press the reverse gear. gear "1" in the "direction of the arrow" to the left side of the vehicle. Insert the right drive shaft "5" into the shaft with flange "4" of the main gear. Remove the engine and gearbox jack with the support "T10149" from the rear suspension. left wheel. Install an engine and gearbox lift with a universal gearbox support "VAG 1359/2" and a corresponding wooden block (height approx. 80 mm) under the rear depth. gear "A". Then shift the key. gear "A" slightly forward. Turn the crossbar "B" to the left and up against the "direction of arrow 1" and install, while bending the head. "Arrow 2" transmission.
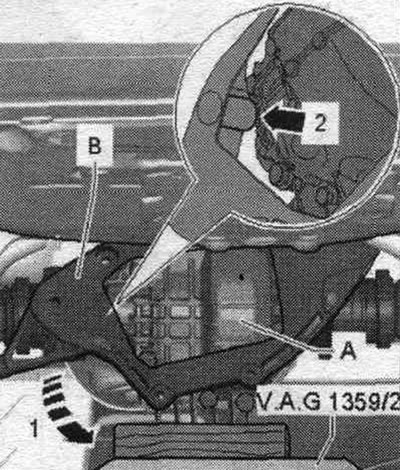


Installation in reverse order. Install the rear ch. gear «1» with the participation of the 2nd…


Then tighten the 4 crossmember "B" mounting bolts to the rear main gear crosswise. At the same time, insert the socket wrench "140154" through the holes in the subframe "A". If necessary, move the main gear slightly. gear left or right.
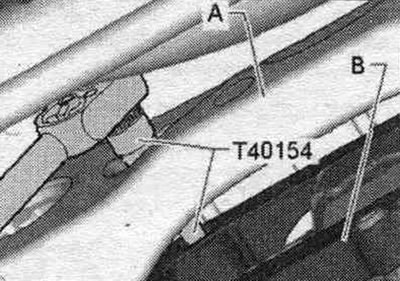
Then tighten the 4 crossmember «B» mounting bolts to the rear main gear crosswise. At the same…


First, tighten bolts "2" and "4" by hand. For greater clarity, the figure shows an engine and gearbox lift with a universal gearbox support "VAG 1359/2" not shown. Tighten bolt "4". Finally, tighten bolts "2". Remove the engine and gearbox jack from under the final drive. Tighten the drive shafts on the left "1" and on the right "3".
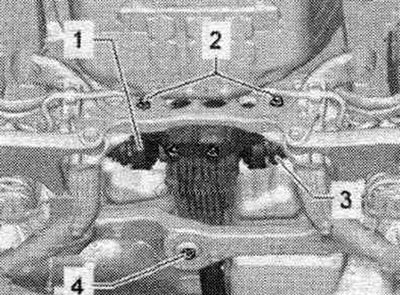
First, tighten bolts «2» and «4» by hand. For greater clarity, the figure shows an engine and…


Install the heat shield "A" of the drive shaft on the left side of the crossmember/rear final drive "arrows".
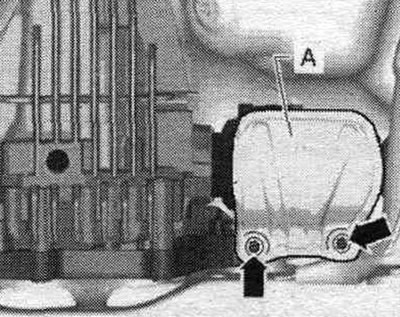


Install the heat shield «A» of the drive shaft on the left side of the crossmember/rear final drive…


Bolt the cardan shaft to the rear. main transmission. Screw on the intermediate support of the cardan shaft without mech. stresses to the body. Check the oil level in the rear. main transmission.
Bolt the cardan shaft to the rear. main transmission. Screw on the intermediate support of the…


Attach the heat shield "3" to the Strelka body. Install the rear part of the exhaust system. and align without fur. stresses. If present, install crossmember "1". Install the left rear wheel and tighten the wheel bolts.

[This article was previously published on the resource: AUDIMANUAL.ru]
The article was checked by auto expert Timur Bazhenov
This article is available at russian, bulgarian, belarusian, ukrainian, serbian, croatian, romanian, polish, slovak, hungarian

Share information:
Previous articles
Audi A4 B8: All-wheel drive system
Next articles

Cardan shaft of the 0BC final drive inserted from the gearbox…
Cardan shaft of the 0BC final drive screwed on from the gearbox…
Rear final drive marking 0BC
Rear final drive marking 0BD
Rear final drive marked 0BF
Cardan shaft from the gearbox side of the main gear 0BD
Rear main drive cardan shaft 0BF


Similar articles on other Audi car models:
Rear shock absorber strut: front wheel drive vehicles Audi 80 B4 (1991-1996)
Gearbox/Final Drive Housing (013 & 093) — Service Audi 100 C3 (1982-1990, diesel)
Checking the automatic transmission final drive fluid level Audi A3 Type 8L (1996-2003)
Gearbox/ final drive Audi A6 C5 (1997-2004)
Rear drive shafts Audi A8 D2 (1994-2002)
Removal and installation the rear final drive Audi Q7 Typ 4L (2005-2015, diesel)
Removal and installation the crankshaft belt drive pulley Audi A2 (1999-2005)
Link to this page in different formats


Visitor comments

No comments yet


How much will 20 + 31 =


A4(B8, 2007-2015) 
  • General information
  • Operating instructions
  • Power unit
  • Petrol engines 1.8 l
  • Petrol engines 1.8/2.0 l
  • Petrol engines 3.0 l
  • Petrol engines 3.2 l
  • Fuel system (petrol)
  • Diesel engines 2.0 l (CA*)
  • Diesel engines 2.0 l (CJCB)
  • Diesel engines 2.7/3.0 l
  • Diesel engines 3.0 l
  • Fuel system (diesel)
  • Transmission
  • Manual gearbox 0B1
  • Manual gearbox 0B2
  • Manual gearbox 0B3
  • Manual gearbox 0B4
  • Automatic transmission 0B5
  • Automatic transmission 0B6
  • Automatic transmission 0AW
  • All-wheel drive system
  • Chassis
  • Front suspension
  • Rear suspension
  • Brake system
  • Steering system
  • Body
  • Exterior
  • Interior
  • Seats
  • Doors, locks and windows
  • Security system
  • Heating and air conditioning
  • Electrical equipment
  • Audio system
  • Power devices
  • Equipment and devices
  • Lighting and lamps
  • Electrical circuits
 
A4(B7, 2004-2008) 
  • General information
  • Introduction to manual
  • Troubleshooting
  • Operating instructions
  • Maintenance
  • Power unit
  • Petrol engines 2.0 (ALT)
  • Petrol engines 2.0 (TFSI)
  • Petrol engines 1.8 (MPI)
  • Diesel engines
  • Cooling system
  • Air conditioner
  • Fuel and exhaust system
  • Ignition system
  • Starting and charging
  • Transmission
  • Clutch
  • Manual gearbox
  • Automatic gearbox
  • Drive shafts
  • Chassis
  • Brake system
  • Front suspension
  • Rear suspension
  • Steering
  • Body
  • Exterior
  • Interior
  • Electrical equipment
  • Equipment and devices
  • Lighting and signaling
  • Windscreen wipers and washers
  • Electrical diagrams
  • Electrical diagrams (since 2007)
 
A4(B6, 2000-2006) 
  • General information
  • Vehicle Description
  • User manual
  • Maintenance
  • Power unit
  • Gasoline engine
  • Diesel engine
  • Lubrication system
  • Cooling system
  • Supply system
  • Injection system
  • Exhaust system
  • Ignition and control
  • Transmission
  • Gear box
  • Clutch and drive shafts
  • Chassis
  • Brake system
  • Car suspension
  • Steering
  • Body
  • Heating and ventilation
  • Exterior (external elements)
  • Interior (internal elements)
  • Electrical equipment
  • Power devices
  • Lighting and appliances
  • Electrical circuits
 
A4(B6, 2000-2006, petrol) 
  • General information
  • Introduction to the guide
  • Car care
  • Power unit
  • Engine repair
  • Lubrication system
  • Cooling system
  • Injection and control system
  • Ignition system
  • Power and exhaust system
  • Transmission
  • Clutch and drive shafts
  • Car gearbox
  • Chassis
  • Suspension and wheels
  • Steering
  • Brake system
  • Body
  • Interior
  • Exterior
  • Electrical equipment
  • Equipment and devices
  • Lighting and signaling
  • Power devices
  • Electrical circuits
 
A4(B5, 1994-2001) 
  • General information
  • Introduction to the guide
  • Car care
  • Maintenance (gasoline)
  • Maintenance (diesel)
  • Power unit
  • Gasoline engines
  • Diesel engines
  • Engine overhaul
  • Cooling system
  • Fuel injection (gasoline)
  • Fuel system (diesel)
  • Exhaust system
  • Ignition system
  • Transmission
  • Clutch
  • Mechanical gearbox
  • Automatic gearbox
  • Drive shafts
  • Chassis
  • Brake system
  • Car suspension
  • Steering
  • Body
  • Exterior
  • Interior
  • Doors, locks and windows
  • Heating and ventilation
  • Electrical equipment
  • Power devices
  • Equipment and devices
  • Electrical circuits
 
A4(B5, 1994-2001, petrol) 
  • General information
  • Vehicle description
  • Maintenance
  • Power unit
  • Engine repair
  • Turbocharging
  • Exhaust system
  • Cooling system
  • Ignition system
  • Fuel system
  • Motronic injection system
  • MPI and MPFI injection system
  • Transmission
  • Clutch
  • Gearbox and shafts
  • Chassis
  • Steering
  • Car suspension
  • Brake system
  • Wheels and tires
  • Body
  • Heating and ventilation
  • Body parts
  • Electrical equipment
  • Fuses and relays
  • Power devices
  • Lighting and lamps
  • Tools and devices
  • Electrical circuits
 
AudiManual.ru © 2017-2026 · Mobile version · Feedback · Sitemap: EN BG BY UA RS HR RO PL SK HU · Site search · News and articles
80 B2 · 80 B3 petrol · 80 B3 · 80 B4 · 100 C3 diesel · 100 C3 petrol · 100 C3 · 100 C4 petrol · 100 C4 · A3 Type 8L · A4 B5 petrol · A4 B5 · A4 B6 petrol · A4 B6 · A4 B7 · A4 B8 · A6 C4 · A6 C5 · A6 C5 Allroad · A8 D2 · Q5 Type 8R · Q7 Typ 4L · Audi A2 ·
This site uses cookies 🍪. Click the button to accept this fact.