
Table of contents: 2-mass flywheel (models with manual… ↓ Drive disk (models with AT) ↓
2-mass flywheel (models with manual transmission)
1. Remove the manual transmission and clutch pressure plate (see Chapter 6).
2. Mark the sides of the flywheel to avoid confusion during installation, and secure the flywheel from turning using tool #3067 (see illustration).
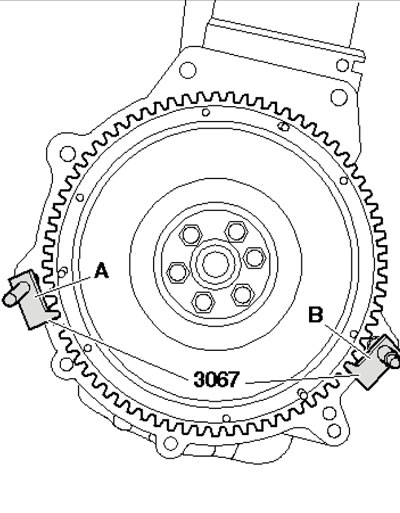
24.2. Securing the flywheel by unscrewing (B) or tightening (A) the fastener
3. Give away the fasteners (see illustration 12.4b) and remove the flywheel.
4. To access the bolts, first turn the flywheel so that the bolts are in the centers of the holes; do not use pneumatic tools to remove bolts.
5. Installation is carried out in the reverse order. Use new bolts to secure the flywheel. Tighten the 22.5 mm flywheel mounting bolts to 60 Nm, then tighten them to an angle of 90°. Tighten the 35.0 mm and 43.0 mm flywheel mounting bolts to 60 Nm, then tighten them to an angle of 180°.
Drive disk (models with AT)
6. Remove AT (see Chapter 7) or engine (see Section 17).
7. Mark the position of the drive disc relative to the engine.
8. Secure the drive disc from turning using the VW558 tool (see illustration), securing it with an M8x45 bolt. Install two M10 nuts between the device and the bolt.
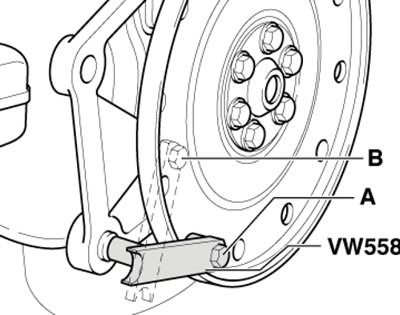
24.8. Securing the drive disc when unscrewing (A) or tightening (B) the fastener
9. Loosen the drive disk fastener and remove it. Remove the compensation washer located behind the drive disk.
10. Install the drive disc with the slotted washer (1 in the illustration). Insert and tighten new bolts (3) to 30 Nm.
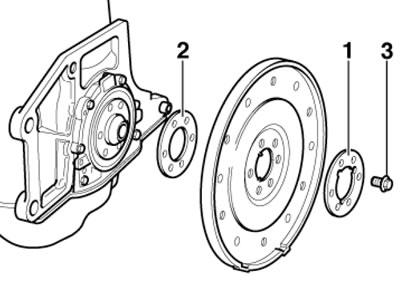
24.10. Drive Disc Installation Details
11. Measure the distance through the three holes (and in the illustration) to the cylinder block. Calculate the average value: it should be 19.5:21.1 mm. If this value is not reached, remove the drive disc and remove (or install) equalizing washer (2 in illustration 24.10), then measure the distance again with the fastener tightened to 30 Nm.
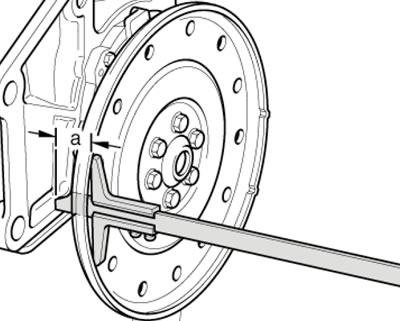
24.11. Determining the installation distance(s)
12. Tighten the drive disc fastener to 60 Nm, then tighten it to an angle of 90°.
13. Install the AT or engine.
(The article was copied from the website: AUDImanual.ru)