
Table of contents: 2.0 TFSI engines ↓ Engines 1.6, 1.8 and 2.0 MPI ↓ Petrol engine 3.0 l ↓ Petrol engine 3.2 l ↓ 4-cylinder diesel engines ↓
2.0 TFSI engines
1. Drain the coolant (see Section 2).
2. Remove the timing belt (see Chapter 2).
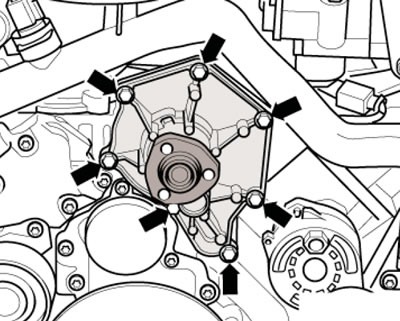
3. Remove the bolts (1 in the illustration) pump mounts (2) and remove the pump. Remove the sealing ring (3).
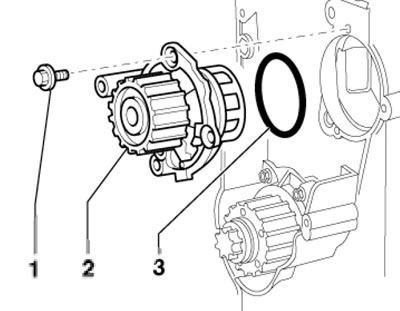
6.3. Removing the water pump of 2.0 TFSI engines
4. Lubricate the new O-ring with coolant and install it.
5. Further installation is carried out in the reverse order of dismantling the components. Tighten the pump mounting bolts with a force of 15 Nm.
Engines 1.6, 1.8 and 2.0 MPI
6. Drain the coolant (see Section 2).
7. Bring the radiator frame to the service position (see Chapter 2).
8. Remove the accessory drive belt and its tensioner, and remove the timing belt from the camshaft sprocket (see Chapter 2). Remove the timing belt center cover.
9. Follow the steps described in paragraphs 3-5.
Petrol engine 3.0 l
10. The water pump installation details are shown in the illustration 5.32.
11. Drain the coolant (see Section 2).
12. Remove the timing belt and camshaft sprockets on the right cylinder head (see Chapter 2).
13. Remove the bolts (1 in the illustration) and remove the bracket with the intermediate roller. Then unscrew the bolts (2) and remove the rear right timing belt cover.
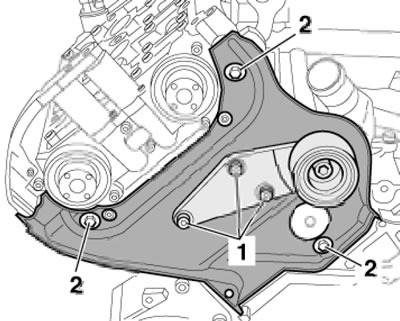
6.13. Fastening the intermediate pulley and timing belt cover
14. Remove the eccentric timing belt adjuster, loosen the nuts (2 in the illustration) fastening the rear right timing belt cover, unscrew the bolts (1) securing the water pump and remove it.
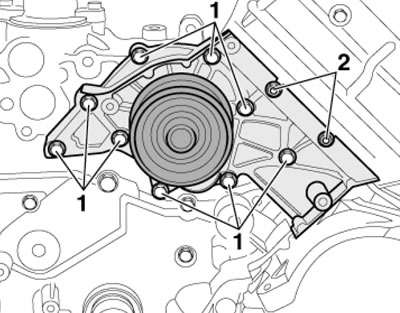
6.14. Water pump mounting
15. Installation is carried out in the reverse order of dismantling the components. Use new sealing rings and gaskets.
Petrol engine 3.2 l
16. The details of the thermostat and water pump installation are shown in the illustration 5.37.
17. Perform the actions described in paragraphs 38-42 Section 5.
18. Remove the accessory drive belt from the water pump (see Chapter 2).
19. While holding the water pump pulley from turning, unscrew its mounting bolts (2 in illustration 5.37).
20. Remove the plug on the intermediate roller, unscrew the bolt (see illustration) and shoot the video.
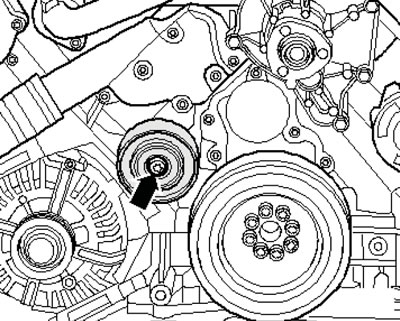
6.20. Intermediate roller mounting bolt
21. Remove the water pump mounting bolts (see illustration) and take it off.
6.21. Water pump mounting
22. Installation is carried out in the reverse order of dismantling the components.
4-cylinder diesel engines
23. Drain the coolant (see Section 2).
24. On models with independent/additional heating, unscrew the bolts (arrows in illustration 5.4 Chapter 2) its exhaust pipe from the soundproofing screen.
25. Release the fasteners (1 and 2 in Illustration 5.5 Chapter 2) and remove the front sound insulation.
26. Remove the front bumper cover (see Chapter 11).
27. Bring the radiator frame to the service position and remove the timing belt (see Chapter 2).
28. Remove the bolts (1 in the illustration) water pump mounts (2) and remove it.
29. Installation is carried out in the reverse order of dismantling the components. Use a new pump sealing ring.