
Table of contents: Support C38 ↓ C43 support with automatic… ↓
Use the illustration to determine the design of the caliper installed on your vehicle.
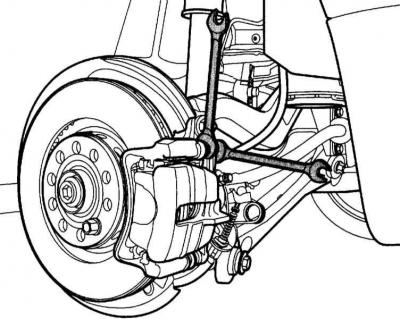
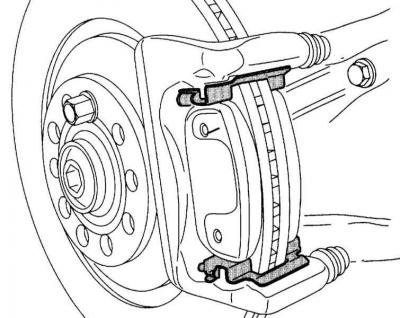
Rear wheel brakes C38
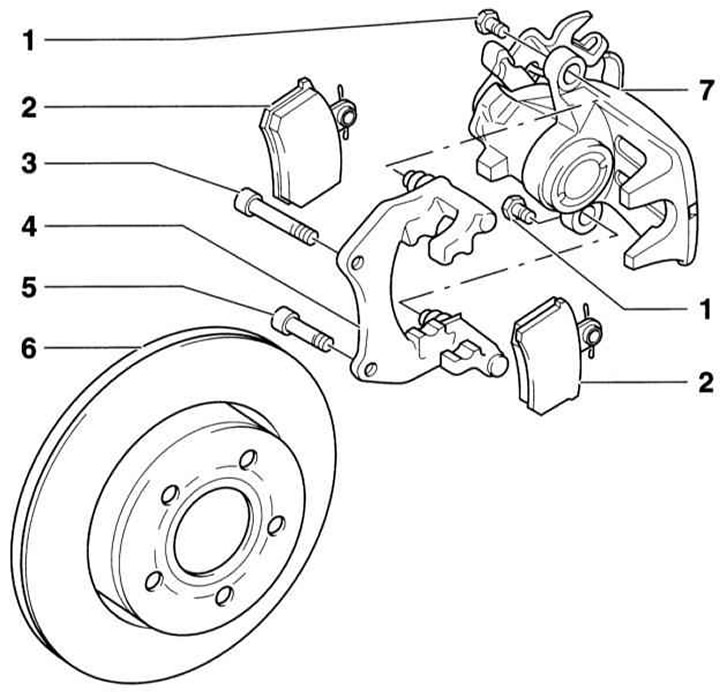
- 1 - Bolt, 35Nm. Self-locking, be sure to replace. When loosening and tightening, it is necessary to hold the guide pins from turning.
- 2 — Brake pads. All 4 pads on one axle must be replaced
- 3 - Bolt with serrated flange, 75Nm. Be sure to replace
- 4 — Guide complete with guide pins and protective cover. Supplied as a spare part with grease. If there is damage to the protective covers, install a repair kit. Use the supplied package of grease to lubricate the guide pins
- 5 - Bolt with serrated flange, 75Nm. Be sure to replace
- 6 — Brake disc. Both brake discs of one axle must be replaced. To remove, first remove the caliper
- 7 — Caliper housing. The hose does not need to be disconnected to replace the brake pad
Support C38
Warning: There are different versions of rear brakes. Therefore, first, using the illustration, find out which version is used on your car.
Removal
Warning: The operation of lifting and installing the vehicle on stands is associated with danger! Therefore, before carrying out the operation, read Section Jacking and towing.
1. Raise and support the vehicle on stands.
2. Mark the direction of rotation on the tire. Loosen the wheel mounting bolts. Raise and place the front of the car on stands and remove the wheel.
Warning: Be sure to follow the instructions in Section In emergency cases.
Caution: If the brake pads are to be reinstalled, they must be marked when removed. Do not interchange the outer and inner brake pads, or switch them from the right to the left wheel. Replace all front brake pads, even if the brake pad on one side has reached the wear limit.
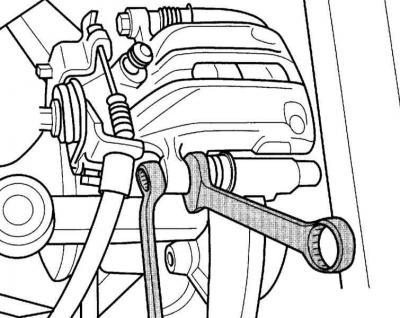
3. Remove the caliper housing mounting bolts. While doing this, hold the guide pins from turning.
4. Remove the caliper housing and take out the brake pads.
Installation
Warning: When the brake pads are removed, do not press the brake pedal, otherwise the piston may be pressed out of the housing. In this case, it is necessary to remove the caliper and piston as a set and hand them over to a service station for repair.
1. Press the piston into the housing.
Caution: Never use a conventional tool or hammer handle to push on the piston, as this may damage the parking brake adjustment mechanism.
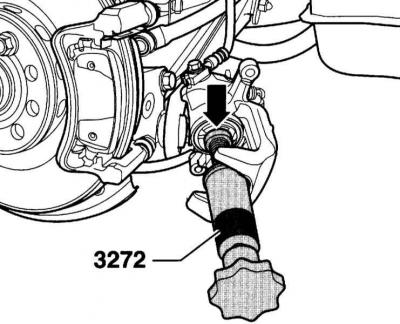
2. To unscrew, install the special device AUDI-3272 so that its flange is adjacent to the caliper. Turn the handle to the left until it stops. Turn the spindle to the right and unscrew the piston.
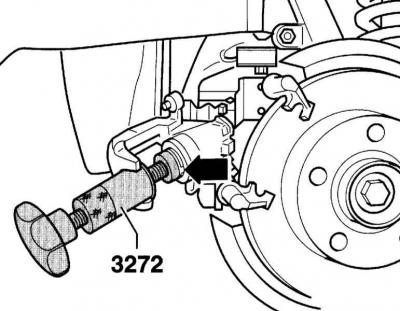
3. If there is no special device available, then cut a metal strip accordingly and insert it into both grooves of the piston. Turn the piston with force in the opposite direction.
Caution: When the piston turns, brake fluid is squeezed out of the brake cylinder into the reservoir. Monitor the fluid level in the reservoir and suck it out if necessary.
Warning: Use a plastic bottle intended for this purpose only to suck out brake fluid. Do not use a drinking bottle! Brake fluid is poisonous and should never be sucked out by mouth through a hose. Use a siphon for this. When replacing brake pads, the brake fluid level in the reservoir should not exceed the MAX mark, as the fluid expands when heated. Leaking fluid gets on the master cylinder, destroys its coating and causes corrosion.
Warning: Use only alcohol to clean the brakes. Clean the guide surface and the seat of the pads in the housing shaft with a rag. Never use a tool with sharp edges for this.
4. Install the brake pads back into place.
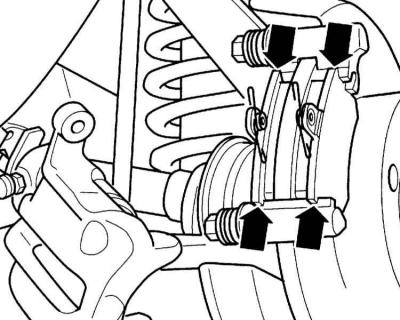
5. Install the caliper body and secure it with new self-locking bolts to torque 35Nm.
Caution: The repair kit contains self-locking bolts that must be installed.
6. Observing the direction of rotation, secure the wheels. Lower the car onto the wheels and only then tighten the mounting bolts crosswise with a torque of 120Nm.
Warning: While standing, press the brake pedal hard several times until you feel resistance. This will cause the brake pads to adhere to the disc and take their working position.
7. Check the brake fluid in the reservoir, if necessary, add fluid to the MAX mark.
8. Carefully allow the new brake pads to break in. To do this, brake the car several times from 80 to 40 km/h, pressing the brake pedal lightly. Allow the brakes to cool between braking.
Warning: After installing a new brake pad, it must be run in. To do this, do not brake abruptly for the first 200 km.
C43 support with automatic installation
Warning: There are different versions of rear brakes. Therefore, first determine with the help of the illustration which version your car has.
Warning: This section only covers differences relative to the C38 rear brake. All safety precautions apply.
Removal
1. Secure the brake disc with one wheel mounting bolt.
2. Remove the bolts from the caliper body using a wrench to hold them in place.
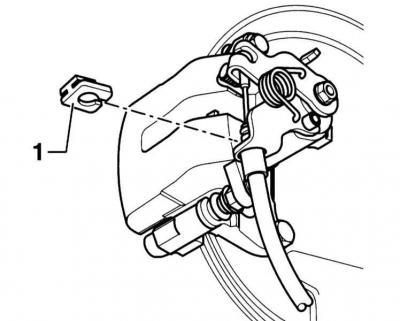
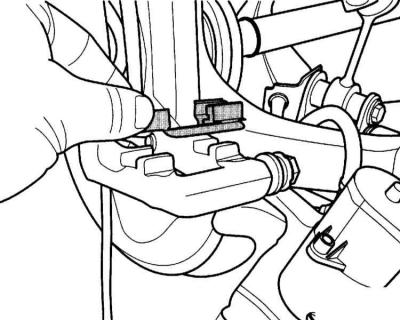
3. Release the parking brake lever. Remove the lock washer (1) of the brake cable from the holder and disconnect the cable at the caliper.
4. Remove the caliper body and tie it with wire to the suspension so that the brake hose is not stretched or damaged.
5. Remove the brake pads.
6. Remove the guide brackets.
Installation
1. Screw in the piston by turning it clockwise using special tool 3272. The operation requires force.
2. Install the brake shoe retaining springs in place.
3. Install the brake pads. Make sure that the brake pads are seated on their bearing surfaces.
4. Install the caliper body in place and tighten the new mounting bolts to torque 35Nm.
Caution: Install the 4 self-locking bolts provided in the repair kit. Be careful not to twist the brake hose.
5. Connect the parking brake cable to the caliper and secure with a lock washer.

6. Adjust the parking brake, refer to Section Adjusting the parking brake.