
Table of contents: Checking the belt surface ↓ Checking the belt tension ↓ Replacing and tensioning the poly… ↓
The poly V-belt, with longitudinal ribs, is wider than the old V-belts. This belt drives all the important units: the generator, the oil pump for the power steering, the coolant pump and the air conditioning compressor. A belt break would mean the most dangerous accident for the engine, so the belt is made very strong. It is not prescribed to check the belt, but it is a good idea to look at it sometimes, since the belt with a V-shaped cross-section is subject to quite high loads. The belt runs over pulleys, i.e. over wheels with a deep groove located around the circumference. The side walls of the groove touch the sides of the belt. Due to this, the force is transmitted, for this the belt must be taut. The belt tension should not be too strong, otherwise the bearings of the driven units will be destroyed. However, the tension should not be too weak, otherwise the belt will slip with a terrible squeal. Over time, the sides of the poly V-belt wear out, the belt sinks deeper into the groove, and the belt tension decreases. The change in tension is corrected by an automatic tensioner, but it is still worth checking the belt.
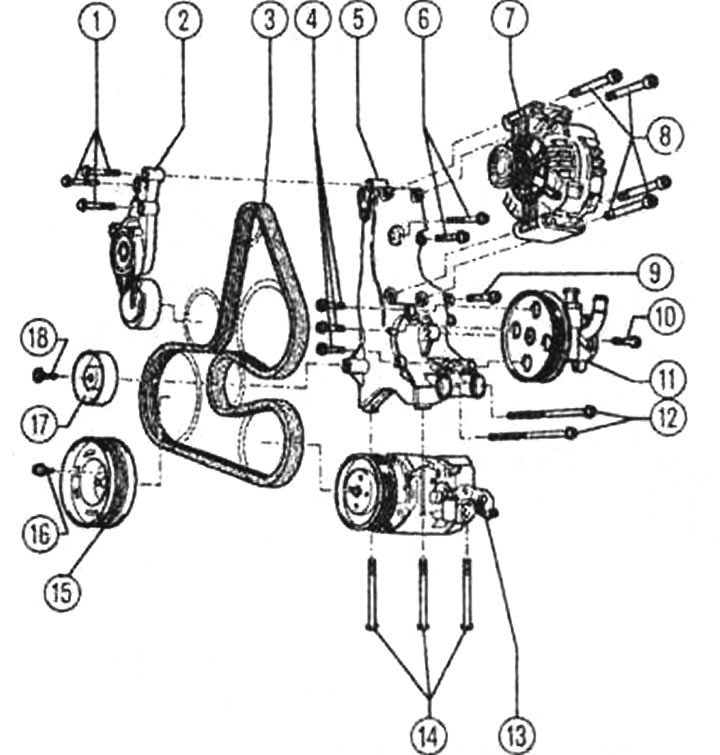
Poly V-belt for 4-cylinder engines: 1, 4, 6, 8, 9, 10. 12 and 14 - screws (20, 25 and 40 Nm), 2 - tension roller, 3 - poly V-belt, 5 - holder, 7 - generator, 11 - vane pump (for power steering), 13 - Air Conditioning Compressor, 15 - Vibration Damper/Pulley, 16 - Flange Screws, 17 - Guide Roller (mounted on a holder for the generator, vane pump and air conditioning compressor), 18 - special screw for guide roller (25 Nm).
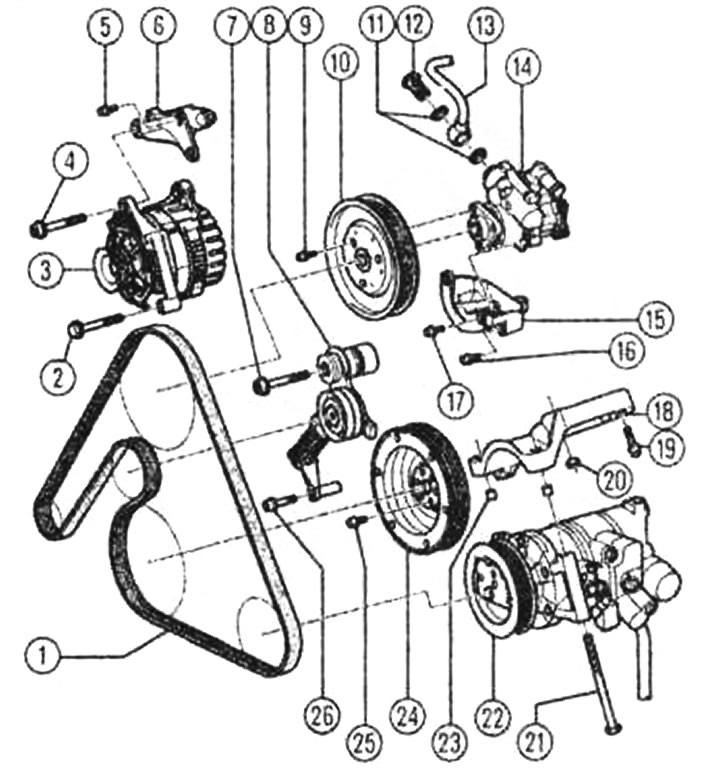
Poly V-belt for 6-cylinder engine: 1 - poly V-belt, 2, 4, 5, 7, 9, 16, 17, 19, 20, 21, 25, 26 - screws(23, 25, 40 and 45 Nm), 3 - generator, 6 - generator holder, 8 - tensioner for poly V-belt, 10 - pulley for drive pump, 11 - sealing ring, 12 - hollow screw (40 Nm), 13 - power steering pressure pipe, 14 - power steering vane pump, 15 - vane pump holder, 18 - air conditioning compressor holder, 22 - air conditioning compressor, 23 - two bushings for air conditioning compressor, 24 - vibration damper.
Checking the belt surface
1. Turn the engine over several times, this is the only way you can see all the surfaces of the V-belt. Often there is one, but deep crack on the belt, when checking this crack can get right on the pulley.
2. If, when checking the V-belt, uneven traces of wear are found on the side surfaces of the belt, a porous or frayed surface, or even cracks in the belt, the V-belt must be replaced with a new belt or a belt in good condition.
Checking the belt tension
1. Press firmly with your thumb (with a force of approximately 5 kg) on a stretched belt in the middle between two pulleys. The belt should deflect no more than 1.5 cm.
2. Press the belt with more force. The belt should bend with resistance, and the tension roller should move to the side. When you release the belt, the roller returns to its previous position and tightens the belt. If the belt lies loosely on the wheels, this indicates a defective tension roller. The second possible reason: You may have forgotten to remove the locking pin from the tensioner.
Replacing and tensioning the poly V-belt
4-cylinder engines
1. Dismantling: Using a felt-tip pen or wax pencil, draw an arrow on the belt in the direction of belt rotation. When viewed from the belt side, the engine rotates to the right, i.e. clockwise. Marking the direction of rotation is important if the same belt is to be installed later. Installing in the opposite direction increases belt wear and may cause the belt to break.
Turning the tensioner
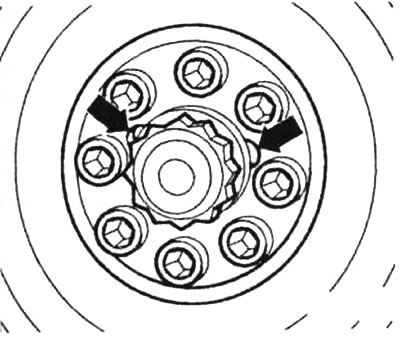
2. To loosen the poly V-belt, turn the tensioner (shown by arrow).
3. Using a marking mandrel (for example, T10060) lock the tensioner in the place indicated by the arrow.
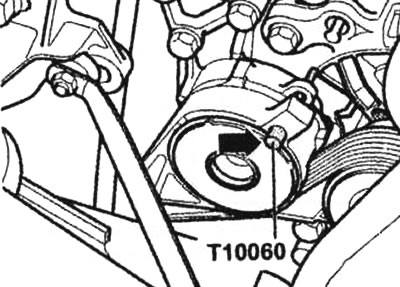
Locking the tensioner
4. Remove the poly V-belt.
5. The belt is installed in the reverse order. Pay attention to the reliability of the installation of all units (generator, vane pump, air conditioning compressor). Pay attention to the direction of the belt movement, as well as the correct placement of the belt on the pulleys. The belt is first placed on the air conditioning compressor.
6. Start the engine and check the belt operation.
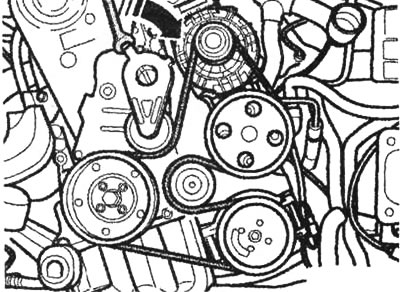
Belt routing in 4-cylinder ALZ, ALT and AVJ engines
6-cylinder engines
1. Dismantling: Remove the top engine cover. Using a felt-tip pen or wax pencil, draw an arrow on the belt in the direction of belt rotation. When viewed from the belt side, the engine rotates to the right, i.e. clockwise. Marking the direction of rotation is important if the same belt is to be installed later. Installing in the opposite direction increases belt wear and may cause the belt to break.
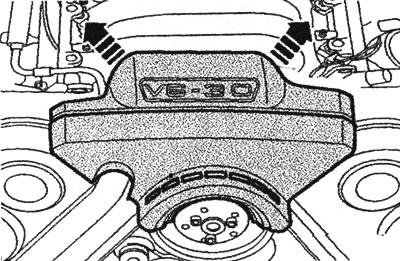
Removing the engine cover
2. To loosen the belt, use the lever (it is recommended to use lever 3299 with attachment 3299/1) turn the tensioner for the poly V-belt in the direction of the arrow.
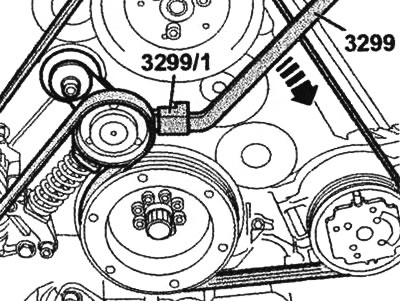
Turning the tensioner
3. Remove the belt from the power steering pump pulley.
4. Install the belt in the reverse order. First, place the poly V-belt on the crankshaft pulley. The belt routing ends on the tension roller. Make sure the belt is seated correctly on the pulleys. Start the engine and check the belt movement.

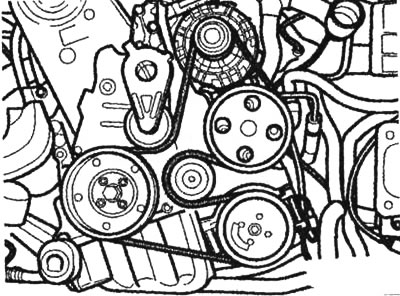
Belt routing in 6-cylinder ASN engines: 1 - generator, 2 - poly V-belt, 3 - power steering pump, 4 - air conditioning compressor, 5 - crankshaft (vibration damper), 6 - tension roller
If the vibration damper was removed, then during installation you should pay attention to the following:
4-cylinder engines
The lock mounting bracket is in the service position, the poly V-belt is removed. The vibration damper (pulley) must be installed using original screws only. Installation is possible in only one position. The hole (arrow) of the vibration damper must be above the protrusion on the toothed belt wheel.
Vibration damper (pulley) for ALZ, AVJ and ALT engines
6-cylinder engine
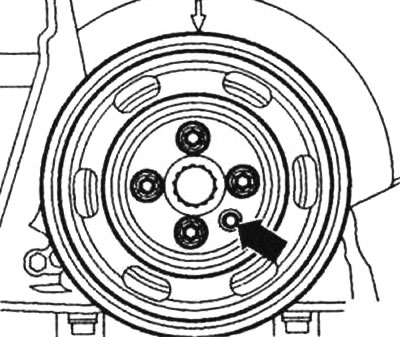
The lock mounting bracket is in the service position, the poly V-belt is removed. (To remove the vibration damper, it is not necessary to loosen the central screw). Installation using original screws only. The notches (arrows) in the vibration damper must match the locking protrusions on the toothed belt wheel.
Vibration damper for ASN engines