Repair Chevrolet Repair Toyota Repair Honda Repair AvtoVAZ Repair Mercedes-Benz Repair BMW Repair Opel
Home  |  Contacts  |  Sitemap  |    
English Русский
Български
Беларускі
Український
Српски
Hrvatski
Română
Polski
Slovenský
Magyar
AudiManual.ru


  • AUDI 80
  • AUDI 100
  • AUDI A3
  • AUDI A4
  • AUDI A6
  • AUDI A8
  • AUDI Q
  • OTHER
  • ARTICLES
B8 (2007-2015) B7 (2004-2008) B6 (2000-2006) B6 (2000-2006, petrol) B5 (1994-2001) B5 (1994-2001, petrol)

Sachs clutch repair (Audi A4 B8)

  • Home
  • Audi A4
  • B8 (2007-2015)
  • Transmission
  • Manual gearbox 0B1
  • Sachs clutch repair
            0
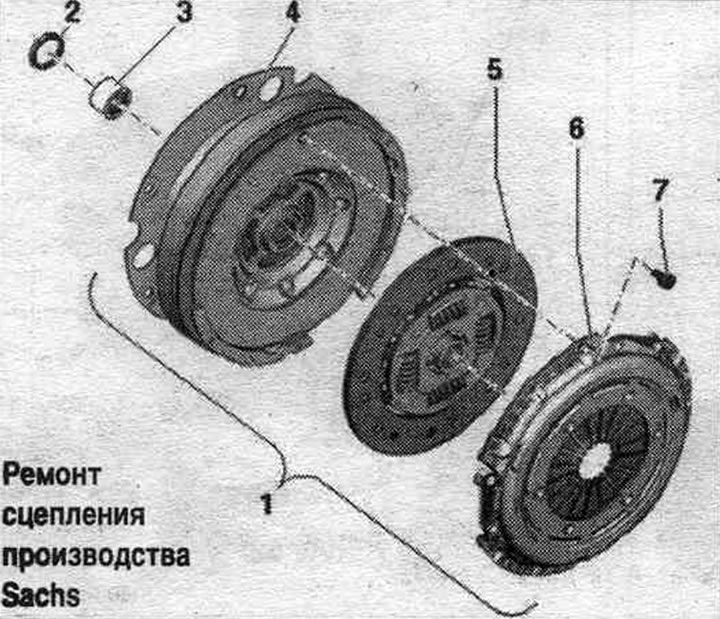
For this clutch, the pressure plate and clutch disc may only be replaced as an assembly. Observe the instructions regarding friction clutches.

1. Clutch module.

1. Clutch module.
2. Lip seal for dual mass flywheel.
3. Needle bearing for dual mass flywheel: check and replace if necessary. If the drive shaft is damaged, always replace the needle bearing. Depending on the design, needle bearings with a full set of rollers or needle bearings with every fourth roller missing are installed. This is not a defect of the needle bearing.
4. Dual mass flywheel with transfer plate: ensure that the centering pins are securely installed; there should be no grooves, oil or grease on the mating surface of the clutch lining.
5. Clutch driven disc: installation position: the inscription "Gearbox side" faces the pressure plate; if available: damping package (coil springs) facing the pressure plate.
6. Pressure plate: self-aligning; replace the pressure plate and clutch disc only together; check the pressure plate for warpage; check the ends of the membrane spring; check springs and riveted joints; checking the steel ring; there should be no grooves, oil or grease on the mating surface of the clutch lining.
7. Bolt: 22 Nm and 90° turn; always subject to replacement; for fastening the pressure plate on the dual mass flywheel; loosen or tighten according to installation instructions.


The distinctive feature of the manufacturer Sachs


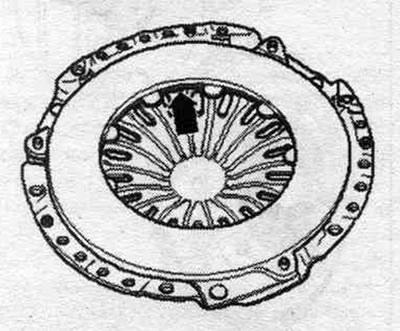
Pressure plate with "arrow" position sensor or Sachs inscription.
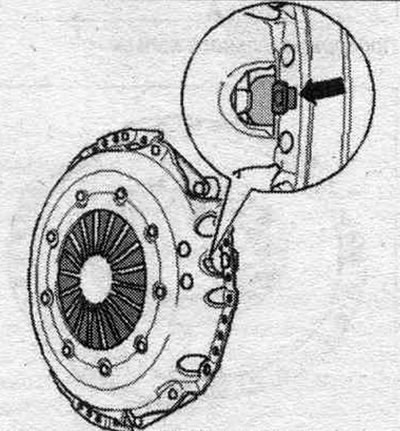
Pressure plate with «arrow» position sensor or Sachs inscription.


Check the plastic disc "A" of the dual mass flywheel from Sachs


The dual-mass flywheel must be equipped with a "white" plastic disc "A." It should be located under the copper-colored sliding washer "B" and above the radial shaft seal "C." If the "white" plastic disc "A" is missing, the dual-mass flywheel must be replaced. Measuring the degree of wear of the plastic disc "A".
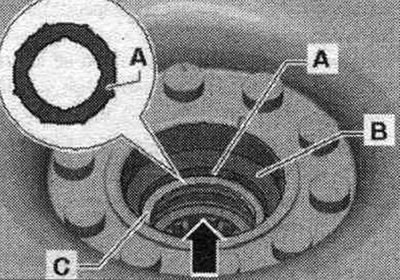
The dual-mass flywheel must be equipped with a «white» plastic disc «A.» It should be located under…


Measuring the wear of a plastic disc in a dual mass flywheel manufactured by Sachs


Clean the copper-coloured sliding washer "A" and the radial shaft seal "B" at the measuring point. Press sliding washer "A" toward radial shaft seal "B." Using a depth gauge, measure the distance "x" from the top of copper-colored sliding washer "A" to the top of radial shaft seal "B" along the outer edge. Dimension "x" min. 2.5 mm. If dimension "x" is less than 2.5 mm, the dual mass flywheel must be replaced.
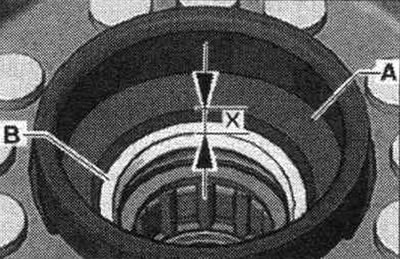


Clean the copper-coloured sliding washer «A» and the radial shaft seal «B» at the measuring point.…


Checking the needle bearings in the dual mass flywheel on a vehicle with a 4-cylinder TDI engine (except for the 125 kW TDI engine)


Depending on the design, needle bearings with a full set of rollers or needle bearings with every fourth roller missing are installed. This is not a defect of the needle bearing. Needle bearings where every 4th "arrow" roller is missing must be replaced. New needle bearings have a full set of rollers. On all other vehicles, the absence of the fourth roller is not a defect of the needle bearing. Do not replace the needle bearing!
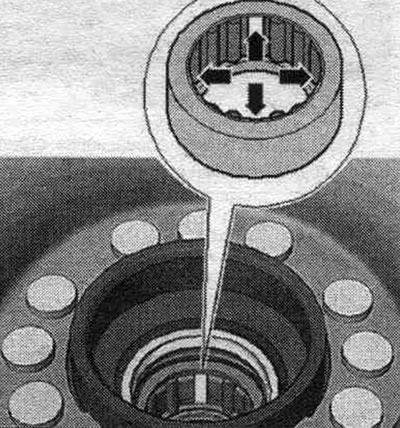
Depending on the design, needle bearings with a full set of rollers or needle bearings with every…


Check the pressure plate for deformation, cracks and signs of burning
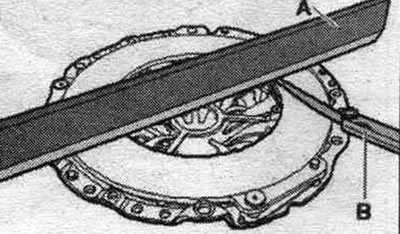


A. Lekalo. V. Template sheet for the feeler gauge. Deformation of the clutch pressure plate is…

A. Lekalo. V. Template sheet for the feeler gauge. Deformation of the clutch pressure plate is permissible within 0.8 mm.


Checking the ends of the membrane spring
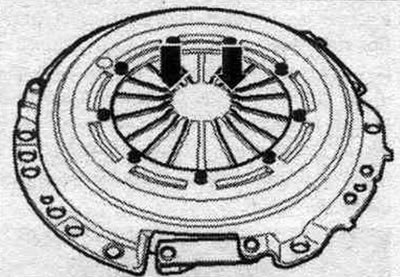


Permissible wear is max. 0.3 mm.

Permissible wear is max. 0.3 mm.


Check springs and riveted joints


The tension springs are normal. The slight bends in the outer area of the "arrow A" are a sign of the series.
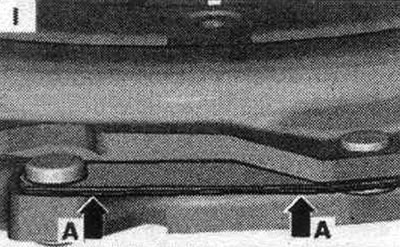
The tension springs are normal. The slight bends in the outer area of the «arrow A» are a sign of…


Damaged springs Pressure plates with bent or cracked springs "arrow B" must be replaced.
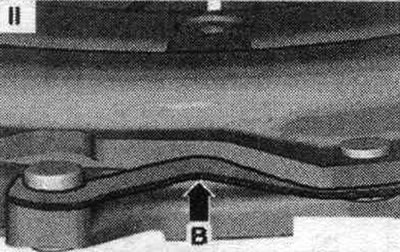
Damaged springs Pressure plates with bent or cracked springs «arrow B» must be replaced.


Check the riveted connections "arrow B" of all springs "arrow A" for tightness.


Replace pressure plates with loose riveted connections "arrow B".
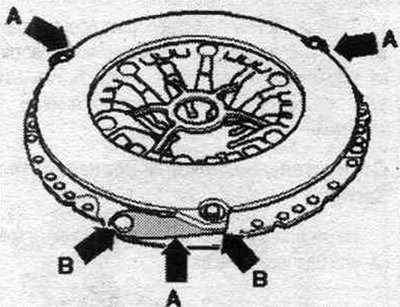
Replace pressure plates with loose riveted connections «arrow B».


Checking the steel ring


Checking the steel ring


Check the steel ring in the pressure plate "arrow" for damage. Replace pressure plates with a broken steel ring.

Removal and installation the clutch disc and pressure plate manufacturer Sachs


Remove the clutch module.
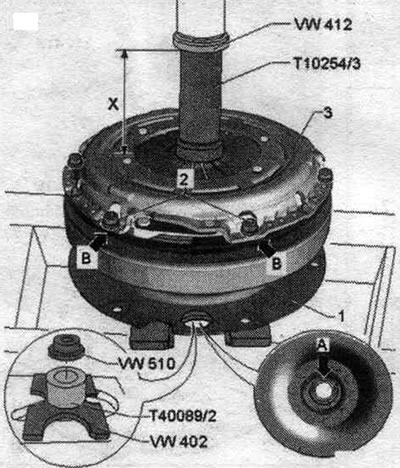
Remove the clutch module.


Clutch pressure plate. Risk of damage to the pressure plate and dual mass flywheel. Pressure plate "3" may only be removed and installed in a pre-compressed state. Pre-compressed pressure plates are deformed when bolts "2" are loosened or tightened, which leads to jerking when starting off. To compress pressure plate "3" using a hydraulic press, the dual-mass flywheel may only be supported by the sliding washer "arrow A." Supporting the dual-mass flywheel against transfer plate "1" will damage it (deformation). In this case, it is necessary to replace the dual mass flywheel. Install the clutch module so that the pressure plate "VW 510" is adjacent to the sliding washer "arrow A" in the dual mass flywheel. Install mont. device "T10254/3" on the spring tongues of the pressure plate "3" and press on them using a press. Compression stroke - dimension "x" 8...9 mm. Unscrew all 6 bolts "2" and release the press. Remove pressure plate "3" and clutch driven disc.


Installation


Installation in reverse order. Check the clutch pressure plate for deformation. Center the clutch driven disc using the T40171 centering tool. Install the pressure plate onto the mounting pins.
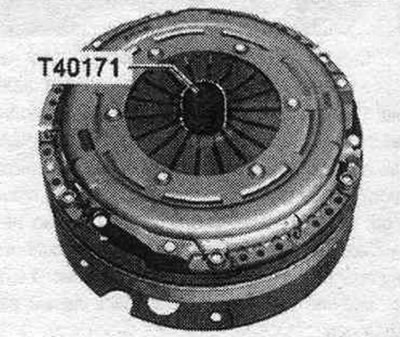
Installation in reverse order. Check the clutch pressure plate for deformation. Center the clutch…


Clutch disc mounting position: damper package (coil springs) or an inscription "Getriebeseite" (side of the checkpoint) must face the gearbox. Install the clutch module so that the "VW 510" pressure plate is flush with the "arrow A" sliding washer in the dual mass flywheel.
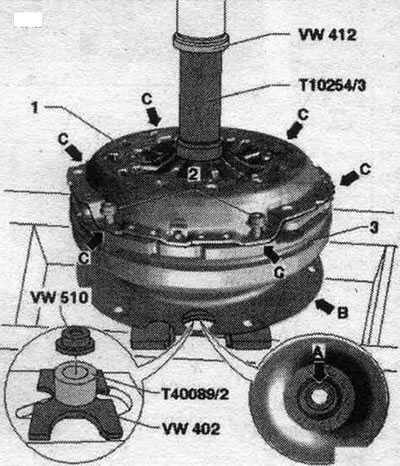
Clutch disc mounting position: damper package (coil springs) or an inscription «Getriebeseite»…


Clutch pressure plate. Risk of damage to the dual mass flywheel. To compress pressure plate "1" using a hydraulic press, dual-mass flywheel "3" may only be supported by the sliding washer "arrow A." Supporting the dual-mass flywheel against the transfer plate "arrow B" will damage it (deformation). In this case, it is necessary to replace the dual mass flywheel. Install mont. device "T10254/3" over the centering mandrel "T40171". Apply pressure with the press until the pressure plate "1" lies against the dual-mass flywheel "3" "arrows C". Screw in all 6 bolts "2" one after the other and tighten to the specified torque. Release the pressure from the press. Install the clutch module.

[The original article is available on the website AudiManual.ru]
The article was checked by auto expert Timur Bazhenov
This article is available at russian, bulgarian, belarusian, ukrainian, serbian, croatian, romanian, polish, slovak, hungarian

Share information:
Previous articles
Audi A4 B8: Manual gearbox 0B1
Next articles

Clutch module general information
Hydraulic clutch system — removal and installation
Clutch drive repair
Checkpoint markings and location at the checkpoint
LuK clutch repair
Replacement of the dual mass flywheel needle bearing…
Clutch release mechanism — inspection, disassembly and assembly
Gear shift mechanism drive and handle with gear shift lever cover


Similar articles on other Audi car models:
Engine — preparation for starting after repair Audi 80 B3 (1986-1991, petrol)
Clutch repair Audi 100 C4 (1990-1994)
Changing the oil in the Haldex clutch of all-wheel drive models Audi A3 Type 8L (1996-2003)
Clutch drive disc Audi A6 C5 (1997-2004)
General information about the clutch Audi A8 D2 (1994-2002)
Valve mechanism repair Audi Q5 Type 8R (2008-2017)
Clutch drive repair Audi A2 (1999-2005)
Link to this page in different formats


Visitor comments

No comments yet


How much will 31 + 46 =


A4(B8, 2007-2015) 
  • General information
  • Operating instructions
  • Power unit
  • Petrol engines 1.8 l
  • Petrol engines 1.8/2.0 l
  • Petrol engines 3.0 l
  • Petrol engines 3.2 l
  • Fuel system (petrol)
  • Diesel engines 2.0 l (CA*)
  • Diesel engines 2.0 l (CJCB)
  • Diesel engines 2.7/3.0 l
  • Diesel engines 3.0 l
  • Fuel system (diesel)
  • Transmission
  • Manual gearbox 0B1
  • Manual gearbox 0B2
  • Manual gearbox 0B3
  • Manual gearbox 0B4
  • Automatic transmission 0B5
  • Automatic transmission 0B6
  • Automatic transmission 0AW
  • All-wheel drive system
  • Chassis
  • Front suspension
  • Rear suspension
  • Brake system
  • Steering system
  • Body
  • Exterior
  • Interior
  • Seats
  • Doors, locks and windows
  • Security system
  • Heating and air conditioning
  • Electrical equipment
  • Audio system
  • Power devices
  • Equipment and devices
  • Lighting and lamps
  • Electrical circuits
 
A4(B7, 2004-2008) 
  • General information
  • Introduction to manual
  • Troubleshooting
  • Operating instructions
  • Maintenance
  • Power unit
  • Petrol engines 2.0 (ALT)
  • Petrol engines 2.0 (TFSI)
  • Petrol engines 1.8 (MPI)
  • Diesel engines
  • Cooling system
  • Air conditioner
  • Fuel and exhaust system
  • Ignition system
  • Starting and charging
  • Transmission
  • Clutch
  • Manual gearbox
  • Automatic gearbox
  • Drive shafts
  • Chassis
  • Brake system
  • Front suspension
  • Rear suspension
  • Steering
  • Body
  • Exterior
  • Interior
  • Electrical equipment
  • Equipment and devices
  • Lighting and signaling
  • Windscreen wipers and washers
  • Electrical diagrams
  • Electrical diagrams (since 2007)
 
A4(B6, 2000-2006) 
  • General information
  • Vehicle Description
  • User manual
  • Maintenance
  • Power unit
  • Gasoline engine
  • Diesel engine
  • Lubrication system
  • Cooling system
  • Supply system
  • Injection system
  • Exhaust system
  • Ignition and control
  • Transmission
  • Gear box
  • Clutch and drive shafts
  • Chassis
  • Brake system
  • Car suspension
  • Steering
  • Body
  • Heating and ventilation
  • Exterior (external elements)
  • Interior (internal elements)
  • Electrical equipment
  • Power devices
  • Lighting and appliances
  • Electrical circuits
 
A4(B6, 2000-2006, petrol) 
  • General information
  • Introduction to the guide
  • Car care
  • Power unit
  • Engine repair
  • Lubrication system
  • Cooling system
  • Injection and control system
  • Ignition system
  • Power and exhaust system
  • Transmission
  • Clutch and drive shafts
  • Car gearbox
  • Chassis
  • Suspension and wheels
  • Steering
  • Brake system
  • Body
  • Interior
  • Exterior
  • Electrical equipment
  • Equipment and devices
  • Lighting and signaling
  • Power devices
  • Electrical circuits
 
A4(B5, 1994-2001) 
  • General information
  • Introduction to the guide
  • Car care
  • Maintenance (gasoline)
  • Maintenance (diesel)
  • Power unit
  • Gasoline engines
  • Diesel engines
  • Engine overhaul
  • Cooling system
  • Fuel injection (gasoline)
  • Fuel system (diesel)
  • Exhaust system
  • Ignition system
  • Transmission
  • Clutch
  • Mechanical gearbox
  • Automatic gearbox
  • Drive shafts
  • Chassis
  • Brake system
  • Car suspension
  • Steering
  • Body
  • Exterior
  • Interior
  • Doors, locks and windows
  • Heating and ventilation
  • Electrical equipment
  • Power devices
  • Equipment and devices
  • Electrical circuits
 
A4(B5, 1994-2001, petrol) 
  • General information
  • Vehicle description
  • Maintenance
  • Power unit
  • Engine repair
  • Turbocharging
  • Exhaust system
  • Cooling system
  • Ignition system
  • Fuel system
  • Motronic injection system
  • MPI and MPFI injection system
  • Transmission
  • Clutch
  • Gearbox and shafts
  • Chassis
  • Steering
  • Car suspension
  • Brake system
  • Wheels and tires
  • Body
  • Heating and ventilation
  • Body parts
  • Electrical equipment
  • Fuses and relays
  • Power devices
  • Lighting and lamps
  • Tools and devices
  • Electrical circuits
 
AudiManual.ru © 2017-2026 · Mobile version · Feedback · Sitemap: EN BG BY UA RS HR RO PL SK HU · Site search · News and articles
80 B2 · 80 B3 petrol · 80 B3 · 80 B4 · 100 C3 diesel · 100 C3 petrol · 100 C3 · 100 C4 petrol · 100 C4 · A3 Type 8L · A4 B5 petrol · A4 B5 · A4 B6 petrol · A4 B6 · A4 B7 · A4 B8 · A6 C4 · A6 C5 · A6 C5 Allroad · A8 D2 · Q5 Type 8R · Q7 Typ 4L · Audi A2 ·
This site uses cookies 🍪. Click the button to accept this fact.