
Table of contents: Camshaft chain drives ↓ Removal and installation camshaft… ↓
Camshaft chain drives
Left camshaft timing chain
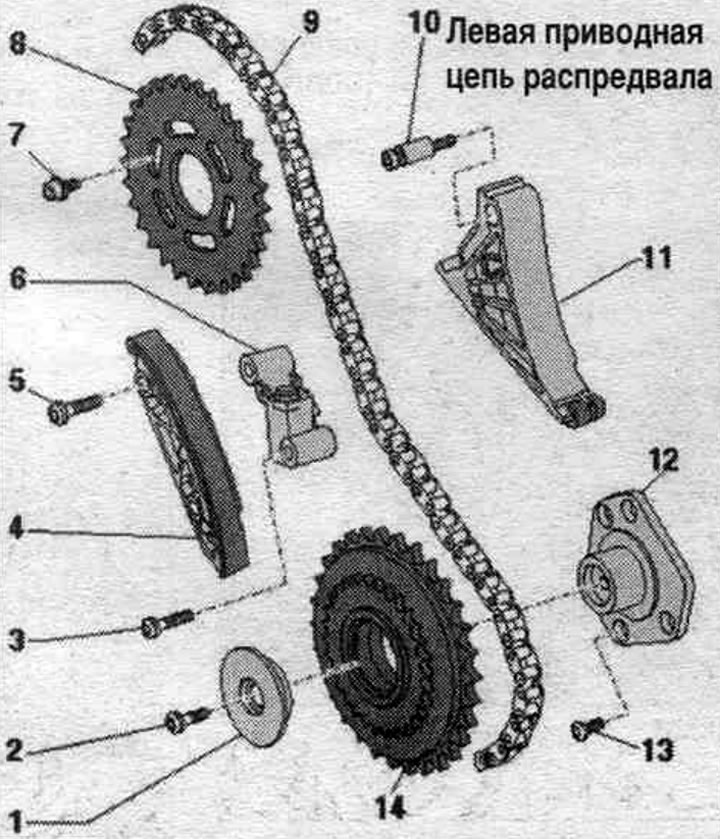
1. Crankshaft axial fixing insert: for chain drive sprocket.
2. Bolt.
3. Bolt: replace; 5 Nm + 90°.
4. Stabilizer bar: install in the proper position.
5. Bolt: replace: 5 Nm + 90°.
6. Chain tensioner: for camshaft drive chain on the left.
7. Bolt: 23 Nm.
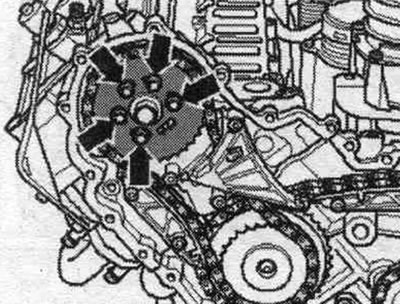
8. Intake camshaft timing chain sprocket; mounting position: with the printed side facing forward.
9. Left camshaft timing chain: remove the chain from the camshafts; before removing, mark the direction of movement with paint.
10. Bolt: with sleeve; replace; 5 Nm + 90°.
11. Tensioner bar.
12. Support bracket: for chain drive sprocket.
13. Bolt.
14. Sprocket: for camshaft drive chain on the left.
Right camshaft timing chain
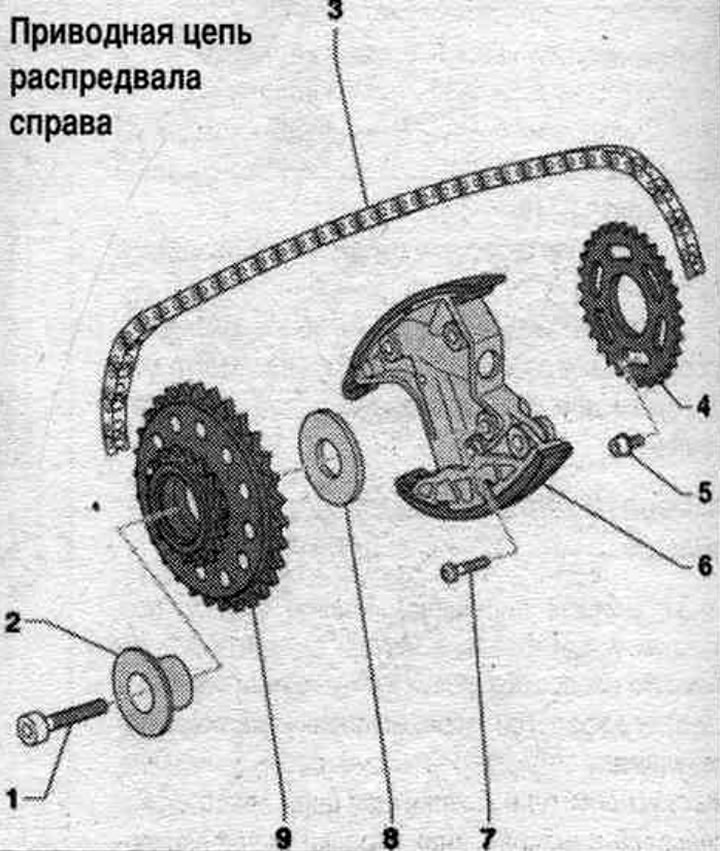
1. Bolt.
2. Support pin: for chain drive sprocket.
3. Right camshaft timing chain: remove the chain from the camshafts; before removing, mark the direction of movement with paint.
4. Intake camshaft timing chain sprocket; mounting position: with the printed side facing forward.
5. Bolt: 23 Nm.
6. Chain tensioner: for the camshaft drive chain on the right.
7. Bolt: replace; 5 Nm + 90°.
8. Crankshaft axial locking insert: for chain drive sprocket.
9. Sprocket: for camshaft drive chain on the right.
Removal the chains from the camshafts
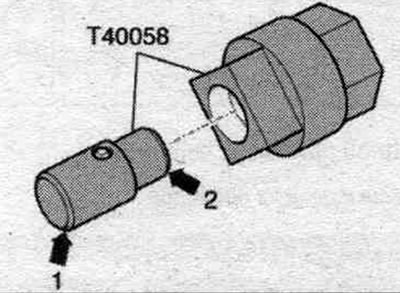
The engine and gearbox are installed. If work is performed on only one of the cylinder heads, then the timing chain cover of the other cylinder head does not need to be removed. Remove the timing chain cover. Insert the guide pins of the "T40058" adapter as shown below: the large diameter "arrow 1" faces the engine, the small diameter "arrow 2" faces the adapter.
Risk of damage due to jumping of the camshaft drive chain. Rotate the crankshaft only in the direction of engine rotation "arrow". Turn the crankshaft with the adapter "T40058" to the "TDC" position.

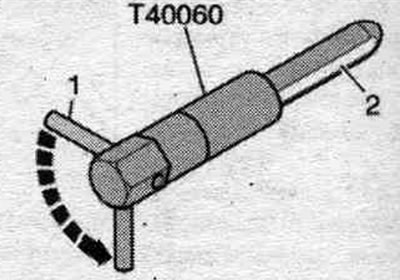
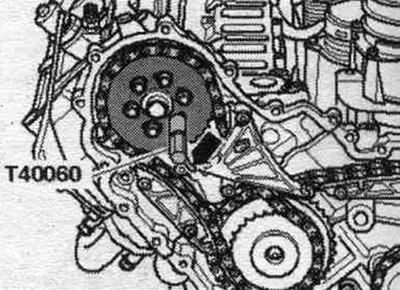
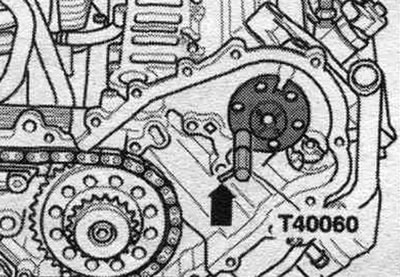
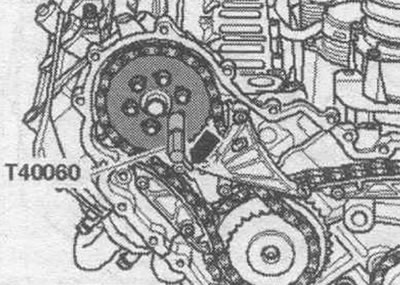
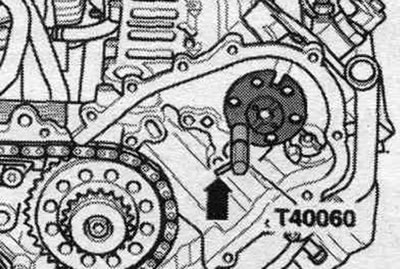
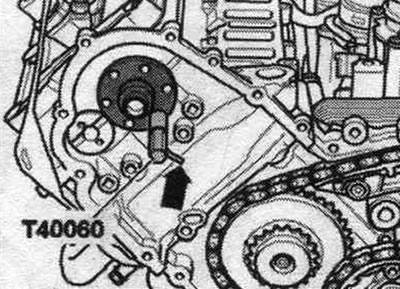
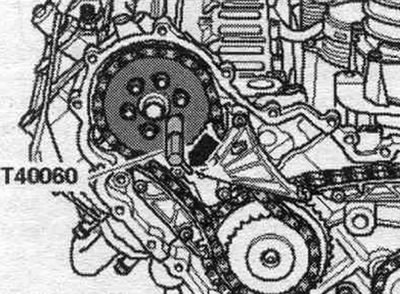
The "T40060" locating pin has a "2" chamfer, which facilitates its installation with a slight shift in the camshaft and cylinder head fixing holes. First, insert the adjusting pin so that pin "1" is perpendicular to the camshaft axis. For correct installation at "TDC", it is necessary to turn pin "1" by 90° "arrow" so that it is vertical in relation to the camshaft axis.
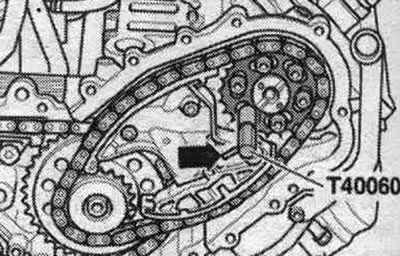
Make sure that the camshafts of both cylinder heads are in the "TDC" position: the camshafts should be secured with "T40060" pins; the "arrow" pin in the "T40060" installation pin must be positioned perpendicular to the axis of symmetry of the camshaft at cylinder bank 1 (right).
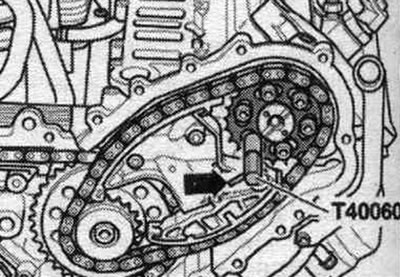
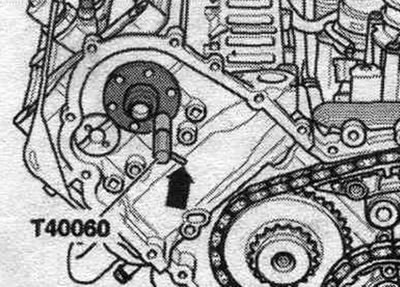
The "arrow" pin in the "T40060" installation pin must be positioned perpendicular to the axis of symmetry of the camshaft at cylinder bank 2 (left).
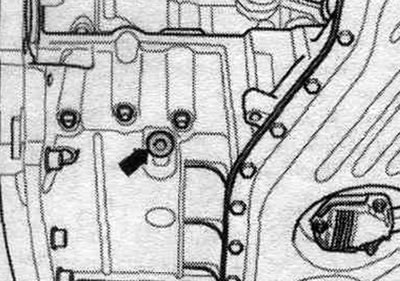
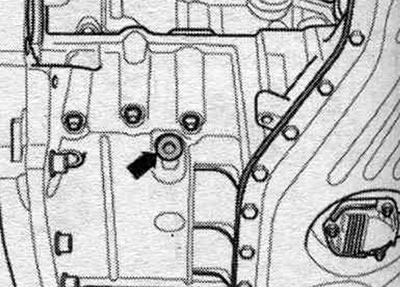
Unscrew the threaded plug "arrow" of the upper part of the oil. pallet, use a socket wrench with a ball head for this.
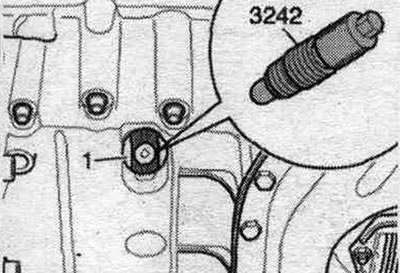
Screw the fixing bolt "3242" into the hole with a torque of 20 Nm, if necessary, slightly turn the crankshaft in both directions to fully center the bolt.
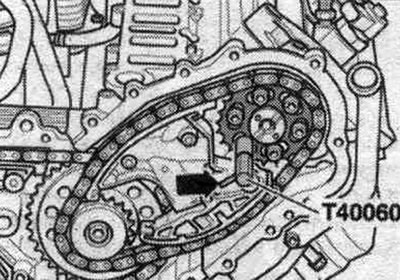
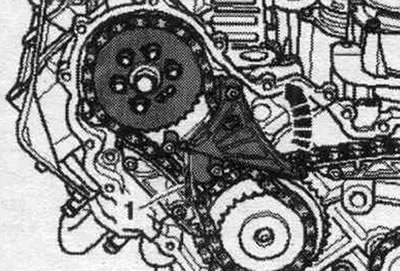
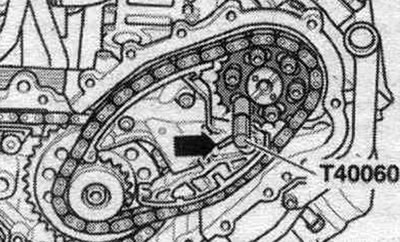
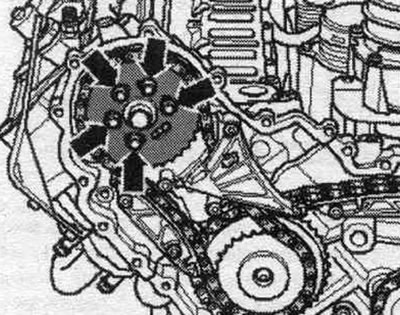
For protection against cuts, wrap the cutting edges of the 3.3 mm diameter drill with insulating tape. Push the left camshaft chain tensioner shoe in the "direction of the arrow" and lock the tensioner with the 3.3 mm diameter drill "pos. 1".
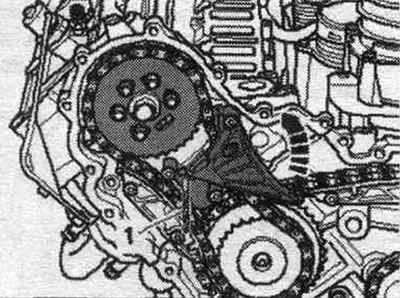
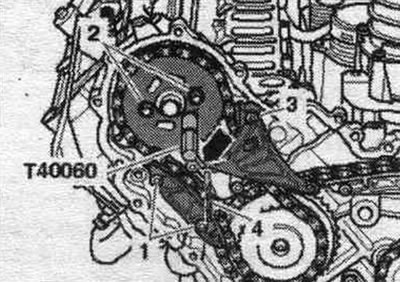
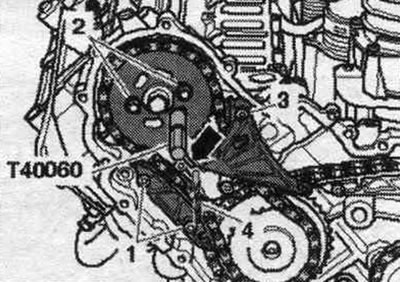
To prevent small parts from entering the engine through the opening in the drive chain cover, cover the opening with a clean rag. Unscrew bolt "3" and remove the tensioner bar. Unscrew bolts "1" of the guide and "2" of the camshaft sprocket. Remove the camshaft chain sprocket and the guide rail.
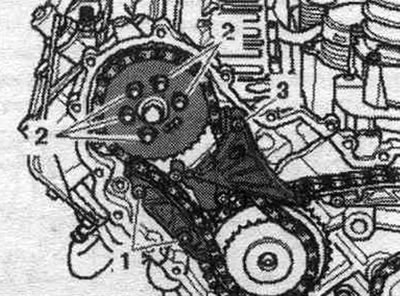
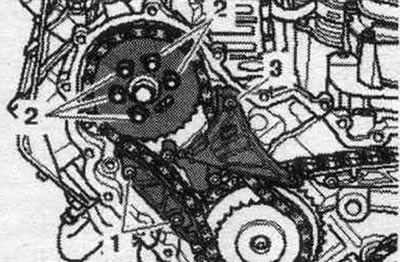
For protection against cuts, wrap the cutting edges of the 3.3 mm diameter drill with insulating tape. Press the right camshaft chain tensioner guide in the "direction of the arrow" and lock the chain tensioner with the 3.3 mm diameter drill "pos. 1".
Unscrew bolts "1" of the chain tensioner, as well as "2" and "3" of the camshaft sprocket. Remove the camshaft chain sprocket and the right chain tensioner.
Installation
Crankshaft "1" is locked in the "TDC" position using locking screw "3242." The bolts tightened to the specified angle should be replaced. Replace the seal. the ring of the threaded plug marks the "TDC" mark. Ensure that the camshafts of both cylinder heads are at the "TDC" position. The camshafts should be secured with "T40060" pins. The "arrow" pin in the "T40060" locating pin should be positioned perpendicular to the axis of symmetry of the camshaft on cylinder bank 1 (right).
The "arrow" pin in the "T40060" camshaft alignment pin must be positioned perpendicular to the camshaft's axis of symmetry on cylinder bank 2 (left). Remove the "T40060" camshaft alignment pin from both camshafts.
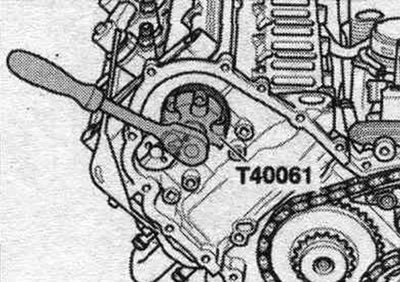
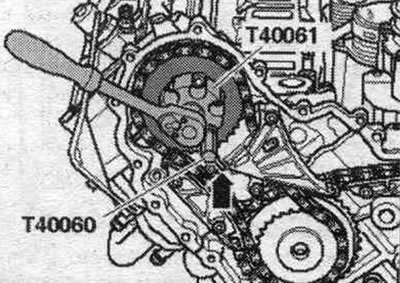
Risk of damage to valves and piston crowns. When turning the camshaft, none of the crankshaft pistons should be at TDC. If the camshafts are not locked, their position can be slightly adjusted using the T40061 adapter. To do this, screw the chain sprocket bolts into the camshaft.
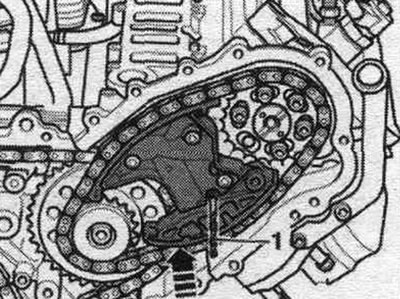
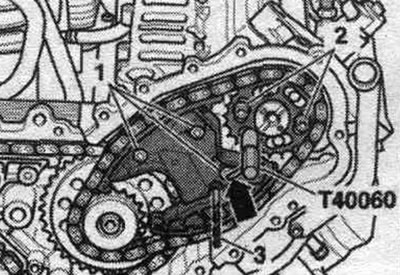
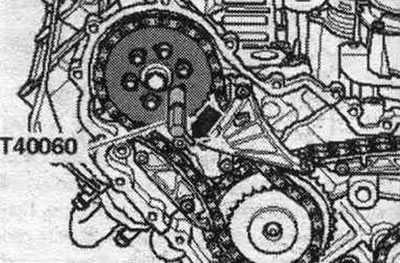
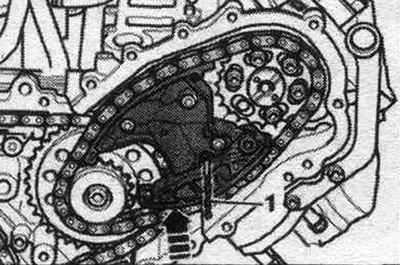
Install the left camshaft chain with the camshaft chain sprocket, guide bar and tensioner bar. The threaded holes of the camshaft must be located in the middle of the elongated holes of the camshaft sprocket. Tighten bolts "1" and "3" of the guide and tensioner shoe. Tighten both bolts "2" of the camshaft sprocket. The sprocket should rotate on the camshaft, but should not be warped. Secure the left camshaft with the T40060 locating pin. The "arrow" pin in the T40060 locating pin must be positioned parallel to the camshaft timing chain axis of symmetry. Remove drill bit "4" from the hole, this will release the left chain tensioner.
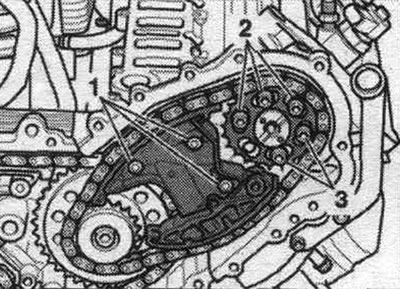
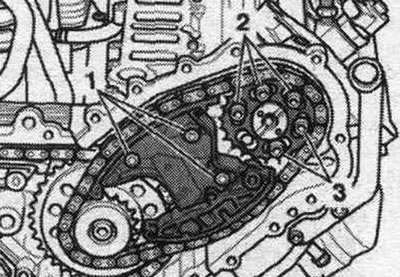
Install the right camshaft drive chain together with the sprocket and chain tensioner. The threaded holes of the camshaft must be located in the middle of the elongated holes of the camshaft sprocket. Tighten the chain tensioner bolts "1". Tighten both bolts "2" of the camshaft sprocket. The sprocket should rotate on the camshaft, but should not be warped. Secure the right camshaft with the T40060 locating pin. The "arrow" pin in the T40060 locating pin must be positioned parallel to the camshaft timing chain axis of symmetry. Remove drill bit "3" from the hole, this will release the right chain tensioner.
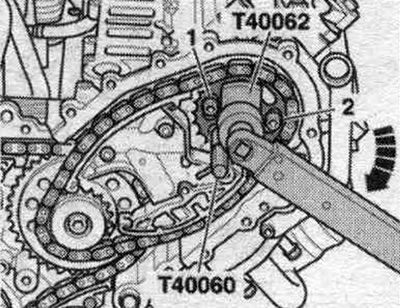
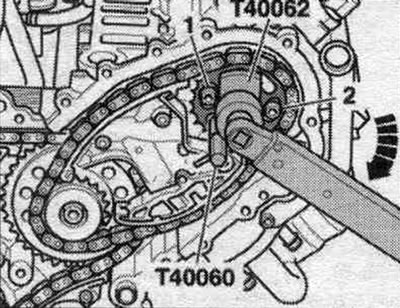
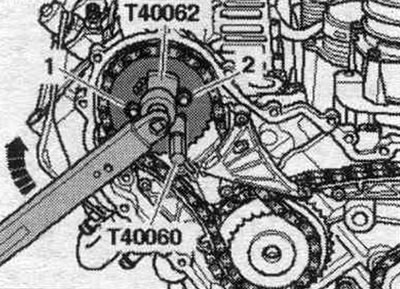
Tighten the right camshaft timing chain sprocket with the adapter "T40062" and a torque of 20 Nm clockwise "arrow" and maintain the pre-tension. Tighten bolts "1" and "2". Remove adapter "T40062" and dowel pin "T40060". Tighten the remaining right camshaft sprocket bolts.
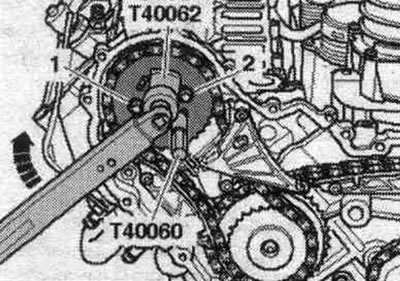
Tighten the left camshaft timing chain sprocket with the adapter "T40062" and a torque of 15 Nm clockwise "arrow" and maintain the pre-tension. Tighten bolts "1" and "2". Remove adapter "T40062" and dowel pin "T40060". Tighten the remaining left camshaft sprocket bolts.
Unscrew the fixing bolt "3242".
Timing phase control
Risk of damage due to jumping of the camshaft drive chain. Turn the crankshaft only in the direction of engine rotation "arrow".
Rotate the crankshaft 2 revolutions until it is before the TDC. Secure crankshaft "1" from rotating with locking bolt "3242" to a torque of 20 Nm. Possibility of incorrect adjustment due to inaccurate TDC position. If the shaft has passed the TDC mark: Rotate the crankshaft 2 revolutions until the crankshaft is again before the TDC. Then lock the crankshaft with locking bolt "3242" using a rotational motion. Make sure that the camshafts of both cylinder heads are at the TDC position. The camshafts should be secured with pins "T40060". The "arrow" pin in the locating pin "T40060" should be positioned perpendicular to the axis of symmetry of the camshaft at cylinder bank 1 (right).
The "arrow" pin in the "T40060" installation pin must be positioned perpendicular to the axis of symmetry of the camshaft at cylinder bank 2 (left).
Timing phase adjustment
If one of the camshafts cannot be fixed, loosen all the "arrow" bolts of the corresponding camshaft by approximately 1 turn.
Install the adapter "T40061" on the heads of the loose bolts. Turn the camshaft using the adapter "T40061" at a small angle in both directions until the adjusting pin "T40060" enters into place. The "arrow" pin in the "T40060" installation pin must be positioned parallel to the axis of symmetry of the camshaft chain transmission. Tighten the camshaft sprocket bolts with the "T40061" adapter still installed and the "T40060" adjusting pin inserted to a torque of approximately 5 Nm. Remove the "T40060" adjusting pin and the "T40061" adapter.
Tighten the camshaft sprocket bolts to the final torque. If necessary, repeat the process on another row of cylinders. Loosen the locking bolt "3242". Repeat the timing check. Install in reverse order. Tighten the TDC mark screw plug to the top of the oil. pallet. Install the drive chain cover.
Removal and installation camshaft drive chains
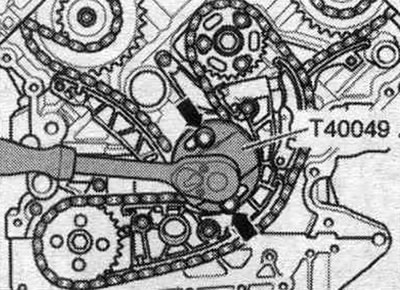
The gearbox has been removed. There is a risk of damage to the valves and piston crowns. The crankshaft and camshafts can only be turned with the timing chain fully installed. Remove the driven disk. Remove the timing chain covers. Risk of damage to the timing chain due to excessively long threads. Only bolts with a thread length "a" of maximum 22 mm may be used to lock the wrench "T40049". If only bolts with a longer thread are available, place a washer under the bolt head to ensure a thread length of 22 mm.
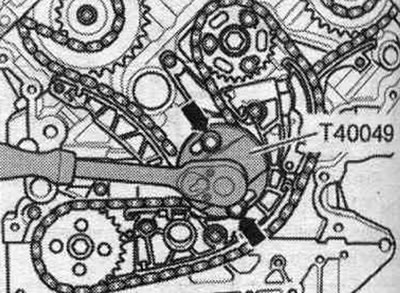
Install the "T40049" key onto the rear of the crankshaft using 2 "arrow" bolts.
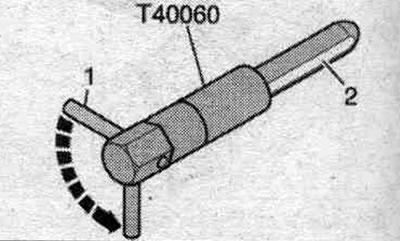
The "T40060" locating pin has a "2" chamfer, which facilitates its installation with a slight shift in the camshaft and cylinder head fixing holes. First, insert the adjusting pin so that pin "1" is perpendicular to the camshaft axis. For correct installation at "TDC", it is necessary to turn pin "1" 90° "arrow" so that it is vertical in relation to the camshaft axis.
Risk of damage due to jumping of the camshaft drive chain. Turn the crankshaft only in the direction of engine rotation. Rotate the crankshaft to the TDC position. The camshafts should be secured with T40060 pins. The "arrow" pin in the T40060 locating pin should be perpendicular to the camshaft axis of symmetry on cylinder bank 1 (right).
The "arrow" pin in the "T40060" installation pin must be positioned perpendicular to the axis of symmetry of the camshaft at cylinder bank 2 (left).
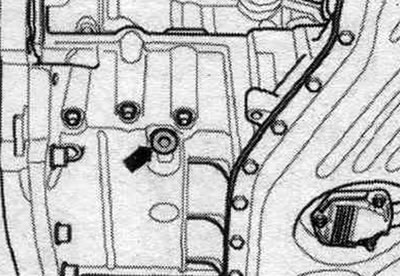
Unscrew the threaded plug "arrow" of the upper part of the oil. pallet, use a socket wrench with a ball head for this.
Screw the fixing bolt "3242" into the hole with a torque of 20 Nm, if necessary, slightly turn the crankshaft in both directions to fully center the bolt. For protection against cuts, wrap the cutting edges of the 3.3 mm diameter drill with insulating tape. Push the left camshaft chain tensioner shoe in the "direction of the arrow" and lock the tensioner with the 3.3 mm diameter drill "pos. 1". Risk of malfunction due to reverse travel of the already used camshaft drive chain. For reassembly, mark the direction of the drive chain with an arrow; use paint for this. Remove the dowel pin "T40060" from both camshafts.
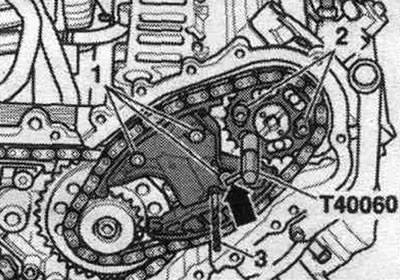
Unscrew bolt "3" and remove the tensioner bar. Unscrew bolts "1" of the guide and "2" of the camshaft sprocket. Remove the chain sprocket, the guide bar and the left camshaft drive chain.
For protection against cuts, wrap the cutting edges of the 3.3 mm diameter drill with insulating tape. Press the right camshaft chain tensioner guide in the "direction of the arrow" and lock the chain tensioner with the 3.3 mm diameter drill "pos. 1".
Risk of failure due to reverse running of the camshaft drive chain already in use. For reassembly, mark the direction of the drive chain with an arrow; use paint for this. Unscrew bolts "1" of the chain tensioner, as well as "2" and "3" of the camshaft sprocket. Remove the chain sprocket, tensioner and right camshaft drive chain.
Install
Crankshaft "1" is fixed in the "BMT" position using locking screw "3242". The chain drive is installed. Replace the seal. the ring of the threaded plug of the "TDC" mark. The bolts tightened at the angle should be replaced. Risk of damage to valves and piston crowns. When turning the camshaft, neither piston should be at TDC. Ensure that the camshafts of both cylinder heads are at TDC. The camshafts should be secured with T40060 pins. The "arrow" pin in the T40060 dowel pin should be perpendicular to the camshaft axis of symmetry on cylinder bank 1 (right).

The "arrow" pin in the "T40060" camshaft alignment pin must be positioned perpendicular to the camshaft's axis of symmetry on cylinder bank 2 (left). Remove the "T40060" camshaft alignment pin from both camshafts.
Risk of damage to valves and piston crowns. When turning the camshaft, none of the crankshaft pistons should be at TDC. If the camshafts are not locked, their position can be slightly adjusted using the T40061 adapter. To do this, screw the chain sprocket bolts into the camshaft.
Install the left camshaft chain with the camshaft chain sprocket, guide bar and tensioner bar. The threaded holes of the camshaft must be located in the middle of the elongated holes of the camshaft sprocket. Tighten bolts "1" and "3" of the guide and tensioner shoe. Tighten both bolts "2" of the camshaft sprocket. The sprocket should rotate on the camshaft, but should not be warped. Secure the left camshaft with the T40060 locating pin. The "arrow" pin in the T40060 locating pin must be positioned parallel to the camshaft timing chain axis of symmetry. Remove drill bit "4" from the hole, this will release the left chain tensioner.
Install the right camshaft drive chain together with the sprocket and chain tensioner. The threaded holes of the camshaft must be located in the middle of the elongated holes of the camshaft sprocket. Tighten the chain tensioner bolts "1". Tighten both bolts "2" of the camshaft sprocket. The sprocket should rotate on the camshaft, but should not be warped. Secure the right camshaft with the T40060 locating pin. The "arrow" pin in the T40060 locating pin must be positioned parallel to the camshaft timing chain axis of symmetry. Remove drill bit "3" from the hole, this will release the right chain tensioner.
Tighten the right camshaft timing chain sprocket with the adapter "T40062" and a torque of 20 Nm clockwise "arrow" and maintain the pre-tension. Tighten bolts "1" and "2". Remove adapter "T40062" and dowel pin "T40060". Tighten the remaining right camshaft sprocket bolts.
Tighten the left camshaft timing chain sprocket with the adapter "T40062" and a torque of 15 Nm clockwise "arrow" and maintain the pre-tension. Tighten bolts "1" and "2". Remove adapter "T40062" and dowel pin "T40060". Tighten the remaining left camshaft sprocket bolts.
Unscrew the fixing bolt "3242".
Timing phase control
Risk of damage due to jumping of the camshaft drive chain. Turn the crankshaft only in the direction of engine rotation. Rotate the crankshaft using the T40049 wrench 2 turns until the crankshaft again approaches the TDC mark. Ignore the arrows.
Secure crankshaft "1" from turning with locking bolt "3242" to a torque of 20 Nm. Incorrect adjustment may occur due to inaccurate TDC position. If the shaft has passed the TDC mark: Turn the crankshaft 2 turns until the crankshaft is again before TDC. Then lock the crankshaft with locking bolt "3242" using a rotational motion. Make sure that the camshafts of both cylinder heads are at the TDC position. The camshafts should be secured with pins "T40060". The "arrow" pin in the locating pin "T40060" must be positioned perpendicular to the axis of symmetry of the camshaft at cylinder bank 1 (right).
The "arrow" pin in the "T40060" installation pin must be positioned perpendicular to the axis of symmetry of the camshaft at cylinder bank 2 (left).
Timing phase adjustment
If one of the camshafts cannot be locked, loosen all the arrow bolts of the corresponding camshaft by approximately 1 turn.
Install the adapter "T40061" on the heads of the loose bolts. Turn the camshaft using the adapter "T40061" at a small angle in both directions until the adjusting pin "T40060" enters into place. The "arrow" pin in the "T40060" installation pin must be positioned parallel to the axis of symmetry of the camshaft chain transmission. Tighten the camshaft sprocket bolts with the "T40061" adapter still installed and the "T40060" adjusting pin inserted to a torque of approximately 5 Nm. Remove the "T40060" adjusting pin and the "T40061" adapter. Tighten the camshaft sprocket bolts to the final torque. If necessary, repeat the process on another row of cylinders. Loosen the locking bolt "3242". Repeat the timing phase check.
Installation in reverse order. Tighten the TDC mark screw plug to the top of the oil. pallet. Install the timing chain protective covers. Install the driven disk. Fill with oil and check its level.
Information obtained from this resource AudiManual