
Table of contents: Camshaft chain drives ↓ Removal and installation the chain… ↓
Camshaft chain drives
Left camshaft timing chain
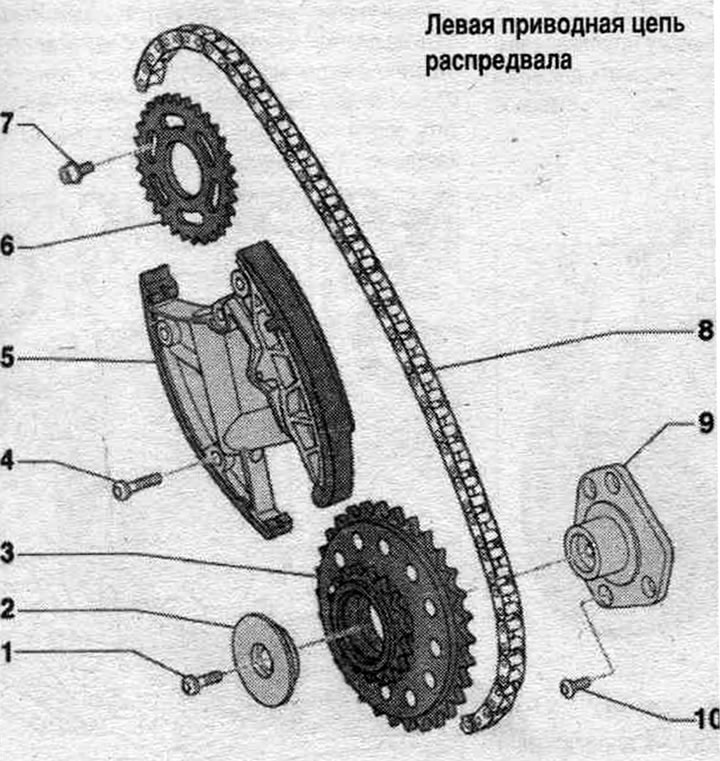
1. Bolt.
2. Crankshaft axial fixing insert: for chain drive sprocket.
3. Sprocket: for camshaft drive chain on the left.
4. Bolt: replace; 5 Nm + 90°.
5. Chain tensioner: for camshaft drive chain on the left.
6. Camshaft chain drive sprocket: intake camshaft; mounting position: the side with the inscription faces the gearbox.
7. Bolt: 23 Nm.
8. Left camshaft drive chain: remove the chain from the camshafts: before removing, mark the direction of travel with paint.
9. Support bracket: for chain drive sprocket.
10. Bolt.
Right camshaft timing chain
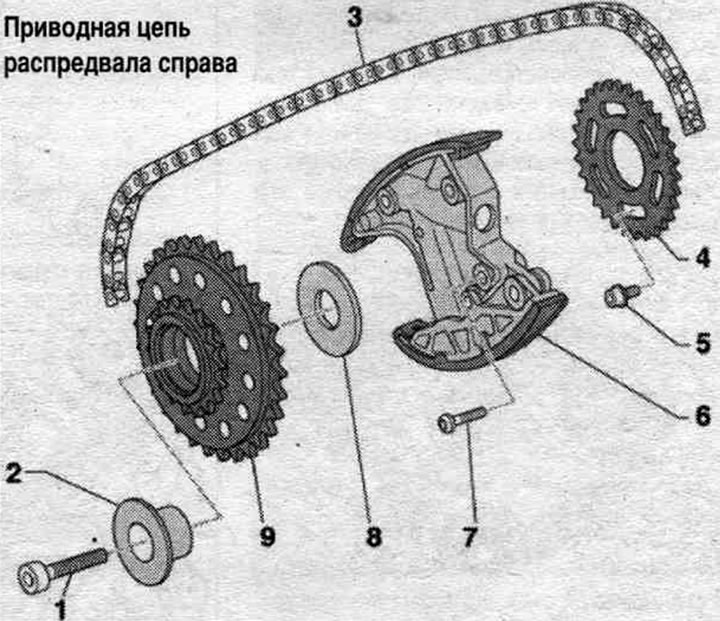
1. Bolt.
2. Support pin: for chain drive sprocket.
3. Right camshaft timing chain: remove the chain from the camshafts; before removing, mark the direction of movement with paint.
4. Intake camshaft timing chain sprocket; mounting position: the side with the inscription faces the gearbox.
5. Bolt: 23 Nm.
6. Chain tensioner: for the camshaft drive chain on the right.
7. Bolt: replace; 5 Nm + 90°.
8. Crankshaft axial locking insert: for chain drive sprocket.
9. Sprocket: for camshaft drive chain on the right.
Timing chain
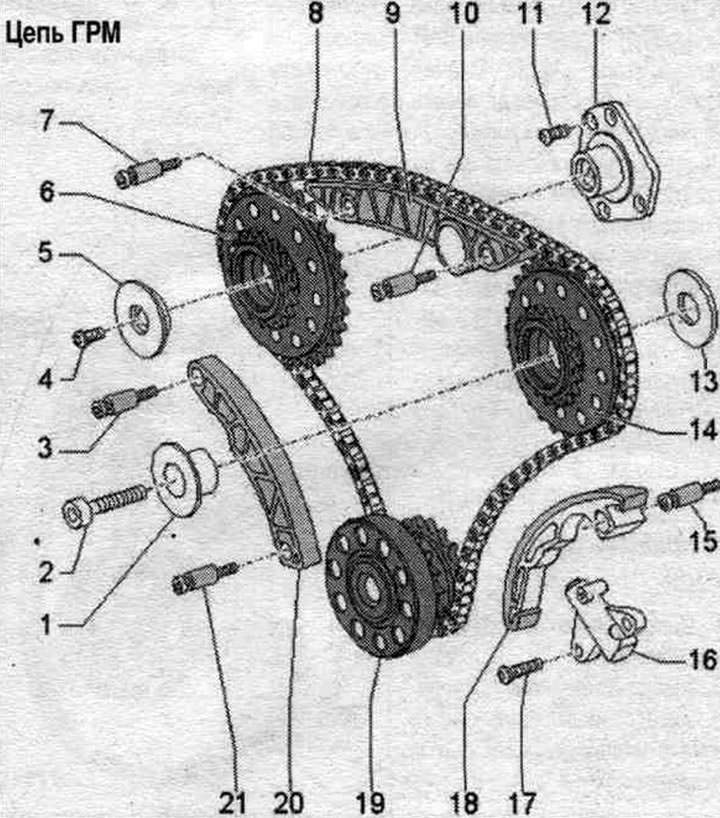
1. Drive sprocket support pins.
2. Bolt: 45 Nm.
3. Support pin: insert with threaded varnish; 12 Nm.
4. Bolt: replace; 5 Nm + 90°.
5. Axial locking washer for the drive sprocket.
6. Sprocket: for camshaft drive chain on the left.
7. Support pin: insert with threaded varnish; 12 Nm.
8. Timing chain: Mark the direction of travel with paint before removing.
9. Dampener bar.
10. Support pin: insert with threaded varnish; 12 Nm.
11. Bolt: 9 Nm.
12. Bracket of the leading sprocket of the chain drive.
13. Crankshaft axial fixing insert.
14. Sprocket: for camshaft drive chain on the right.
15. Support pin: insert with threaded varnish; 12 Nm.
16. Chain tensioner.
17. Bolt: 12 Nm.
18. Chain tensioner guide bar.
19. Crankshaft.
20. Stabilizer bar: install in the proper position.
21. Support pin: insert with threaded varnish; 12 Nm.
Removal and installation the chain drive of the control mechanism
The gearbox is removed. Remove the driven disk. Remove the timing chain protective covers. Remove the camshaft drive chains. Remove the auxiliary chain. drives. For protection against cuts, wrap the cutting edges of the 3.3 mm diameter drill with insulating tape. Press the chain tensioner rail in the "direction of the arrow" and lock the chain tensioner with the 3.3 mm diameter drill "pos. 4". Risk of malfunction due to reverse travel of the already used camshaft drive chain. For reassembly, mark the direction of the drive chain with an arrow, using paint for this. Unscrew bolts "2" and "3" and remove the chain sprockets together with the chain and tensioner bar "1".

Install
Installation in reverse order. Crankshaft "1" is locked in the TDC position using locking bolt "3242". First, install sprocket "2" of the left camshaft drive chain. Install tensioner bar "1" with the drive chain mounted. Install the right camshaft chain sprocket "3". Press the chain guide bar in the direction of the arrow and remove the drill bit "4" from the chain tensioner. Install the auxiliary chain. drives. Install the timing chain protective covers. Install the driven disk. Fill with oil and check its level.
[The original source of the article can be found on the website «AudiManual.ru»]