



Table of contents: Removal ↓ Installation ↓
Warning: Before starting the procedure, read the warnings in chapter 12 regarding SRS system components (airbags).
Removal
1. Set the wheel to the straight-ahead position.
Caution! Make sure that the wheels are set in a straight-ahead position during the entire procedure, otherwise the airbag contact group will be reset, causing a malfunction in the SRS system.
2. Disconnect the negative cable from the battery.
Note: If your radio has a secret code, make sure you know it before disconnecting the battery. If in doubt, consult the dinar.
3. Remove the driver's airbag as described in chapter 12.
4. Remove the steering wheel as described in paragraph 14.
Caution: Before disconnecting SRS components (airbags) read the warnings in chapter 12.
5. Loosen the mounting screws under the steering column and remove the upper and lower steering column covers.
6. Remove the screws and disconnect the steering column switch combination as described in chapter 12.
7. Disconnect the wiring harness clamps and remove it from the steering column.
8. Remove the storage compartment, the panel covering the pedal assembly, and the steering column trim near the engine shield from the driver's side under the dashboard.
9. Disconnect the wiring connector from the ignition switch as described in paragraph 16.
10. On models with automatic transmission, disconnect the selector locking cable from the ignition switch. To do this, first move the selector lever to the "P" position, insert the ignition key and turn it to the first position (On). Then slightly lift the locking lever at the rear of the ignition switch and disconnect the cable from the housing.
11. Remove any remaining trim under the dashboard that may be blocking access to the base of the steering column.
12. Tie the upper and lower sections of the column together with wire. This is necessary so that they do not fall apart when the column is removed from the steering shaft (fig. 15.12).
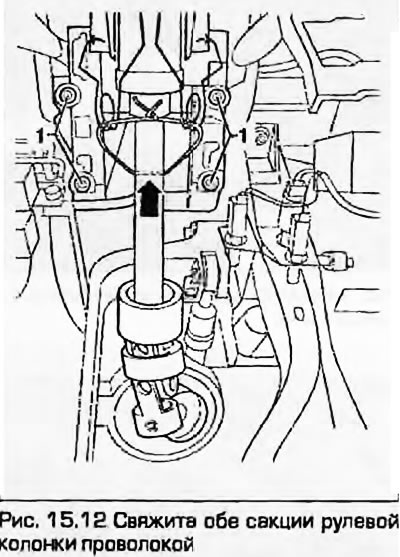
Warning: When removing the steering column from the steering gear, do not allow it to separate into sections - the alignment of the internal components will be disrupted.
13. Loosen the nut of the clamping bolt of the joint mounting to the steering gear shaft. Loosen the bolt by half a turn and remove it from the clamp (fig. 15.13).
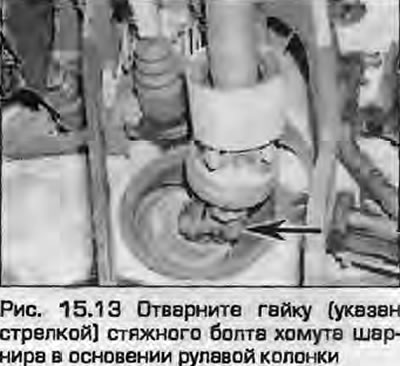
14. Pull the steering column joint of the steering shaft and move it to the side.
15. Unscrew the four steering column mounting bolts and remove it from the vehicle (fig. 15.15).
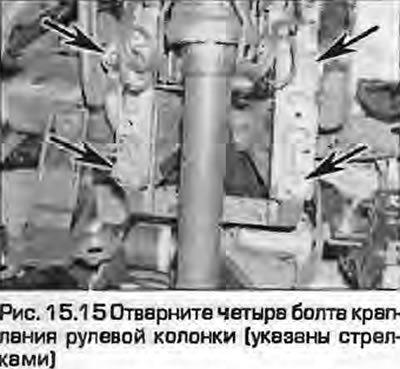
16. Check all components of the column for wear. If the column is damaged, replace it with a whole unit.
17. If necessary, remove the steering column lock/ignition switch as described in paragraph 16.
Installation
18. Installation is the reverse procedure. Please note the following.
19. Make sure the plastic cap is on the pivot bolt protruding from the left side of the steering column. If the cap is missing, wrap the bolt with electrical tape to prevent damage to the wiring.
20. If necessary, install the ignition switch/steering column lock as described in paragraph 16.
21. Install the upper steering column mounting bolts, but do not tighten them yet.
22. Insert the clamp bolt of the column joint fastening clamp to the steering gear shaft and secure it by turning it half a turn counterclockwise. Screw in the nut and tighten it to the specified torque.
23. Tighten the four upper steering column mounting bolts to the specified torque.
24. Remove the wire holding the steering column sections together.
25. On models with automatic transmission, to install the selector locking cable, move its lever to the "P" position, turn the ignition key to the "On" position. Insert the end of the cable into the ignition switch from behind and push it until it stops and the lock clicks into place (a click should be heard). Check the operation of the cable as follows:
- (1) The movement of the lever from the "P" position to any other position shall be possible only with the ignition key in the "On" position
- (2) The ignition key can only be removed when the ignition is in the "Off" position and the selector lever is in the "P" position.
26. Install the lower panels under the fascia and steering column covers.
27. Install the steering column switches as described in chapter 12.
28. Install the steering wheel as described in paragraph 14.
29. Install the driver's airbag as described in chapter 12.
30. As a precaution against accidental airbag deployment, I asked everyone to leave the car before connecting the battery.
31. Finally, make sure the steering works properly.
(Material republished from the website: «AUDIMANUAL»)