



Table of contents: Execution order ↓ Removal the brake booster ↓
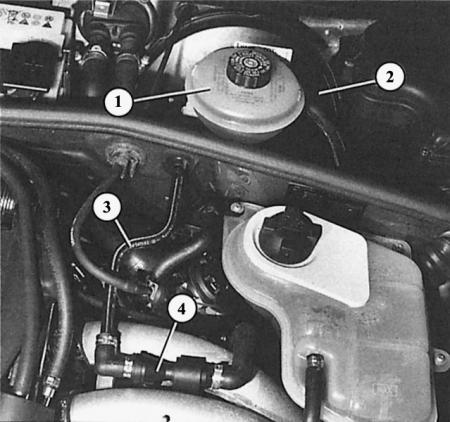
Area around the brake booster with a 1.6L engine: 1 – brake fluid reservoir; 2 – brake booster; 3 – vacuum tube from the intake manifold; 4 – ejector for increasing low pressure
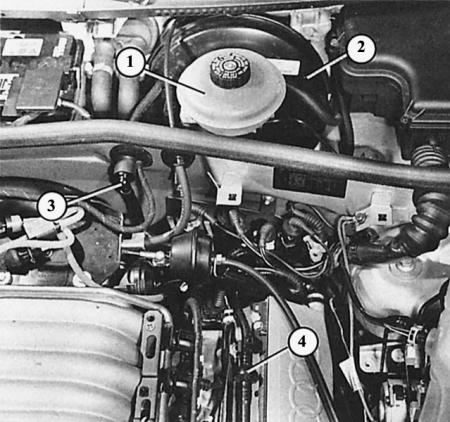
Same view as in the photo above, but with a six-cylinder engine: 1 - brake fluid reservoir; 2 – brake booster; 3 – vacuum tube from the intake manifold; 4 – check valve in the vacuum tube
Execution order
1. The engine must be turned off.
2. Press the brake pedal 10 times.
3. Keep the pedal depressed and start the engine.
4. If the brake booster is working properly, the pedal should move slightly. If the pedal does not move, the brake booster is faulty.
5. If the brake booster fails, the defect most likely lies in the low-pressure system: the vacuum hose from the intake manifold to the brake booster is leaky, the check valve in the vacuum hose is leaky, or there is a defect in the rubber ring between the master brake cylinder and the servo drive or the brake booster membrane.
6. To check the check valve, remove the vacuum hose from the servo.
7. It is blown through, suction is not allowed.
8. The check valve is sold only with the vacuum hose.
9. To replace a damaged rubber ring between the master cylinder and the booster, you need to remove the cylinder.
10. Finally, there is still a defect of the brake cylinder itself. In this case, repair is impossible - it must be replaced.
Removal the brake booster
To loosen the brake pressure rod on the brake pedal, Audi uses a special tool 3289. Unfortunately, you cannot do without this tool. Sequence of actions:
1. Remove the brake master cylinder.
2. Remove the vacuum hose.
3. Unscrew the two brake booster mounting bolts (TORX T45).
4. Remove the pocket on the left under the instrument panel (chapter Salon).
5. Disconnect the brake light switch and cruise control ventilation valve switch from the brake pedal.
6. Install special tool 3289 on the brake pedal lever. Now you can disconnect the brake booster push rod from the pedal (pull the pedal back).
7. Remove the brake booster from the engine compartment.
8. If a new brake booster is installed, the length of its control rod must be adjusted in the dismantled state.
9. Distance between the end of the control rod (it should stand vertically) and the adjacent surface with two threaded holes should be 158.5 mm (tolerance 0.5 mm).
10. After adjustment, tighten the lock nut.
11. Lightly lubricate the pivot pin before installation.
12. Use a new pivot pin retainer and new self-locking nuts. Install a new O-ring between the brake booster and the brake master cylinder.
(The original article is available on the online resource: audimanual.ru)