
Table of contents: Handbrake cable on rear brake… ↓ Replacing the handbrake cable ↓ Adjusting the handbrake ↓
Handbrake cable on rear brake caliper housing
Handbrake in quattro model
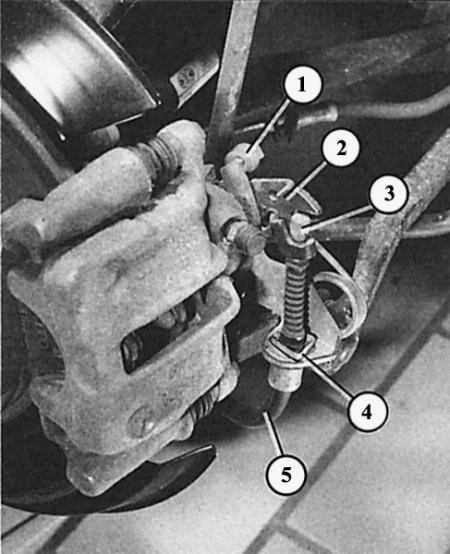
- 1 - stop;
- 2 - control lever (handbrake lever);
- 3 - handbrake cable nipple;
- 4 - spring clamp;
- 5 - handbrake cable casing.
Rear wheel brake in a front-wheel drive Audi model
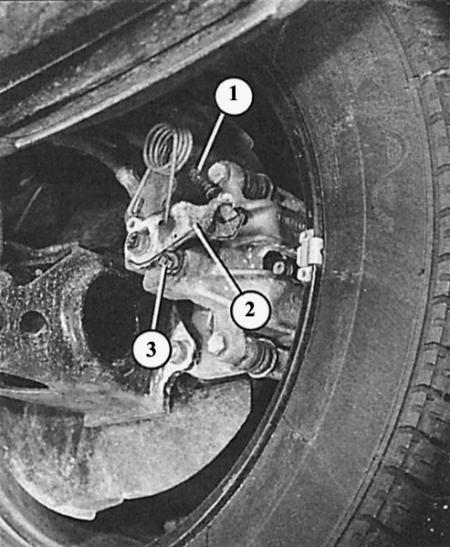
- 1 - handbrake cable sheath;
- 2 - control lever (handbrake lever);
- 3 - stop.
1. The action of the handbrake should begin from the third locking lever.
2. When entering the groove of the fourth tooth, the rear wheels should be locked.
3. If the lever travel is longer, this indicates worn rear brake pads or stretched brake cables, as the handbrake was pulled tightly every time it was parked.
4. Usually, handbrake adjustment is only necessary when replacing the cable.
Replacing the handbrake cable
1. Raise and secure the rear of the vehicle.
2. Release the handbrake.
3. Remove the exhaust heat shield in the area of the handbrake cable guide.
4. This may require dismantling part of the exhaust system.
5. Loosen the handbrake cable on the adjusting device by removing the adjusting element's locking clamp and tightening the adjusting nut until it stops.
6. At the end of the cable housing on the brake caliper, press the spring clip and remove the brake cable nipple from the control lever.
7. Only in quattro!: Remove the handbrake cable from the guide at the height of the rear axle. To do this, squeeze the guide sleeve.
8. Now remove the cable from the various brackets on the rear axle and on the underbody of the car and remove it.
9. At the height of the handbrake lever under the bottom of the car, press the handbrake cable sheath out of the console (use a screwdriver).
10. Remove the rear part of the center console in the passenger compartment (Chapter Salon).
11. Remove the cables from the rocker arm on the handbrake lever.
12. Remove the brake cables downwards.
13. Installing new brake cables: On the handbrake rocker arm, remove the inserted plastic parts, if any (don't put them anymore).
14. Use a screwdriver to secure the rocker arm in the middle position.
15. Install the handbrake cables from below and hang them on the rocker arm.
16. Insert the handbrake cable housing into the console on the underside of the vehicle (under the handbrake lever) and insert it into the groove.
17. Route the handbrake cable along the bottom of the car and place it on the rear wheel brake control lever.
18. Adjust the handbrake.
Adjusting the handbrake
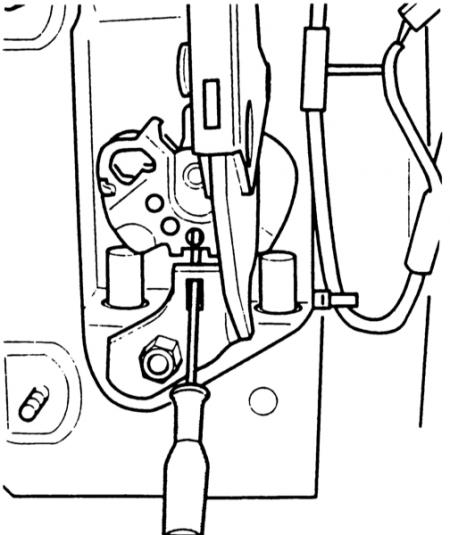
This is how the handbrake rocker arm is fixed in the middle position with a screwdriver.
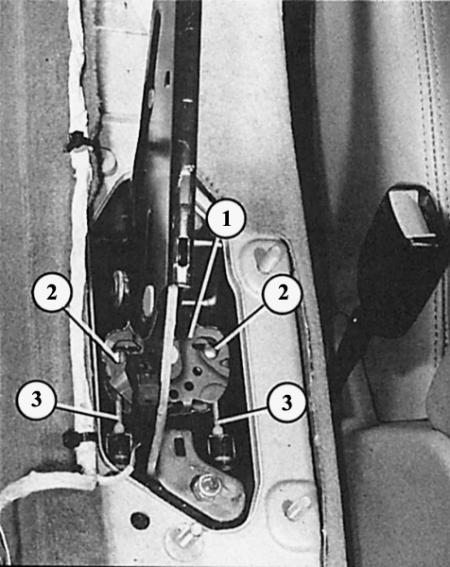
View of the handbrake lever with the center console removed (rear end):
- 1 - rocker arm;
- 2 - handbrake cable nipples (3).
Thanks to the automatic adjustment mechanism of the disc brakes, the handbrake only needs to be adjusted after replacing the cable or brake caliper.
1. Press the brake pedal vigorously at least once.
2. Open the handbrake (handbrake lever at the bottom).
3. Remove the ashtray from the rear seats to expose the back of the handbrake lever (with a rocker).
4. Use a screwdriver to secure the rocker arm on the handbrake lever in the middle position.
5. Raise the rear of the car on both sides and secure it.
6. Loosen the handbrake cable in the adjustment mechanism, remove the adjusting mechanism locking clamp and tighten the adjusting nut until it stops.
7. Slide the coarse adjustment device in the adjustment mechanism.
8. Now tighten the adjusting mechanism set nut until the groove of the locking clamp becomes visible.
9. Reinsert the retaining clamp.
10. Evenly pull the coarse adjuster on both brake cable housings in different directions so that the brake cables are taut, but the control lever has not yet lifted off the stop on the brake caliper.
11. Remove the screwdriver from the rocker arm on the handbrake lever.
12. Pull the handbrake lever high three times.
13. Check the pre-tension of the handbrake cables again: when the handbrake is released, the control levers on the brake calipers should rise from the stops by a maximum of 1.5 mm.
14. If the pre-tension is not correct, it must be corrected by fine-tuning the adjustment mechanism.
[This article was previously published on the resource: AudiManual]