
Table of contents: Replacing rear disc brake pads ↓ Removal the rear brake caliper ↓ Replacing the rear brake piston seals ↓ Replacing the rear brake disc ↓
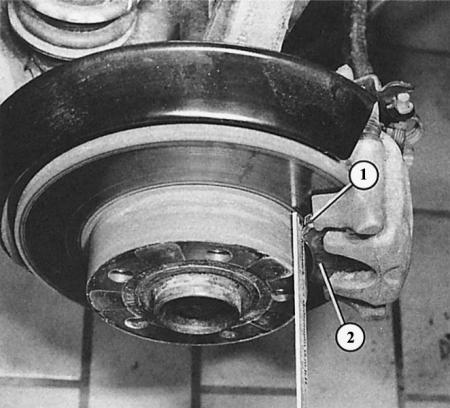
Measuring the thickness of the brake lining on the rear wheels:
- 1 - lining material;
- 2 - metal supporting plate.
The wear control of the rear disc brake pads is carried out in the same way as on the front ones. The same maximum permissible wear value of 7 mm applies here – measured together with the bearing plate of the pad, which corresponds to the thickness of the pad itself of approximately 2 mm.
The condition of the brake discs is checked simultaneously with the linings. The amount of wear and the sequence of actions are the same as for the front disc brakes.
In addition to the rear axle pads, four new self-locking bolts are also used, which are usually included with the pads in the packaging.
Replacing rear disc brake pads
Although this job is easy to do, it becomes a problem if you do not have the special key 3272 from the Audi workshop. The following description assumes that the workshop will rent you a key or you can make one from a rented sample.
1. Unscrew both brake caliper housing mounting bolts, while pressing the guide pin in the opposite direction using the hexagon.
2. Remove the brake caliper housing.
3. Remove the pads from the guides.
4. Install special key 3272 on the brake piston (picture below) and screw the piston in until it stops by turning the lead screw to the right and the knurled roller to the left.
5. Have your assistant keep an eye on the brake fluid level in the reservoir. If it threatens to spill out, suck it out with an injection syringe.
6. Never press the piston with force and without rotation. Otherwise, the adjustment mechanism in the brake piston will be destroyed.
7. Insert new pads.
8. Tighten the brake caliper housing with new self-locking bolts to 30 Nm.
9. Use only a narrow open-end wrench to push the guide pin in the opposite direction. A wide open-end wrench will jam and the tightening torque will be distorted.
10. Before the first meters of driving, press the brake pedal several times to establish normal pedal clearance.
Removal the rear brake caliper
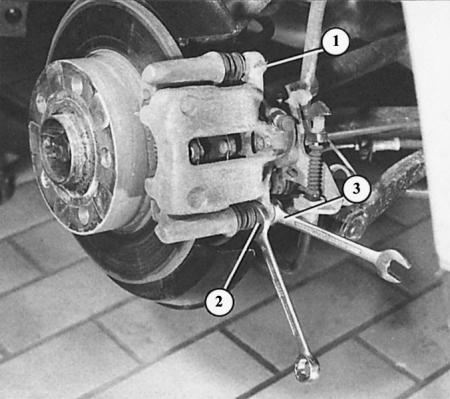
Here, the lower mounting bolt of the brake caliper housing is loosened using the socket wrench (3). The guide pin is pressed in the opposite direction using the open-end wrench (2). In contrast to the Lucas brakes on the front wheels, the upper mounting (1) is also loosened here. Use new self-locking mounting bolts when installing!
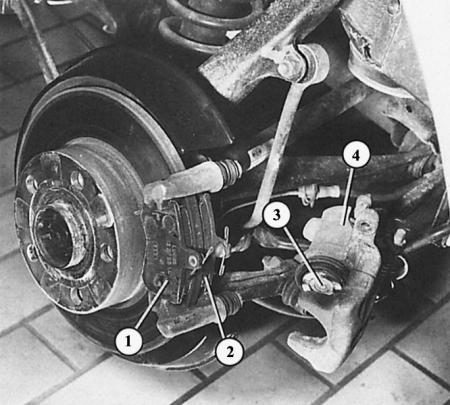
When the housing (4) of the rear wheel brake caliper is removed, the following is visible: 1 – outer lining; 2 – inner lining; 3 – brake piston with inserted heat shield.
Here, with the brake caliper housing removed, the rear disc brake piston is screwed in using a special key 3272 from the Audi workshop.
1. If the brake caliper needs to be replaced, remove the brake hose.
2. Remove the brake caliper housing as for replacing the lining. Be sure to follow the instructions above in the text!
3. Remove the handbrake cables.
4. Loosen both mounting bolts of the brake support, still secured to the axle.
5. Before installation, clean the ribbed surfaces under the heads of the mounting bolts (knurled bolts).
6. Use only the specified knurled bolts, never regular ones.
7. When installing, tighten the brake support mounting bolts to 65 Nm.
8. When installing the brake caliper housing, follow the instructions described above.
9. Before the first ride, press the brake pedal several times to establish normal pedal clearance.
Replacing the rear brake piston seals
The same procedure applies to replacing defective rear caliper brake piston seals as for the front ones.
Replacing the rear brake disc
1. Remove the rear brake caliper assembly.
2. Remove the brake disc.
3. Clean the mating surface of the wheel hub or sand it and install a new brake disc.
4. Perform a new basic adjustment.