
Repair Chevrolet Repair Toyota Repair Honda Repair AvtoVAZ Repair Mercedes-Benz Repair BMW Repair Opel
Home  |  Contacts  |  Sitemap  |    
English Русский
Български
Беларускі
Український
Српски
Hrvatski
Română
Polski
Slovenský
Magyar
AudiManual.ru


  • AUDI 80
  • AUDI 100
  • AUDI A3
  • AUDI A4
  • AUDI A6
  • AUDI A8
  • AUDI Q
  • OTHER
  • ARTICLES
Q7 Typ 4L (2005-2015, diesel) Q5 Type 8R (2008-2017)

Removal and installation timing chain covers (Audi Q7-4L-D)

  • Home
  • Audi Q
  • Q7 Typ 4L (2005-2015, diesel)
  • Power unit
  • Diesels 3.0 l (BUG, BUN, CAS)
  • Removal and installation timing chain covers
            0
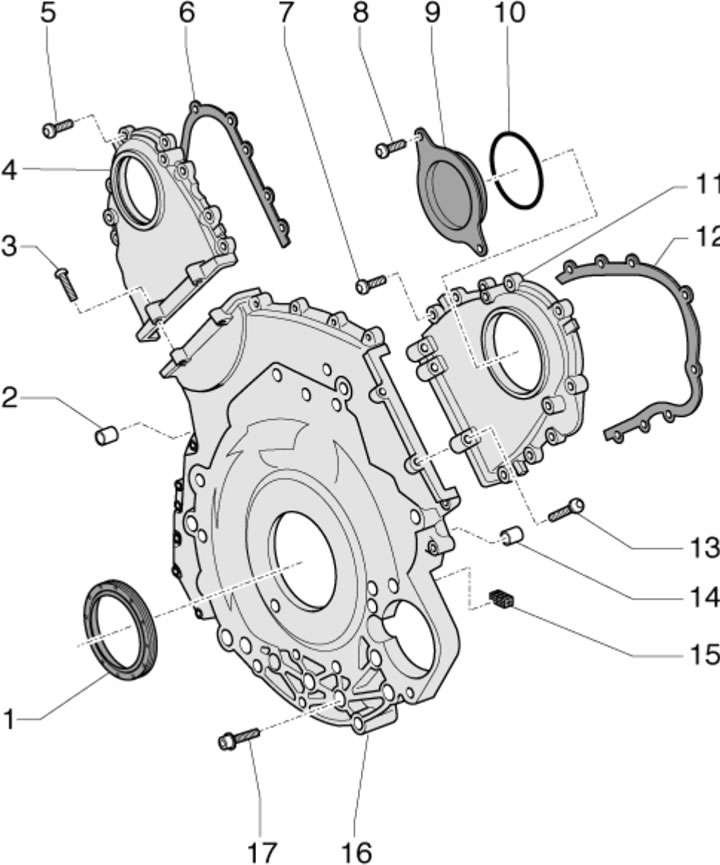
1. Timing chain cover installation details are shown in the illustration. The timing chains are located on the rear of the engine.

8.1. Timing chain cover installation details:

8.1. Timing chain cover installation details:

1 - Rear crankshaft oil seal;
2, 14 - Centering bushings, 2 pcs.;
3, 5, 7, 13 - Bolts subject to replacement, tightened in several approaches, with a final force of 9 Nm;
4 - Left upper timing chain cover;
6, 12 - Gasket, subject to replacement;
8 - Bolt, 9 Nm;
9 - Sealing cover;
10 - O-ring, must be replaced;
11 - Right upper timing chain cover;
15 - Sealing element;
16 - Lower timing chain cover;
17 - Cover fastening bolts 16.


2. Remove the drive disc (see Section 7) and the rear right coolant pipe (see Chapter 3), and on CASA/CASB engines, additionally remove the rear left coolant pipe.

3. Remove the turbocharger (see Chapter 4).

4. Remove the left and right intermediate pipes of the exhaust system (see Chapter 4).

5. Drain the engine oil (see Section 6 of Chapter 1).

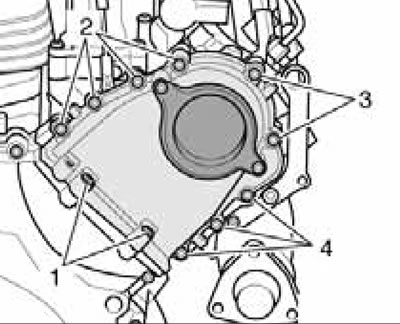
6. Remove the bolts (1-4 in the illustrations) and remove the lids.
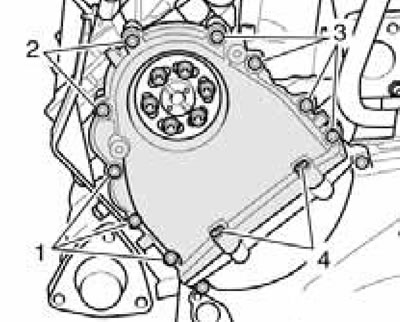
8.6a. Upper left timing chain cover mounting bolts.
8.6a. Upper left timing chain cover mounting bolts.


8.6b. Upper right timing chain cover mounting bolts.

8.6b. Upper right timing chain cover mounting bolts.


7. On CASA/CASB engines, remove the bolt (arrow in the illustration) and remove the lower section of the return oil pipe (1) from the cylinder block.
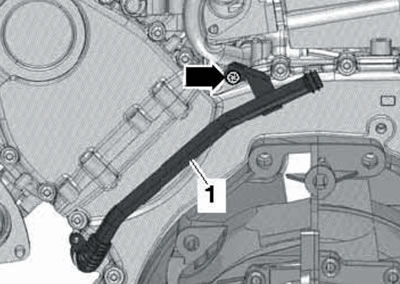
8.7. Fastening the lower section of the return oil pipe to the cylinder block (cASA/CASB engines).

8.7. Fastening the lower section of the return oil pipe to the cylinder block (cASA/CASB engines).


8. Remove the bolts (1-9 in the illustration) and remove the lower timing chain cover.
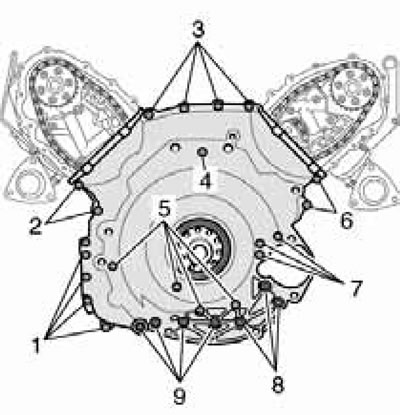
8.8. Lower timing chain cover mounting bolts.

8.8. Lower timing chain cover mounting bolts.


Remove the rear crankshaft oil seal from it (see Section 7).

9. Using a plastic drill brush attachment, remove old sealant from the cover grooves and from the mating surfaces of the cover/cylinder head/cylinder block. At the same time, do not allow dirt to enter the lubrication system. Clean mating surfaces from oil and grease.

Note: After subsequent application of sealant, the lid must be installed within 5 minutes.


10. Install the sealing elements into the lower chain cover (2 and 5 in the illustration) and apply beads of sealant into the grooves (1 and 4).
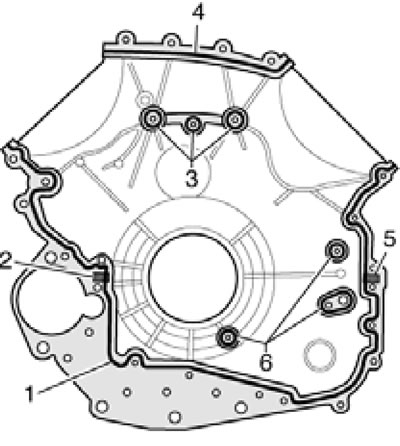
8.10. Lower timing chain cover seal parts.

8.10. Lower timing chain cover seal parts.


The sealant should completely fill the grooves and protrude 1.5-2.0 mm. Apply 1.5-2.0 mm diameter beads of sealant around holes (3 and 6). Make sure there are two centering bushings for the lower chain cover in the cylinder block. Install the cover and tighten its fasteners in the following order. Tighten all bolts first (1...9 in illustration 8.8) with a force of 5 Nm in a diagonal order, starting from the inside and moving outwards. Then, also in a diagonal order, tighten bolts (1...7) to 9 Nm. Finally, tighten bolts (8 and 9) to 23 Nm.


11. Apply a bead of sealant into the groove (1 in illustration 8.11a) left upper chain cover.
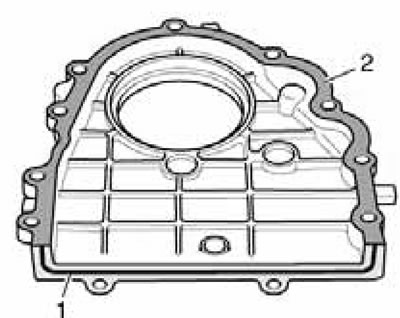
8.11a. Places to apply sealant to the left upper timing chain cover.

8.11a. Places to apply sealant to the left upper timing chain cover.


The sealant should completely fill the groove and protrude from it by 1.5-2.0 mm. Place the gasket (2). Apply 3 mm diameter beads of sealant to the joints of the left cylinder head and the lower timing chain cover (see illustration 8.11b), install the left upper chain cover and tighten its bolts in the following order.
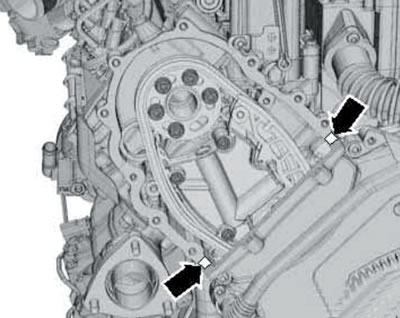
8.11b. Places where sealant is applied to the joint of the left cylinder head.

8.11b. Places where sealant is applied to the joint of the left cylinder head.


Tighten the bolt first (1 in illustration 8.11c) - with a force of 3 Nm, and then tighten the bolts in sequence (2-1-3) with a force of 9 Nm.
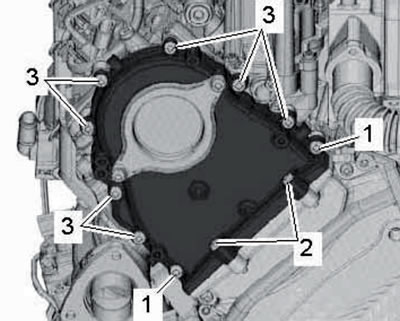
8.11s. Left upper timing chain cover bolt tightening sequence.

8.11s. Left upper timing chain cover bolt tightening sequence.


Note: Tighten the bolts (3) in a diagonal order.


12. Install the right upper timing chain cover in the same manner.

13. Install the new rear crankshaft oil seal and drive plate (see Section 7).

14. Install the lower section of the return oil line, intermediate outlet pipes and turbocharger.

15. Install the coolant pipes, add engine oil and check the coolant level (see Chapter 1).

(Read the original source on the website: «Audimanual.ru»)
The article was checked by auto expert Daniil Ushakov
This article is available at russian, bulgarian, belarusian, ukrainian, serbian, croatian, romanian, polish, slovak, hungarian

Share information:
Previous articles
Audi Q Q7 Typ 4L: Diesels 3.0 l (BUG, BUN, CAS)
Next articles

Removal and installation the drive disc and crankshaft seals
Removal and installation of auxiliary drive components
Removal and installation engine mounts and crossmembers
Removal and installation the 3.0L TDI engine of the 1st…
Removal and installation timing chains
Removal and installation the balance shaft and accessory drive…
Removal and installation cylinder heads and their covers
Work on the gas distribution mechanism


Similar articles on other Audi car models:
Timing Belt and Sprockets — Removal, Check and Installation Audi 80 B3 (1986-1991, petrol)
Valve timing marks — general description and use Audi 100 C3 (1982-1990, diesel)
Checking the timing belt for damage, measuring wear Audi A3 Type 8L (1996-2003)
Timing chain covers, timing valves Audi A4 B8 (2007-2015)
Timing chain — removal and installation Audi A6 C5 Allroad (1999-2005)
Replacing the timing belt Audi A8 D2 (1994-2002)
Timing Belt (4-cyl. petrol engine) Audi A2 (1999-2005)
Link to this page in different formats


Visitor comments

No comments yet


How much will 23 + 22 =


Q7 4L(2005-2015, diesel) 
  • General information
  • Operating instructions
  • Maintenance
  • Power unit
  • Diesels 3.0 l (BUG, BUN, CAS)
  • Diesels 3.0 l (CATA, CCMA)
  • Diesels 3.0 l (CJGA/CJGC)
  • Diesels 4.2 l (BTR, CCFA/CCFC)
  • Cooling system
  • Fuel and exhaust system
  • Engine management system
  • Starting and charging
  • Transmission
  • Automatic gearbox
  • Drive shafts
  • Chassis
  • Brake system
  • Front suspension
  • Rear suspension
  • Steering system
  • Body
  • Air conditioner
  • Exterior
  • Interior
  • Electrical equipment
  • Equipment and devices
  • Electrical circuits
 
Q5 8R(2008-2017) 
  • General information
  • User manual
  • Power unit
  • Petrol engine 2.0 l
  • Petrol engine 3.2 l
  • Fuel system (petrol)
  • Diesel 2.0 liter (CA)
  • Diesel 2.0 liter (CG/CJ/CM)
  • Diesel engine 3.0 l
  • Fuel system (diesel)
  • Transmission
  • Manual gearbox 0B1
  • Manual gearbox 0B2
  • Automatic gearbox 0B5
  • Automatic gearbox 0B6
  • Chassis
  • Front suspension
  • Rear suspension
  • Brake system
  • Steering
  • Body
  • Exterior
  • Interior
  • Doors, locks and windows
  • Safety system
  • Ventilation and heating
  • Electrical equipment
  • Power devices
  • Equipment and devices
  • Lighting and alarm
  • Audio system
  • Electrical circuits
 
AudiManual.ru © 2017-2026 · Mobile version · Feedback · Sitemap: EN BG BY UA RS HR RO PL SK HU · Site search · News and articles
80 B2 · 80 B3 petrol · 80 B3 · 80 B4 · 100 C3 diesel · 100 C3 petrol · 100 C3 · 100 C4 petrol · 100 C4 · A3 Type 8L · A4 B5 petrol · A4 B5 · A4 B6 petrol · A4 B6 · A4 B7 · A4 B8 · A6 C4 · A6 C5 · A6 C5 Allroad · A8 D2 · Q5 Type 8R · Q7 Typ 4L · Audi A2 ·
This site uses cookies 🍪. Click the button to accept this fact.