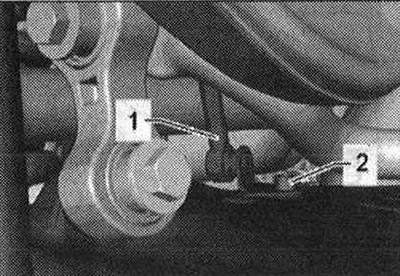
Repair Chevrolet Repair Toyota Repair Honda Repair AvtoVAZ Repair Mercedes-Benz Repair BMW Repair Opel
Home  |  Contacts  |  Sitemap  |    
English Русский
Български
Беларускі
Український
Српски
Hrvatski
Română
Polski
Slovenský
Magyar
AudiManual.ru


  • AUDI 80
  • AUDI 100
  • AUDI A3
  • AUDI A4
  • AUDI A6
  • AUDI A8
  • AUDI Q
  • OTHER
  • ARTICLES
Q7 Typ 4L (2005-2015, diesel) Q5 Type 8R (2008-2017)

Removal the lower control arm (Audi Q5-8R)

  • Home
  • Audi Q
  • Q5 Type 8R (2008-2017)
  • Chassis
  • Rear suspension
  • Removal the lower control arm
            0
Before starting work, measure the distance "a" from the center of the wheel to the lower edge of the wheel arch, while the wheels are still on the car. Install the car on a lift. Remove the wheel. Remove the coil spring. For cars with ground clearance sensor "1", unscrew bolt "2".

Before starting work, measure the distance «a» from the center of the wheel to the lower edge of…


Unscrew bolt "4".

Unscrew bolt «4».


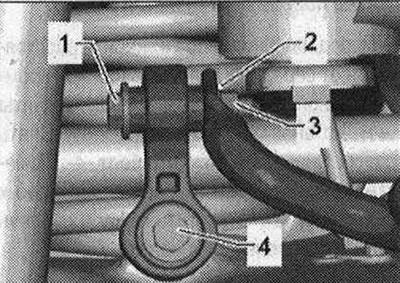
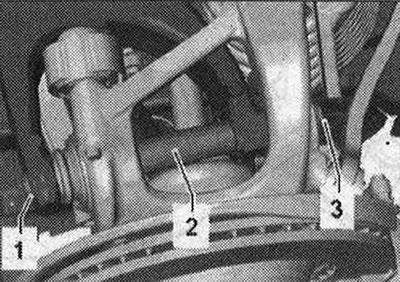
Unscrew nut "3". Unscrew bolt "1" and remove spacer tube "2". If nut "3" loosens or bolt is removed, wheel alignment must be adjusted. Unscrew bolt "1". Unscrew nut "3" and remove bolt "2". Remove lower wishbone.

Unscrew nut «3». Unscrew bolt «1» and remove spacer tube «2». If nut «3» loosens or bolt is…


Installation


Installation in reverse order. In this case, it is necessary to take into account the tightening torques. The "belt" blocks have a limited working range of twisting. Therefore, the wheel suspension bolt connections should be tightened only when the car is in the unloaded position or the standard suspension position. Raise the wheel support with the suspension in a static position on a car with coil springs. Insert the lower transverse arm and first bait bolt "1".


Installation in reverse order. In this case, it is necessary to take into account the tightening…


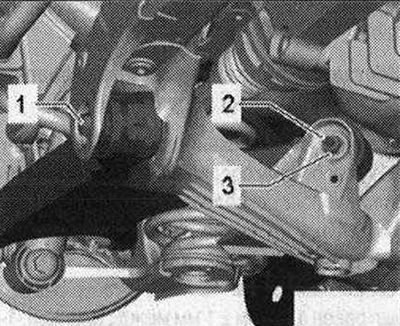
To ensure free rotation of the head of bolt "2" during tightening, remove the aerodynamic trim and wheel spoiler. Insert bolt "2" and tighten nut "3". Insert bolt "1" with spacer tube "2" and tighten nut "3". Do not use nut "3" to tighten the threaded connection. Tighten bolt "1". Tighten the remaining threaded connections. Install the coil spring. Tighten the wheel. It is necessary to adjust the wheel alignment angles. For vehicles with automatic transmission, headlight range control, perform basic headlight adjustment. After removing and installing the ride height sensor or unfastening the rods on vehicles with electronic damping control, the adjustment position must be readjusted. After re-adapting the adjustment position on vehicles with lane assist, the lane assist control unit "J759" must be recalibrated.
The article was checked by auto expert Timur Bazhenov
This article is available at russian, bulgarian, belarusian, ukrainian, serbian, croatian, romanian, polish, slovak, hungarian

Share information:
Previous articles
Audi Q Q5 Type 8R: Rear suspension
Next articles

Upper wishbone, tie rod, coil spring, lower wishbone, ride…
Removal the connecting rod with the stabilizer
Replacing the rear silent block of the rear axle main gear
Replacing the front silent block of the rear axle main…
Removal the upper control arm
Removal the tie rod
Removal the coil spring
Body level sensor


Similar articles on other Audi car models:
Front lower control arm — removal, overhaul and installation Audi 80 B3 (1986-1991, petrol)
Heater Remote Control (without Air Conditioner) — Removal and… Audi 100 C3 (1982-1990, diesel)
Removal and installation the lower engine compartment cover Audi A3 Type 8L (1996-2003)
Removal the servo control pump Audi A4 B5 (1994-2001, petrol)
Lower control arm of the front suspension Audi A6 C4 (1994-1997)
Air Conditioning Control Audi A8 D2 (1994-2002)
Removal and installation the lower trim of the A-pillar Audi A2 (1999-2005)
Link to this page in different formats


Visitor comments

No comments yet


How much will 46 + 25 =


Q7 4L(2005-2015, diesel) 
  • General information
  • Operating instructions
  • Maintenance
  • Power unit
  • Diesels 3.0 l (BUG, BUN, CAS)
  • Diesels 3.0 l (CATA, CCMA)
  • Diesels 3.0 l (CJGA/CJGC)
  • Diesels 4.2 l (BTR, CCFA/CCFC)
  • Cooling system
  • Fuel and exhaust system
  • Engine management system
  • Starting and charging
  • Transmission
  • Automatic gearbox
  • Drive shafts
  • Chassis
  • Brake system
  • Front suspension
  • Rear suspension
  • Steering system
  • Body
  • Air conditioner
  • Exterior
  • Interior
  • Electrical equipment
  • Equipment and devices
  • Electrical circuits
 
Q5 8R(2008-2017) 
  • General information
  • User manual
  • Power unit
  • Petrol engine 2.0 l
  • Petrol engine 3.2 l
  • Fuel system (petrol)
  • Diesel 2.0 liter (CA)
  • Diesel 2.0 liter (CG/CJ/CM)
  • Diesel engine 3.0 l
  • Fuel system (diesel)
  • Transmission
  • Manual gearbox 0B1
  • Manual gearbox 0B2
  • Automatic gearbox 0B5
  • Automatic gearbox 0B6
  • Chassis
  • Front suspension
  • Rear suspension
  • Brake system
  • Steering
  • Body
  • Exterior
  • Interior
  • Doors, locks and windows
  • Safety system
  • Ventilation and heating
  • Electrical equipment
  • Power devices
  • Equipment and devices
  • Lighting and alarm
  • Audio system
  • Electrical circuits
 
AudiManual.ru © 2017-2026 · Mobile version · Feedback · Sitemap: EN BG BY UA RS HR RO PL SK HU · Site search · News and articles
80 B2 · 80 B3 petrol · 80 B3 · 80 B4 · 100 C3 diesel · 100 C3 petrol · 100 C3 · 100 C4 petrol · 100 C4 · A3 Type 8L · A4 B5 petrol · A4 B5 · A4 B6 petrol · A4 B6 · A4 B7 · A4 B8 · A6 C4 · A6 C5 · A6 C5 Allroad · A8 D2 · Q5 Type 8R · Q7 Typ 4L · Audi A2 ·
This site uses cookies 🍪. Click the button to accept this fact.