
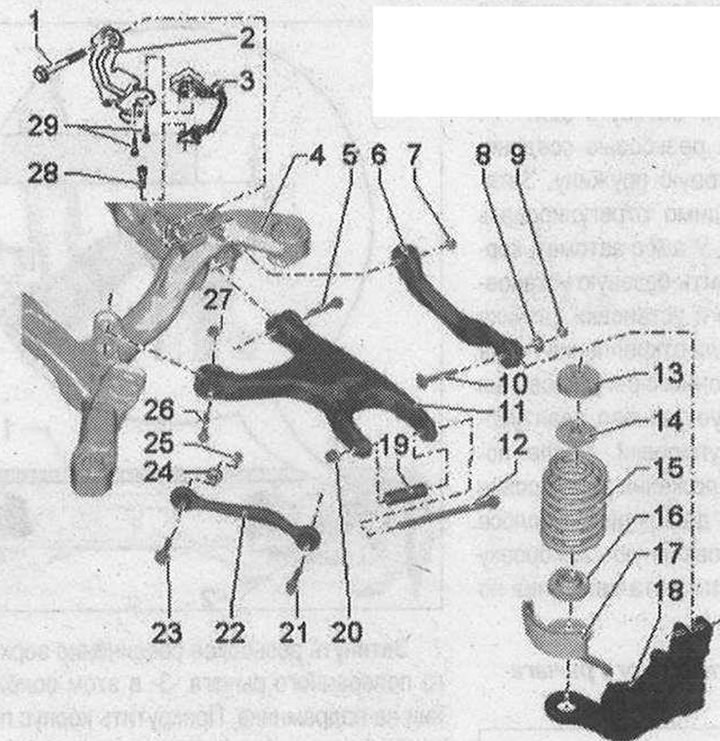
Upper wishbone, tie rod, coil spring, lower wishbone, ride height sensor 1. Bolt. 70 Nm + turn further by +180°. Replace each time when removing. Tighten only when the vehicle is in a no-load position; 2. Mounting bracket.; 3. Rear left ride height sensor "G76". Install only the same version of the sensor. Complete with add-on parts. The sensor arm faces outward. Replacement is performed on the vehicle. After loosening, check the basic setting of the headlights. After removing and installing the vehicle level sensor or loosening the rods on vehicles with electronic control, the standard suspension position must be re-adjusted. After re-adapting the adjustment position on vehicles with lane assist, the lane assist control unit "J759" must be recalibrated; 4. Subframe; 5. Bolt. 70 Nm + turn further by +180°. Replace each time when removing. Tighten only when the vehicle is in the unloaded position; 6. Upper wishbone; 7. Nut. Replace each time it is removed; 8. Adjusting washer; 9. Nut. 95 Nm. Replace each time it is removed. Tighten only when the vehicle is at its unladen weight; 10. Adjusting screw; 11. Lower wishbone; 12. Bolt. 120 Nm + 360°. Replace each time it is removed. Tighten only when the vehicle is unloaded. If the bolt is removed, it is necessary to adjust the wheel alignment angle; 13. Upper spring spacer washer; 14. Upper spring pad. Only installed on vehicles with a rough road chassis; 15. Coil spring. It is necessary to take into account the differences in the design of the chassis, see the plate with the vehicle data; 16. Lower spring gasket; 17. Stone protection for coil spring; 18. Hub bearing housing; 19. Spacer tube. Replace each time it is removed; 20. Nut. Replace each time it is removed. Do not use the nut to tighten the threaded connection. If the nut becomes loose, the wheel alignment must be adjusted; 21. Bolt. 90 Nm + 90° further. Replace each time when removing. Tighten only when the vehicle is in a no-load position; 22. Cross tie. Consider the installation position. Consider the different designs: aluminum and steel. Simultaneous installation of 2 racks of different types is not allowed; 23. Bolt; 24. Eccentric washer; 25. Nut. 95 Nm. Replace each time when removed. Tighten only when the vehicle is in a no-load position; 26. Bolt. 70 Nm + turn further by +180°. Replace each time when removing. Tighten only when the vehicle is in the unloaded position; 27. Nut. Replace each time it is removed; 28. Bolt. 9 Nm; 29. Bolt. 5 Nm