
Warning: Brake fluid is poisonous. If it gets on your skin, wash it off immediately with plenty of water. If it gets into your body or into your eyes, seek medical attention. Some types of brake fluid are flammable and may ignite when in contact with hot parts. When handling brake fluid, take fire safety measures as when working with gasoline. Brake fluid is aggressive to paintwork and plastics. If the fluid gets on the car body, wash it off with plenty of water. The fluid is also hygroscopic, which means it absorbs moisture from the air, making it unsuitable for use. Never use fluid that has expired. When adding or replacing fluid, always use the specified type and from a freshly opened container.
General information
1. The correct operation of the system is possible only after all air has been removed from the components and circuits. This is achieved by bleeding the system.
2. When filling the system, use only clean, fresh fluid of the recommended type and grade. Never reuse fluid. Stock up on a sufficient amount of fluid for replacement.
3. If a fluid of a type not recommended has entered the hydraulic system Specification, the system must be completely flushed, all seals replaced and filled with fresh, clean fluid of the prescribed type.
4. Before starting work on replacing the fluid, eliminate all leaks.
5. Place the vehicle horizontally on a pit or lift. Otherwise, apply the handbrake, raise the front of the vehicle and install safety supports. If necessary, remove the lower powertrain guard from under the vehicle. Remove the wheels for better access.
6. Check the reliability of the tubes, hoses, connections. Remove the caps from the bleed nipples and clean the areas around them from dirt.
7. Unscrew the brake reservoir cap and fill the fluid level to the maximum. Close the cap, remember that during the procedure the fluid level should not fall below the minimum mark, otherwise there is a risk of air penetration into the system.
8. There are a sufficient number of ways to bleed the brakes yourself without an assistant, and auto shops sell all sorts of devices for this. We recommend purchasing one of them, as this greatly simplifies the operation. The main method (with an assistant) described below.
9. If you have purchased the device, prepare the vehicle as described above and then proceed in accordance with the manufacturer's instructions.
10. Whichever method you choose, the pumping sequence (pp. 11 and 12) and the result should be the same - removal of all air from the system.
Pumping sequence
11. If only one circuit was opened, there is no need to bleed the entire system.
12. When bleeding the entire system, follow the following bleeding sequence:
- a) Right rear wheel
- b) Left rear wheel
- c) Right front wheel
- d) Left front wheel
Pumping
Basic method (with an assistant)
13. Prepare a clean glass jar, a rubber or plastic hose that needs to be pulled onto the bleed nipple, and a socket wrench for the nipple. You will also need an assistant.
14. Remove the dust cap of the first (in the above sequence) fitting, put a wrench on the fitting and tighten the hose. Lower the free end of the hose into the jar and pour in enough liquid so that its level is higher than the end of the hose.
15. When performing this procedure, the fluid level in the tank must be maintained at no lower than the MIN mark.
16. Have an assistant press the brake pedal several times to build up pressure in the system, and then hold the pedal down.
17. With the pedal pressed, unscrew the nipple approximately one turn to release air and pressurized liquid into the jar.
18. The assistant should press the pedal to the floor and not release it without your command. As soon as the fluid stops flowing, tighten the nipple and ask the assistant to release the pedal. Check the fluid level in the brake reservoir.
19. Repeat the operations described in points 16 and 19 until bubbles stop appearing from the hose.
20. If no more bubbles come out, tighten the nipple. Remove the hose and key. Install the dust cap on the nipple.
21. Repeat the bleeding procedure for the remaining working cylinders (in the sequence indicated above), until the air is completely removed from the system and the brake pedal becomes "hard".
Bleeding - the "check valve" method
22. The name implies the use of a check valve to prevent air from entering the system. A transparent container may also be included in such a kit.
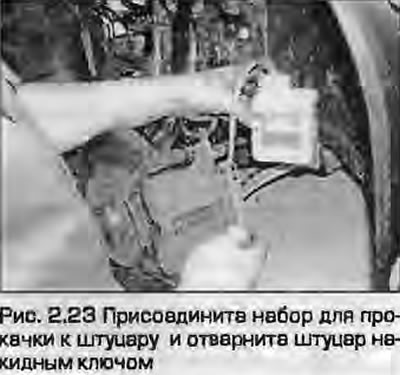
23. Attach this device to the bleeding nipple and unscrew it. Get behind the wheel, press the brake pedal sharply - release smoothly. Repeat the procedure until bubbles stop coming out of the "valve".
24. The use of such a device is intended to facilitate bleeding the circuit, but not to refill the brake reservoir with fluid. During the procedure, make sure that the fluid level in the reservoir does not fall below the minimum, otherwise air may get into the system and start all over again.
Pumping using external pressure
25. Such devices usually work using air from, for example, a spare tire. Keep in mind that you may have to lower the air pressure (see the instructions for use of the device).
26. Attach a sealed container with pressurized fluid to the brake reservoir. After this, simply unscrew the bleed nipples in accordance with the above sequence. Release the fluid until bubbles stop appearing.
27. This method has the advantage that the system is protected from the possibility of air penetration during pumping.
28. Bleeding under pressure is especially effective when bleeding complex systems or when completely replacing fluid.
All methods
29. After removing air from the system and restoring the pedal's "rigidity", wash away any fluid leaks. Tighten the fittings to the specified torque. Install the dust caps.
30. Check the fluid level in the reservoir and top up if necessary (see Weekly Checks).
31. Throw away the drained liquid - it cannot be reused.
32. Check the pedal stiffness. If the pedal is "soft" or the free play is large, there may still be air in the system and repeated bleeding is required. If repeated bleeding does not produce the desired result, the master cylinder seals may be worn out.
Note: If the air cannot be completely removed by bleeding the system, it may be because air has entered the ABS hydraulic system. Contact your dealer for assistance, as specialized diagnostic equipment is required to completely remove the air in this case.