
Table of contents: Replacing the tie rod end ↓ Replacing the steering rod assembly ↓
Outer end of the tie rod
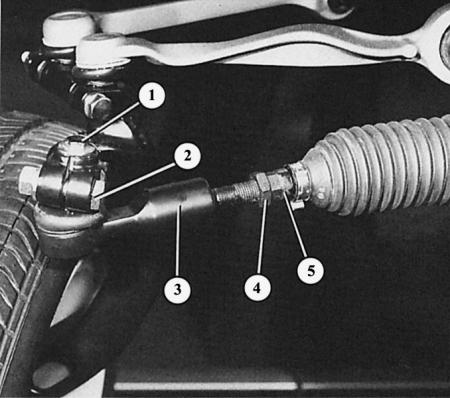
- 1 - wheel alignment bolt when turning;
- 2 - Clamping bolt of the transverse steering rod;
- 3 - tie rod end;
- 4 - lock nut;
- 5 - hexagon of the transverse steering rod.
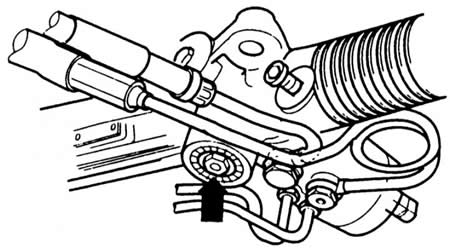
The arrow indicates the mounting position of the steering gear mounting bolt.
Replacing the tie rod end
1. Remove the wheel.
2. Loosen the self-locking nut on the tie rod clamp bolt.
3. Remove the clamp bolt.
4. Loosen the wheel alignment bolt when turning.
5. Press the tie rod end down from the steering arm on the wheel bearing housing.
6. Unscrew the lock nut on the tie rod head, while pressing the hexagon of the tie rod in the opposite direction.
7. Mark the position of the screw connection of the transverse steering rod, then after screwing the track width will be approximately the same.
8. Unscrew the tie rod end and transfer the marking to the new tie rod end.
9. Installation: press the pin of the tie rod head into the steering knuckle, if necessary, carefully tap it in.
10. Tighten the new self-locking nut to 40 Nm.
11. Tighten the lock nuts to 40 Nm as well.
12. Check wheel alignment.
Replacing the steering rod assembly
This work sometimes fails due to the inaccessibility of the screw connection between the tie rod and the steering gear. For this screw connection there is a VAG 1923 key that allows you to tighten this screw connection to 100 Nm. Recommended for use.
1. Separate the tie rod end from the steering arm as described in the previous section.
2. Loosen the bellows on the tie rod and steering gear, remove.
3. Unscrew the transverse steering rod from the steering gear arm.
4. Installation: Lubricate the inner joint with steering gear grease AOF 063 000 04.
5. Tighten the new tie rod onto the steering linkage to 100 Nm.
6. Install the bellows.
7. Secure the head to the tie rod and steering knuckle as described above.
8. Check wheel alignment.