



Table of contents: Adjustment, Keihin-I carburetor ↓ Carburetor Keihin-ll ↓
Warm up the engine. Oil temperature +60°C.
Turn off all electrical consumers, including the air conditioner.
Connect the tachometer.
Attention: connection must be made only with the ignition off.
Check the ignition timing.
Connect the CO measuring device. For vehicles with a catalytic converter, connect the device to the CO intake pipe in the engine compartment. The intake pipe is attached to the front exhaust manifold and is usually closed with a blue cap.
Caution: Push the measuring instrument hose onto the measuring pipe. Make sure that there is no exhaust gas leakage.
Fully retract the starting air flap actuator. Check that the air flap (the topmost valve in the carburetor) was fully open. Otherwise, adjust the drive or release the damper. To do this, remove and put back on the air filter.
Disconnect the air bleed hose from the crankcase at the cylinder head and plug it with a suitable plug. If the hose is secured with a clamp, use the special HAZET 798-4 pliers to make the job easier.
Start the engine and let it idle. Check the idle speed and CO content. The required values are in the chapter "Repair characteristics".
Adjustment, Keihin-I carburetor
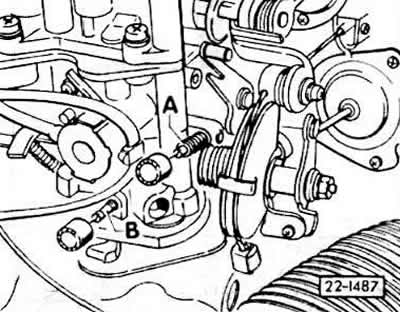
Carburetor Keihin-ll
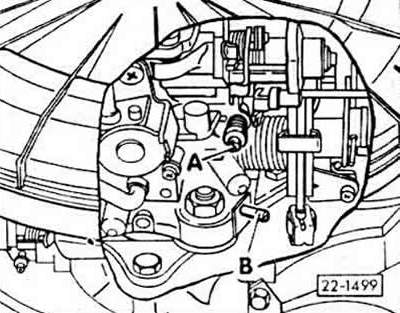
Remove protective seals.
Set the required values using the idle speed "A" and CO content "B" adjusting bolts.
Note: The radiator fan must not operate during adjustment.
Insert new fillings.
Disconnect the measuring instruments with the ignition off.
Place the crankcase ventilation hose on the cylinder head and secure with a clamp.
Note: If the CO content now increases, the reason is not incorrect adjustment, but rather enrichment of the mixture from the crankcase due to dilution of the oil during intensive short-distance driving.
With longer trips, the amount of gasoline in the oil decreases and the CO content normalizes. This can be quickly achieved with a 30-minute trip or an oil change.