Repair Chevrolet Repair Toyota Repair Honda Repair AvtoVAZ Repair Mercedes-Benz Repair BMW Repair Opel
Home  |  Contacts  |  Sitemap  |    
English Русский
Български
Беларускі
Український
Српски
Hrvatski
Română
Polski
Slovenský
Magyar
AudiManual.ru


  • AUDI 80
  • AUDI 100
  • AUDI A3
  • AUDI A4
  • AUDI A6
  • AUDI A8
  • AUDI Q
  • OTHER
  • ARTICLES
B4 (1991-1996) B3 (1986-1991) B3 (1986-1991, petrol) B2 (1979-1986)

Installation and removal of the camshaft (Audi 80 B3)

  • Home
  • Audi 80
  • B3 (1986-1991)
  • Power unit
  • Gasoline engine
  • Installation and removal of the camshaft
            0
Table of contents: Dismantling ↓ Installation ↓ 5-cylinder engine. ↓

Dismantling


Remove the air filter. Remove the upper timing belt cover.

5-cylinder engine: remove the upper part of the intake manifold.

Remove the cylinder head cover.

Set the crankshaft to TDC of the piston of the 1st cylinder.

Note: Do not change the engine position again.


Loosen the timing belt and remove it upwards from the camshaft wheel.

5-cylinder engine: remove the ignition distributor.

Secure the camshaft gear at the front with a suitable rod. Unscrew and remove the camshaft gear, otherwise knock it out with light blows of a rubber hammer. Remove the camshaft key.

Mark all bearing caps.

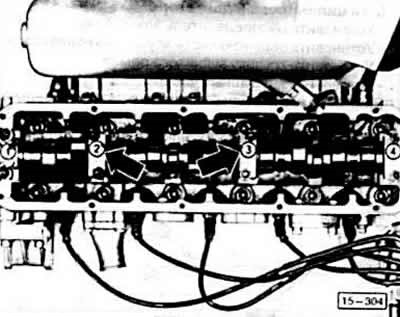
Remove the 1st and 3rd bearing caps. Then loosen the 2nd and 4th alternately crosswise.

Diesel engine: First remove bearing caps 5, 1 and 3, then loosen bearing caps 2 and 4 alternately in a crosswise pattern.

Remove the camshaft.

Note: If the plate tappets are removed, they must be replaced so that they can be reinstalled in their original position. Place the tappets with the working surface (camshaft side) down.

Note: If the plate tappets are removed, they must be replaced so that they can be reinstalled in…


Installation


Installation


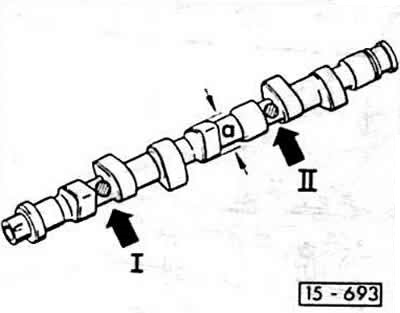
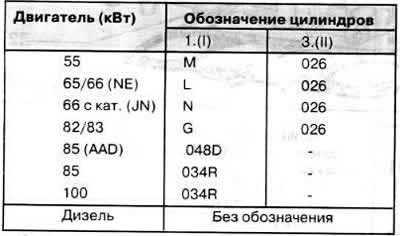
The camshaft is marked with numbers and letters stamped between the intake and exhaust cams.


The camshaft is marked with numbers and letters stamped between the intake and exhaust cams.

Note: For the 4-cylinder petrol engine, the cylinder heads are partly supplied with bearing shells. There are two versions: a cylinder head with machined journals for using a normal-sized camshaft (journal diameter = 26.00).


Caution: Cylinder head with machined bearing beds and camshaft with reduced main journal size (journal size = 25.75 mm and yellow dot on VW-AUDI sign). The latter camshafts are not available as spare parts, a normal size camshaft with the corresponding bearing shells must be used.


Before installing a long-life camshaft, it must be checked for radial play. Its permissible value is 0.01 mm.

If a camshaft with a long service life is installed or if there is noise in the operation of the valve timing mechanism, it is necessary to check the axial (longitudinal) clearance. Its permissible value is 0.15 mm. The measurement is performed with the plate tappets removed and the 1st and 4th bearing caps installed, for a diesel engine the 1st and 5th.

Install a new camshaft oil seal. Lightly lubricate the installation areas.

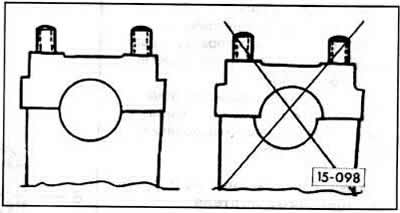
If the rear plug is damaged, replace it.
If the rear plug is damaged, replace it.


Install the bearing caps. Check that there is no lateral displacement. The holes in the caps and the cylinder head must match.


If the plate tappets were removed, they must be installed in place. Lightly lubricate the tappets and insert them into place without skewing.

Note: The tappets are not replaceable.


Lubricate and install the camshaft.

Note: The cams of the 1st cylinder must be facing upwards. Install the bearing caps in accordance with the marks. Watch the axial offset; tighten bearing caps 2 and 4 alternately crosswise with a force of 20 Nm.


Install bearing caps 1 and 3 and tighten to 20 Nm.

Diesel engine: Install bearing caps 5, 1 and 3 and tighten to 20 Nm. At the same time, adjust bearing cap 5 with light blows of a polymer hammer.

Insert the camshaft gear key. Put the gear on and tighten it to 80 Nm. Hold the gear with a suitable rod.

Place the toothed belt on the pinion. Ensure that the intermediate shaft and V-belt pulley are installed correctly.

Tighten the timing belt.

For the cylinder head cover, use a new seal, carefully tighten the cylinder head cover bolts to 10 Nm.

5-cylinder engine.


Install the ignition distributor.

Install the upper intake manifold.

Install the timing belt cover.

Install the air filter.

Caution: If new bucket tappets have been installed, the engine must not be started for approximately 30 minutes, otherwise the valves may collide with the pistons.
The article was checked by auto expert Elisey Ermolaev
This article is available at russian, bulgarian, belarusian, ukrainian, serbian, croatian, romanian, polish, slovak, hungarian

Share information:
Previous articles
Audi 80 B3: Gasoline engine
Next articles

Camshaft/Valve timing mechanism
Installation and removal of the timing belt
Checking and adjusting the timing belt tension
V-belt and toothed belt drive
Cylinder head
Dismantling and installation of the cylinder head
Hydraulic pusher
Removal the engine valve


Similar articles on other Audi car models:
Camshaft Cover — Removal and Installation Audi 100 C3 (1982-1990, diesel)
Adjusting the camshaft Audi A4 B6 (2000-2006, petrol)
Electrical diagram of the Motronic control unit, air mass meter,… Audi A6 C5 (1997-2004)
Camshaft Audi A8 D2 (1994-2002)
Camshaft chain drives Audi Q5 Type 8R (2008-2017)
Camshaft housing — design description Audi A2 (1999-2005)
Link to this page in different formats


Visitor comments

No comments yet


How much will 10 + 28 =


80(B4, 1991-1996) 
  • General information
  • User manual
  • Maintenance
  • Troubleshooting
  • Power unit
  • Engine
  • Cooling system
  • Heating and ventilation
  • Petrol injection
  • Diesel fuel system
  • Fuel system
  • Exhaust systems
  • Ignition system
  • Transmission
  • Clutch
  • Car gearbox
  • Chassis
  • Brake system
  • Suspension and steering wheel
  • Body
  • Body and trim
  • Electrical equipment
  • Electrical system
  • Electrical circuits
 
80(B3, 1986-1991) 
  • General information
  • Repair characteristics
  • Maintenance
  • Power unit
  • Gasoline engine
  • Diesel engine
  • Engine lubrication system
  • Fuel system (gasoline)
  • Injection system (gasoline)
  • Fuel system (diesel)
  • Ignition system
  • Cooling system
  • Heater
  • Exhaust system
  • Transmission
  • Clutch and gearbox
  • Chassis
  • Steering
  • Brake system
  • Car suspension
  • Body
  • Body elements
  • Electrical equipment
  • Power devices
  • Lighting and appliances
  • Electrical circuits
 
80(B3, 1986-1991, petrol) 
  • General information
  • User manual
  • Maintenance
  • Power unit
  • Engine 4-cylinder
  • Engine 5-cylinder
  • Cooling system
  • Fuel and exhaust systems
  • Ignition system
  • Transmission
  • Clutch
  • Mechanical transmission
  • Automatic transmission
  • Drive shafts
  • Chassis
  • Brake system
  • Suspension
  • Steering
  • Body
  • Exterior
  • Interior
  • Electrical equipment
  • Equipment and devices
  • Electrical circuits
 
80(B2, 1979-1986) 
  • General information
  • User manual
  • Power unit
  • Engine FZ
  • Engine EP, YP, YZ, DT, DS, DZ
  • Transmission
  • Clutch
  • 4 speed gearbox
  • 5 speed gearbox
  • Front wheel drive
  • Chassis
  • Front suspension
  • Rear suspension
  • Steering
  • Brake system
  • Electrical equipment
  • Equipment and devices
  • Electrical circuits
 
AudiManual.ru © 2017-2026 · Mobile version · Feedback · Sitemap: EN BG BY UA RS HR RO PL SK HU · Site search · News and articles
80 B2 · 80 B3 petrol · 80 B3 · 80 B4 · 100 C3 diesel · 100 C3 petrol · 100 C3 · 100 C4 petrol · 100 C4 · A3 Type 8L · A4 B5 petrol · A4 B5 · A4 B6 petrol · A4 B6 · A4 B7 · A4 B8 · A6 C4 · A6 C5 · A6 C5 Allroad · A8 D2 · Q5 Type 8R · Q7 Typ 4L · Audi A2 ·
This site uses cookies 🍪. Click the button to accept this fact.