
Repair Chevrolet Repair Toyota Repair Honda Repair AvtoVAZ Repair Mercedes-Benz Repair BMW Repair Opel
Home  |  Contacts  |  Sitemap  |    
English Русский
Български
Беларускі
Український
Српски
Hrvatski
Română
Polski
Slovenský
Magyar
AudiManual.ru


  • AUDI 80
  • AUDI 100
  • AUDI A3
  • AUDI A4
  • AUDI A6
  • AUDI A8
  • AUDI Q
  • OTHER
  • ARTICLES
B4 (1991-1996) B3 (1986-1991) B3 (1986-1991, petrol) B2 (1979-1986)

Removal and installation the timing belt (Audi 80 B3)

  • Home
  • Audi 80
  • B3 (1986-1991)
  • Power unit
  • Diesel engine
  • Removal and installation the timing belt
            0
Table of contents: Removal ↓ Installation ↓

Removal


Remove the upper timing belt cover and cylinder head cover.
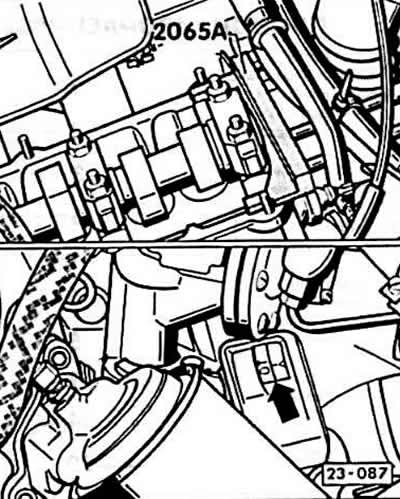
Remove the upper timing belt cover and cylinder head cover.


Set the crankshaft to the top dead center position of the first cylinder. To do this, turn the crankshaft with the key head on the belt pulley (gearbox set to neutral) before installing the crankshaft of the first cylinder -arrow-. Never turn the crankshaft by the toothed belt pulley.

The crankshaft is in the top dead center position of the first cylinder if the pair of cams of the first cylinder is facing upward.

In this position, the 206A adjustment ruler can be inserted into the slot of the camshaft.

Lock the camshaft with a straight edge. Straight edge (VW-Nr. 206A) has a protrusion that prevents the camshaft from turning.

Check the position with an adjusting ruler. To do this, turn the locked camshaft until the end of the adjusting ruler rests against the cylinder head. Using a feeler gauge, measure the resulting gap at the other end of the adjusting ruler. Insert a feeler gauge of half the thickness of the measuring gap between the adjusting ruler and the cylinder head. Then turn the camshaft so that the adjusting ruler rests against the feeler gauge. Insert a feeler gauge of the same size from the other end of the adjusting ruler between the ruler and the cylinder head.
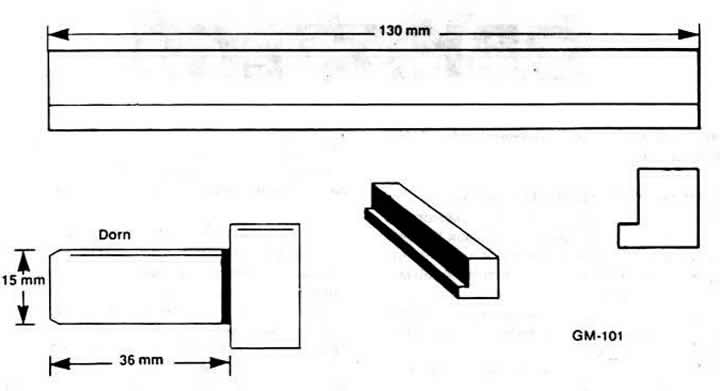


Check the position with an adjusting ruler. To do this, turn the locked camshaft until the end of…


Lock the high pressure fuel pump gear with a suitable rod.

Loosen the tension roller nut and remove the timing belt tension.
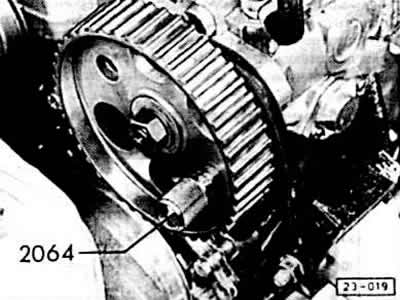
Loosen the tension roller nut and remove the timing belt tension.


Caution: When turning the camshaft with the timing belt removed, none of the pistons should be in the top position. Otherwise, severe damage to the pistons or valves may occur.


If you need to turn the camshaft, first set all the pistons below dead centers. To do this, draw a chalk line on the top of the crankshaft belt pulley (condition: the crankshaft is in the top dead center position of the first cylinder), then turn the crankshaft pulley ¼ turn (90°) to the left or right. The chalk mark should now be facing right or left.

Loosen and remove the V-belt.

Remove the timing belt.


Installation


Check through the hole in the gearbox whether the TDC marks on the flywheel and the reference mark match.

Loosen the camshaft toothed pulley mounting bolt by ⅓ of a turn. Knock the toothed pulley off the camshaft cone using a hammer blow on a rod inserted into a 6 mm hole in the rear toothed belt cover.

Install the timing belt as shown in Figure 13-786 and remove the high pressure fuel pump gear retaining pin.

Tighten the timing belt.

Tighten the tension roller nut to 45 Nm.

Tighten the camshaft timing pulley mounting bolt to 45 Nm.

Remove the adjustment ruler.

Turn the crankshaft 2 revolutions in the direction of engine rotation. Hit with a rubber hammer between the toothed pulley of the camshaft and the gear of the high-pressure fuel pump and check again that the tension of the toothed belt corresponds to the specified value, if necessary, tighten the belt.

Check the moment the high pressure fuel pump starts supplying fuel.

Install the V-belt pulley and lower casing, tighten the V-belt.

Replace the cylinder head cover gaskets, tighten the cylinder head cover.

Install the upper timing belt cover.

[The original publication in its entirety is posted on the website «AUDIMANUAL»]
The article was checked by auto expert Elisey Ermolaev
This article is available at russian, bulgarian, belarusian, ukrainian, serbian, croatian, romanian, polish, slovak, hungarian

Share information:
Previous articles
Audi 80 B3: Diesel engine
Next articles

Checking and adjusting the timing belt tension
Gas distribution mechanism drive
Diesel Engine. General Information


Similar articles on other Audi car models:
Timing Belt and Sprocket Tensioner Mechanism — Removal and… Audi 100 C3 (1982-1990, diesel)
Checking the timing belt for damage, measuring wear Audi A3 Type 8L (1996-2003)
Removal and installation the timing belt (4-cylinder) Audi A4 B6 (2000-2006)
Removal and installation the timing belt — Diesel engine… Audi A6 C5 (1997-2004)
Replacing the timing belt Audi A8 D2 (1994-2002)
Removal the timing belt Audi Q5 Type 8R (2008-2017)
Timing Belt (4-cyl. petrol engine) Audi A2 (1999-2005)
Link to this page in different formats


Visitor comments

No comments yet


How much will 35 + 10 =


80(B4, 1991-1996) 
  • General information
  • User manual
  • Maintenance
  • Troubleshooting
  • Power unit
  • Engine
  • Cooling system
  • Heating and ventilation
  • Petrol injection
  • Diesel fuel system
  • Fuel system
  • Exhaust systems
  • Ignition system
  • Transmission
  • Clutch
  • Car gearbox
  • Chassis
  • Brake system
  • Suspension and steering wheel
  • Body
  • Body and trim
  • Electrical equipment
  • Electrical system
  • Electrical circuits
 
80(B3, 1986-1991) 
  • General information
  • Repair characteristics
  • Maintenance
  • Power unit
  • Gasoline engine
  • Diesel engine
  • Engine lubrication system
  • Fuel system (gasoline)
  • Injection system (gasoline)
  • Fuel system (diesel)
  • Ignition system
  • Cooling system
  • Heater
  • Exhaust system
  • Transmission
  • Clutch and gearbox
  • Chassis
  • Steering
  • Brake system
  • Car suspension
  • Body
  • Body elements
  • Electrical equipment
  • Power devices
  • Lighting and appliances
  • Electrical circuits
 
80(B3, 1986-1991, petrol) 
  • General information
  • User manual
  • Maintenance
  • Power unit
  • Engine 4-cylinder
  • Engine 5-cylinder
  • Cooling system
  • Fuel and exhaust systems
  • Ignition system
  • Transmission
  • Clutch
  • Mechanical transmission
  • Automatic transmission
  • Drive shafts
  • Chassis
  • Brake system
  • Suspension
  • Steering
  • Body
  • Exterior
  • Interior
  • Electrical equipment
  • Equipment and devices
  • Electrical circuits
 
80(B2, 1979-1986) 
  • General information
  • User manual
  • Power unit
  • Engine FZ
  • Engine EP, YP, YZ, DT, DS, DZ
  • Transmission
  • Clutch
  • 4 speed gearbox
  • 5 speed gearbox
  • Front wheel drive
  • Chassis
  • Front suspension
  • Rear suspension
  • Steering
  • Brake system
  • Electrical equipment
  • Equipment and devices
  • Electrical circuits
 
AudiManual.ru © 2017-2026 · Mobile version · Feedback · Sitemap: EN BG BY UA RS HR RO PL SK HU · Site search · News and articles
80 B2 · 80 B3 petrol · 80 B3 · 80 B4 · 100 C3 diesel · 100 C3 petrol · 100 C3 · 100 C4 petrol · 100 C4 · A3 Type 8L · A4 B5 petrol · A4 B5 · A4 B6 petrol · A4 B6 · A4 B7 · A4 B8 · A6 C4 · A6 C5 · A6 C5 Allroad · A8 D2 · Q5 Type 8R · Q7 Typ 4L · Audi A2 ·
This site uses cookies 🍪. Click the button to accept this fact.