
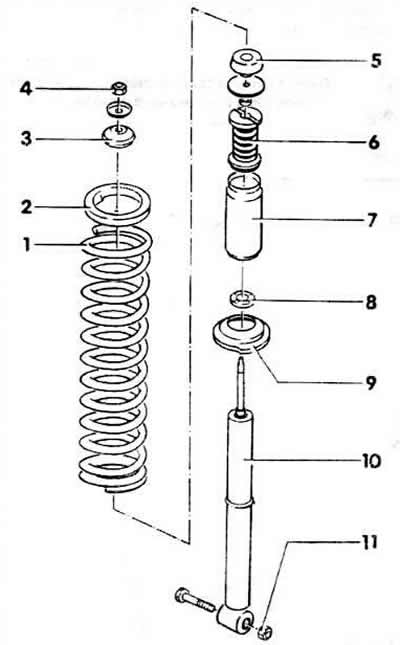
1 - coil spring
2 - damping ring
3 - rubber cushion
4 - nut, 30 Nm
Self-locking, always replace.
5 - rubber cushion
6 - Stop buffer
Differs between serial production vehicles and vehicles with increased cross-country capability.
7 - protective cover
8 - cap
9 - spring plate
10 - shock absorber
Can be replaced one by one.
11 - nut, 60 Nm
Self-locking, always replace.
Removal
Caution: Remove and install the shock absorber strut only on one side each time, otherwise the brake hoses will be stretched too much.
The car is mounted on wheels.
Remove the trunk trim.
Remove the shock absorber cap.
Unscrew the piston rod nut while holding the piston rod with a wrench.
Note: The vehicle must be on its wheels.
Raise the car.
Unscrew the mounting bolt from below.
Remove the shock absorber strut
Disassembly
When loosening the hex nut, hold the piston rod with a wrench
Installation
Shock absorbers can be replaced individually. Check the shock absorber
Note: There are coil springs of different tolerance groups. Springs of the same group should be installed on one axle (one color designation).
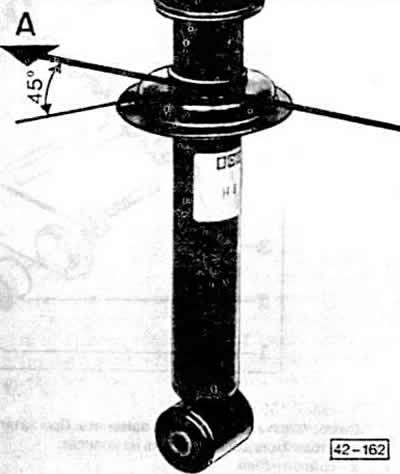
Install the spring plate. The protrusion on the plate faces 45° to the left of the direction of movement "A".
Assemble the coil spring and shock absorber according to Fig. 42-594.
Insert the rubber cushion and the damping ring of the shock absorber strut. Put the rubber cushion on the piston rod of the shock absorber from above in the trunk, install the plate and tighten the new self-locking nut several turns. Insert the rubber cushion and damping ring well covered with talc.
Insert the shock absorber from below. If necessary, slowly raise the wheel with a car lift. Tighten the new self-locking nut to 60 Nm.
Lower the car, tighten the shock absorber rod nut from above in the trunk with a force of 30 Nm, while holding the piston rod with a wrench.
You can also first secure the shock absorber from below, slowly lift the wheel with a car lift and insert the shock absorber rod into the guide at the top.
(The original text of the material can be found on the website: AUDIMANUAL)