
Table of contents: Complex 1 of units and parts on the… ↓ A set of 2 units and parts on the… ↓ Checking, removing and installing… ↓ Removal and checking the condensate… ↓ Removal and installation of used… ↓ Removal and installation the fan for… ↓ Removal and installation the cabin… ↓
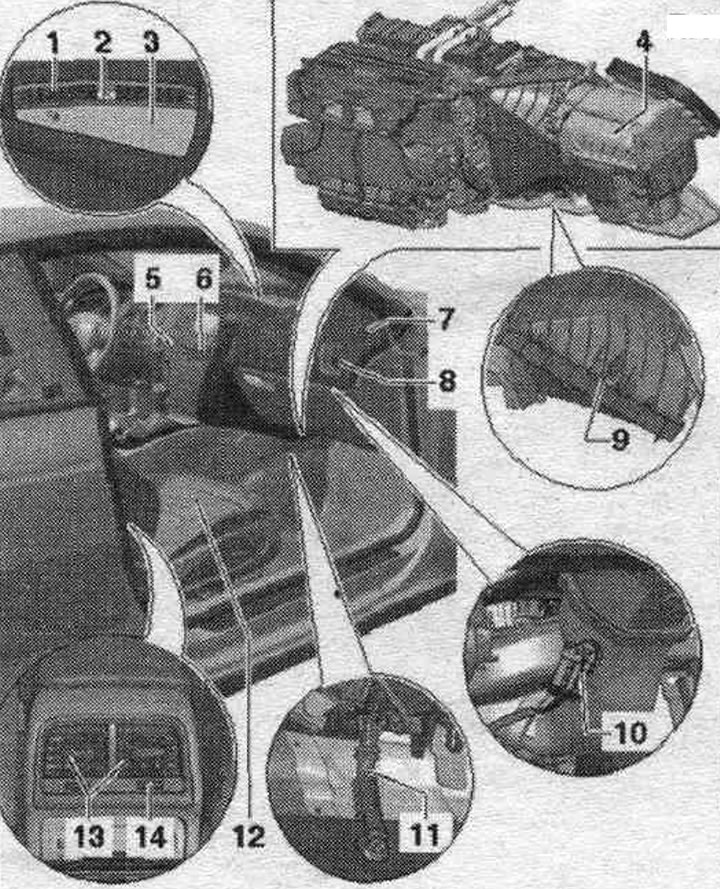
Complex 1 of units and parts on the left side

1. Left seat (the seat drives.) with heating and ventilation parts: seat heating and ventilation are not installed in all vehicles; heating and ventilation settings. the seats are replaced with used ones and climate control indicators, installations, used Climatronic "J255"; heating and ventilation control. seats is displayed in the block of measured values pan. climate control and indication. installations, used Climatronic "J255": heating and ventilation control. the seats are controlled, depending on the vehicle's equipment and design, through different control units.
2. Condensate drain on the left (the side drives.).
3. Gas pedal: Kick-Down - the compressor is switched off (via the compressor control valve "N280") at the request of the used engine (data is transmitted via the system. data bus); in the block of measured values pan. control and indication, used Climatronic "J255", you can read the current state of "N280" (climate, settings and depending on the engine system. injection and ignition or syst. preheating and injection of diesel vehicles).
4. Diagnostic connection: perform guided troubleshooting. climate, settings.
5. Used on-board network "J519": control of various components, eg rear heating. glass "Z1" is carried out through the center, used comfort system "J393".
6. Temperature sensor. front left deflector "G385": only for vehicles with Comfort air conditioning system.
7. Defroster deflector/left side window.
8. Left front panel deflector.
9. Used with indicator panel on the instrument panel "J285": with outside temperature sensor. "G106" in the driver information system. (FIS); in case of a complaint about a high value of the outdoor air temperature sensor indication "G106" (due to an excessively high measured value "G17").
10. Flashing indicator device. used display and information "J685": MMI display; different design and control versions, depending on the MMI variant and vehicle equipment: on the MMI display, the functions selected on the control and display module, Climatronic control unit "J255" are shown (and various optional. climate control functions, installations); with the SAG key of the radio "R" or used multimedia system. "E380" (depending on the vehicle's equipment) you can call various add. climate control functions, installations and changing its settings; since the 2009 model year, a modified used Climatronic "J255" and indicators have been gradually installed; on vehicles with such used and indications, depending on the coding and adaptation, for example, the on-screen indication on the MMI display no longer switches to the climate control system when pressing the keys and control buttons used and indications, the selected climate functions and settings are displayed here in continuous indication mode (different designs).
11. Air humidity sensor "G355": not installed on all vehicles (depending on the date of production and execution).
12. Radio "R": depending on the vehicle's equipment, a used multimedia system may be installed instead of the "R" radio. "E380"; the "Car" key can be used to call up various additional functions. climate control functions, installations and changing its settings.
13. Temperature sensor fan. "V42" and temperature sensor, front panel "G56": installed in used and climate control display, settings, used Climatronic "J255"; the temperature sensor on the instrument panel "G56" is used, and the air conditioning indicator, used Climatronic "J255" (cannot be replaced separately).
14. Control and display module, used Climatronic "J255" - Basis version: temperature sensor, on the instrument panel "G56" is located in the used air conditioner indicator, used Climatronic "J255" (cannot be replaced separately); temperature sensor fan. "V42" is installed in the used and climate control indicators, settings, used Climatronic "J255", it cannot be changed separately; guided search malfunction. control panel and indicators, used Climatronic "J255", should be carried out as described in the section "Guided troubleshooting."; pay attention to additional things as well. instructions for the climate control and display panel, settings, used for Climatronic "J255".
15. Control and display module, used Climatronic "J255" Comfort version: various options (for vehicles with or without heated/ventilated seats, with left-hand or right-hand drive, depending on the date of manufacture and vehicle configuration), correspondence; temp sensor. "G56" is integrated into the control and display module, used Climatronic "J255" (cannot be replaced separately); temperature sensor fan. "V42" is installed in the used and climate control indicators, settings, used Climatronic "J255", it cannot be changed separately; guided search malfunction. control panel and indicators, used Climatronic "J255", should be carried out as described in the section "Guided troubleshooting."; pay attention to additional things as well. instructions to pan. used climate control and display units for Climatronic "J255"; the illumination of various buttons, display fields and rotary switches is carried out using light-emitting diodes (LEDs), which cannot be replaced separately; the indicator lights in the buttons and rotary switches, as well as the rotary switches and buttons, cannot be replaced separately; since the 2009 model year, used Climatronic "J255" with the number 8T1 820 043 with the T index has been gradually installed (for left-hand drive vehicles) or 8T2 820 043 with index Q (for right-hand drive vehicles), on a car with such a used and indication, depending on the coding and adaptation, for example, the on-screen indication on the MMI display no longer switches to the climate control system when pressing the keys and control buttons of the used and indication; selected climate functions. the settings are displayed here in continuous display mode.
16. Used multimedia system. "E380": depending on the vehicle's equipment, instead of a used multimedia system. "E380" a radio "R" may be installed; the "Car" key can be used to call up various additional functions. climate control functions, installations and changing its settings; so that different climate control functions and settings can be selected on the "E380" and displayed on the instrument panel. used and indicators "J685", you need to install the correct version of the used and indicators, used Climatronic "J255" and correctly code and adapt it.
A set of 2 units and parts on the right side
1. Defroster deflector/windshield.
2. Solar radiation intensity photodetector "G107".
3. Front Panel Mid-Speaker Cover/Indirect Vent Deflector: Front panel mid-speaker cover. it is installed only on cars with the Comfort air conditioning system; on cars with the Basis air conditioning system, a cover is installed and the hole in the air conditioner is closed (various designs of air conditioner and air duct under the front panel).
4. Air conditioner with evaporator and mounting parts: various designs depending on the design and configuration of the vehicle; clean the evaporator of the air conditioning system using the ultrasonic device for cleaning air conditioning systems "VAS 6189".
5. Front panel deflector in the center left.
6. Front panel deflector in the center right.
7. Defroster deflector/right side window.
8. Right front panel deflector.
9. Microfilter (with or without activated carbon filter element): observe replacement intervals; various designs depending on the vehicle's configuration and equipment; on a car with a Basis air conditioning system without AKF (activated carbon filter), on a car with a Comfort air conditioning system with AKF (activated carbon filter), these vehicles are also equipped with the G238 air composition sensor. Since the 2012 model year, vehicles with the Comfort air conditioning system have been gradually equipped with a modified microfilter with an activated carbon filter element. This filter with improved fine dust separation parameters has almost the same air resistance as the previous filter and can therefore also be installed on vehicles with the previous filter. At the customer's request, a cabin filter with an activated carbon insert may be installed in a vehicle with a Basis air conditioning system that was equipped with a factory cabin filter without an activated carbon insert.
10. Temperature sensor. front right deflector "G386": only for vehicles with Comfort air conditioning system.
11. Right condensate drain (front side. passage.).
12. Right seat (front seat. passenger) with heating and ventilation parts: seat heating parts and units (temperature sensor, front right seat "G345", heated front. right seat "Z46") and seat ventilation (used and various fans); heated and ventilated seats are not installed in all vehicles (additional equipment); heating and ventilation settings. the seats are replaced with used ones and climate control indicators, installations, used Climatronic "J255"; heating and ventilation control. seats is displayed in the block of measured values pan. control and display of climate control, installation, used Climatronic "J255"; depending on the equipment and design of the car, heating and ventilation control. seats are controlled through different control units.
13. Rear center console deflector: installed only with climate control. installation of Comfort (with the Basis climate control system, the opening in the center console is closed).
14. Temperature selection potentiometer, rear "G538": installed only with climate control. installation of Comfort (with the Basis climate control system, the opening in the center console is closed); the temperature selection potentiometer, set "G538", is an integral part of the deflector and cannot be replaced separately.
Checking, removing and installing the condensate drain hose
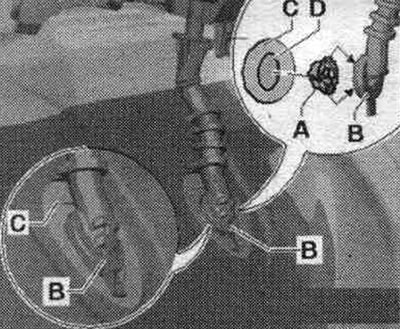
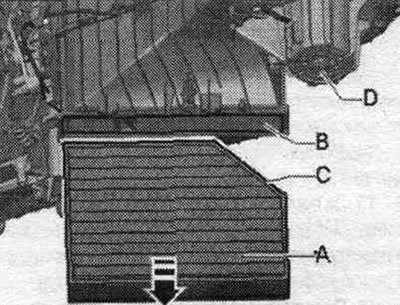
This vehicle has 2 condensate drain hoses (right and left on the climate. installation and on the central tunnel). There is no valve or cover at the outlet "C" of the condensate drain hose "B", and the condensate drains through the rubber lips.

There are different versions of condensate drain hoses "B". In version 1, condensate drain hose "B" is installed directly into opening "D". In version 2, bracket "A" is installed in condensate drain hose "B". Bracket "A" is held in opening "D" of body base "C" by the retaining tabs provided on bracket "A". To prevent condensate from condensate drain hose "B" from entering the passenger compartment, after installation, condensate drain hose "B" should be pressed against body base "C" with bracket "A" and pre-tensioned. If pre-tensioning is insufficient, seal the joint between the two parts, for example, with silicone sealant 0176 001 A3.
If there are complaints about high humidity in the cabin, in addition to the condensate drain, check the following components: drains for the water drainage box.
Check the fairing and the outside air intake shaft cover for correct installation and damage, the cabin filter for contamination and correct installation, and the forced exhaust vent openings. in the trunk, control and functionality of the air intake/fresh air flaps. Also in case of complaints about humidity in the cabin (with the compressor on and under certain external conditions) additional check of the evaporator air supply temperature: Select the measured value of the evaporator deflector temperature sensor "G263" in the "Read measured value block" function in the "Guided Fault Finding" mode. Based on customer settings or the next time the air conditioner is installed, the used air conditioner indicator will be displayed. used Climatronic "J255": Auto mode, compressor on (the control lamp in the AC button is on), temperature setting Cold - make sure that the medium speed of the fresh air fan is set with the voltage on the fresh air fan "V2" of approximately 7 V, the fresh air mode is set (the indicator lamp in the "Air recirculation" button is not lit) and the instrument panel deflectors are open, and check the temperature of the air coming out of the evaporator deflectors. If the sensor readings are excessively low (at ambient temperatures above 0°C, or readings remain below 0°C for an extended period of time), even though the air conditioning system is operating properly, the readings are higher, for example, by 10°C. Eliminate the cause of the deviation, while following the instructions for checking the cooling capacity.
Removal and checking the condensate drain hose
Turn off the ignition. Remove the glove compartment (for the right steam trap). Remove the box under the front panel on the driver's side, (for the left steam trap). Carefully wrap the floor covering around the steam trap (left or right), to see the steam trap. Check both hoses of the "B" condensate drain for proper routing and contamination. Eliminate any narrowing, for example. Cover the area under both "D" openings (for the "C" steam trap hose openings) with absorbent paper (to prevent water from getting under the rug). Remove both hoses from condensate drain "B". Check both condensate drains on air conditioner "A" for contamination (for example, using a piece of wire). Check the distance between the insulating mat "E" installed in the central tunnel and the end of the condensate drain hose "C" through the hole "D" in the bottom sheet "F". It must be sufficient to allow condensate to drain from the hose "B".
Installation
Installation in reverse order. Install both condensate drain hoses "B" so that they are not twisted or pinched (different designs for left and right sides). When positioning the floor mat, ensure it does not compress condensate drain hose "B." If hose "B" fits too loosely on the air conditioner condensate drain "A," secure it with a clamp.
Removal and installation the solar radiation intensity photo sensor "C107"
Turn off the ignition. Carefully press the solar radiation intensity photo sensor "G107" "A" out of the defrost deflector "B" (windshield), for example, with a small screwdriver. Be careful not to damage the surface of the cover of the solar radiation intensity sensor "G107" "A" and the defroster deflector "B". Disconnect the plug "C".
Installation
Installation in reverse order. Turn on the ignition. After installation, query the memory is faulty. control and display module, used Climatronic "J255" and remove possible displayed faults.
Removal and installation of used climate control and indicators. installations, used Climatronic "J255"
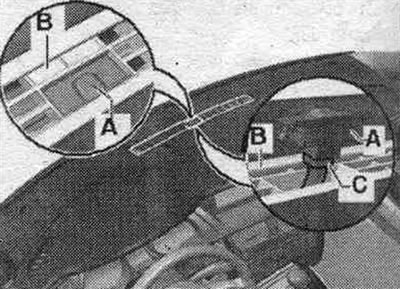
At the start of production, this "B" trim was secured with "C" staples in the "D" slots of the used Climatronic "J255" and "A" indicators. Later, the "B" trim was replaced with a version secured with suitable double-sided adhesive tape. This "B" overlay no longer has the "F" fasteners.
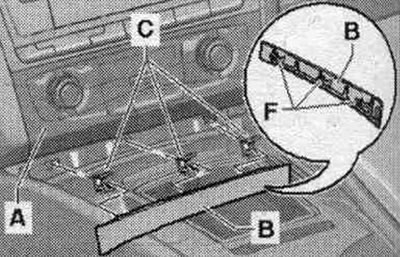
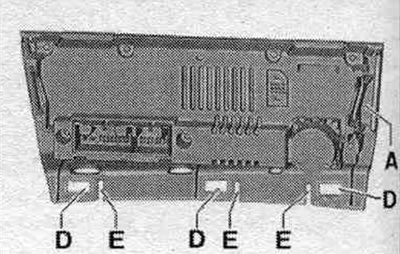
Since the "D" grooves and "E" splines cannot be made independently, only the "B" trim is offered as a spare part in a version that is attached with double-sided adhesive tape to the control and display unit, the Climatronic "J255" "A" control unit.
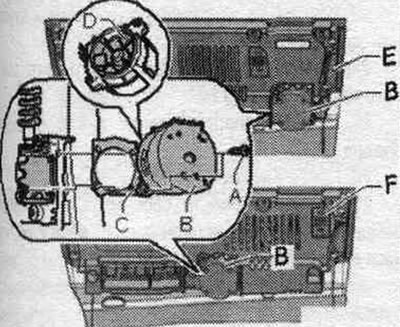
Removal and installation the fan for the temperature sensor, on the front panel "V42"
Remove the used climate control unit and display, installation, used Climatronic "J255". Unscrew screws "A". Remove the temperature sensor fan. "V42" "B" from the climate control and display module, installation, used Climatronic "J255".
Installation
Installation in reverse order. When installing the temperature sensor fan. "V42" do not press on the impeller "D", but fix the fan on the casing. Turn on the ignition. Query memory faulty. control and display module, used Climatronic "J255" and remove possible displayed faults.
Removal and installation the cabin filter
Note: The cabin filter is available in different designs (with or without activated carbon filter insert). Vehicles with the Komfort air conditioning system are currently equipped with a cabin filter with activated carbon, while vehicles with the Basis air conditioning system are currently equipped with a cabin filter without activated carbon. Clean around the cabin filter in the air conditioning duct before installing the new filter. On vehicles with driving training equipment, additional equipment should be removed if necessary. pedals (depending on the version on extra. pedals there are places for service disconnection). From model year 2012, vehicles with Komfort climate control are gradually fitted with a modified microfilter with an activated charcoal filter element. This filter with improved fine dust separation parameters has almost the same air resistance as the previous filter and can therefore also be installed on vehicles with the previous filter. At the customer's request, a cabin filter with an activated carbon insert may be installed in a vehicle with a Basis air conditioning system that was equipped with a factory cabin filter without an activated carbon insert.
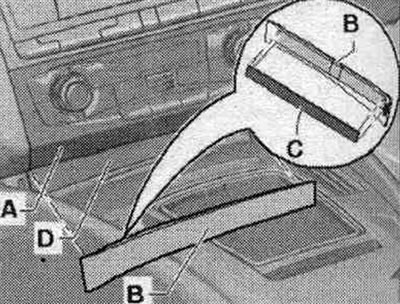
Move the passenger compartment and seat to the rearmost position. Turn off the ignition. Remove threaded clamp "A" and sound-insulating mat "B." Cover the floor covering under the cabin filter with paper.

Disconnect clamps "B", move cover "A" in the direction of arrow "arrow" and remove the cover. Cover "A" can be secured with bolts "D" at mounting points "C" if fasteners "B" no longer hold it.
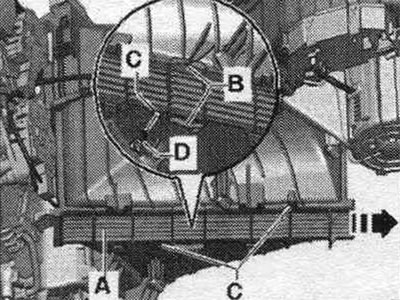
Remove cabin filter "A" from channel "B" of the air conditioner.
Installation
Installation in reverse order. After removing the cabin filter "A", clean the air conditioner through channel "B" (for example, with a vacuum cleaner). Install cabin filter "A" (straight, bevel "C" towards the side of the intake fan "D").