



Table of contents: Set of keys ↓ Remote control for single lock ↓ Replacing the remote control battery ↓ Remote control synchronization ↓ Single lock ↓
Warning: Do not leave children unattended in a vehicle with keys in it, especially if the key is inserted into the ignition. Children have a habit of imitating adults and may lock the doors from the inside, turn on the ignition or start the engine. This may result in injury to children when using, for example, the window lifters or an accident if the vehicle starts to move.
Set of keys
The car comes with two main keys (And in illustration 1.1), spare mechanical key (B) and a plastic plate (C) with a number for ordering a new key. All keys fit all car locks.
Note: To avoid damage to the electronic components located in the main key, do not subject it to strong mechanical stress (deformations, impacts), high temperatures and humidity. The spare key and number plate should be kept in a safe place; the spare key should only be used temporarily, in case the main key is lost.
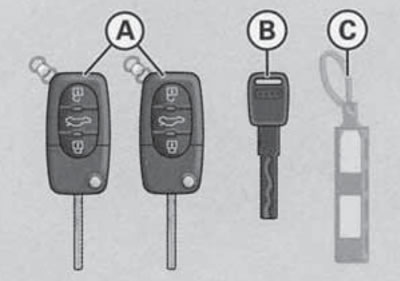
1.1. Set of keys A - Main key with remote control and built-in mechanical key; B - Spare key; C - Plate with key numbers.
Each of the main keys contains:
- remote control for a single lock, see description in the relevant subsection below;
- immobilizer chip, see Section 7;
- replaceable battery (a description of how to replace the battery is provided in the relevant subsection below);
- built-in mechanical key. To remove it, press the button (4 in illustration 1.2); to fold the key, press the same button and fold the key manually. The mechanical key is used to mechanically unlock/lock the car, as well as to start/stop the engine;
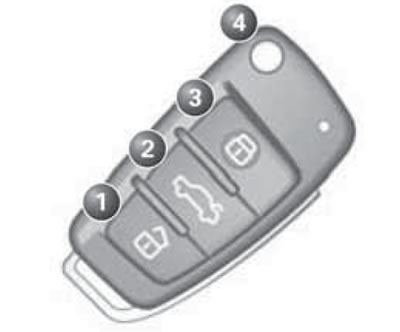
1.2. Main Key Buttons 1. Unlocking the single lock, lowering the windows; 2. Unlocking the luggage compartment only (with long press); 3. Locking the single lock, raising the windows; 4. Unfolding/folding the mechanical key
Remote control for single lock
Note: The remote control automatically turns off when the ignition is on.
Note: When replacing a lost key, or after repairing or replacing the remote control receiver, the remote control can only be used after it has been initialized.
The remote control of the single lock uses a power source that requires periodic replacement (see subsection below).
The proper functioning and range of the remote control may be negatively affected by local sources of radio emission.
The remote control is designed to lock/unlock a single lock (see subsection below) or just the luggage compartment (see Section 2), located outside the car, as well as for controlling the comfort opening/closing functions. The purpose of the remote control buttons is indicated in the captions to Illustration 1.2.
Unlocking and locking the car using the remote control is accompanied by a double and single flashing of all direction indicators, respectively.
If the main interior light switch is in the automatic position, the interior light will automatically turn on/off when the vehicle is locked/unlocked using the remote control.
If no door or luggage compartment is opened within 1 minute after the vehicle is unlocked using the remote control, the vehicle will automatically lock to prevent accidental unlocking.
On models with an additional level of protection, a single press of the unlock button on the remote control unlocks only the driver's door and the fuel filler flap. In this case, to unlock the remaining locks, press the unlock button again within 5 seconds.
To operate the comfort opening/closing functions, press the unlock or lock button (a or b respectively) on the remote control and hold it down until the door windows are open or closed. When you release the button, the door windows stop in their current position. If there is a sunroof, the comfort closing function also applies to the sunroof.
Note: Make sure that there are no obstructions in the path of the door glass and the top hatch cover.
If the remote control used to unlock the vehicle has a memory function assigned to it, then when the vehicle is unlocked, the driver's seat and rear-view mirrors will assume the position stored in the memory for that remote control (see Section 10).
Replacing the remote control battery
1. Fold back the mechanical key.
2. Insert a slotted screwdriver and turn it to separate the transmitter (In illustration 1.3) from the main key (Ą).
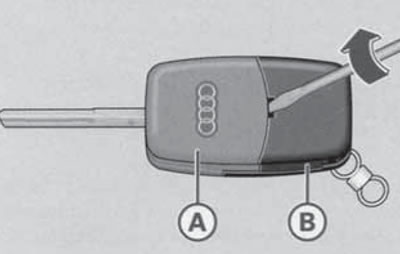
1.3. Removing the transmitter (B) from the main key (A)
3. Remove the transmitter cover as shown in Illustration 1.4 and remove the battery from the cover.
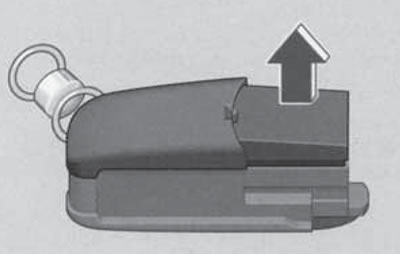
1.4. Removing the battery cover
4. Install the new battery so that the side with the "+" mark faces down (the polarity is also indicated on the transmitter cover).
5. Place the battery cover into the transmitter and press both parts together.
6. Insert the transmitter into the main key and press it until it locks into place.
7. Check the proper functioning of the remote control.
8. If you cannot open or close the vehicle using the remote control after replacing the battery, synchronize the remote control as described in the next subsection.
Remote control synchronization
1. If the vehicle is locked, unlock it with the mechanical key from the driver's door.
2. Press the lock button on the remote control.
3. Insert the key into the ignition switch and turn on the ignition.
4. Turn off the ignition and remove the key from the lock.
5. Press the unlock button or the lock button on the remote control.
Single lock
The single lock becomes ready to operate after the driver's door is closed. All doors, trunk lid/tailgate and fuel filler flap can be simultaneously locked/unlocked from both outside and inside the vehicle (in this case the fuel filler flap does not lock).
Single lock control from outside the car
Note: When locking/unlocking the single lock from outside the vehicle, the anti-theft system is simultaneously activated/deactivated.
Caution: If people or pets are left in the vehicle, they may lock the vehicle from the inside, so always take the key with you to unlock the vehicle from the outside.
Warning: The car doors cannot be unlocked from the inside and the windows cannot be rolled down if the main lock is locked from the outside. Therefore, do not lock the car from the outside if there are people in it, as they will not be able to get out if necessary.
You can use the remote control to lock and unlock the single lock from outside the car (see subsection above) or a mechanical key. When the car is locked from the outside, the anti-theft system is activated, and it becomes impossible to operate the windows and unlock the doors from the inside (anti-hacking function).
For additional security, there is a function of automatic locking of doors and luggage compartment when the car accelerates to 15 km/h. In this case, unlocking is also performed automatically when the key is removed from the ignition switch, or manually (by means of the release button in the driver's door or by pulling the inner door opening handle twice).
It may be necessary to use a mechanical key if the remote control fails (due to radio interference or low battery) or malfunctions of the vehicle's electrical equipment.
Note: If the single lock is faulty, the anti-theft alarm system will not activate when the doors are locked individually. Insert the mechanical key into the driver's door lock and turn it counterclockwise to unlock or clockwise to lock the single lock. On models with an additional level of security, turning the key counterclockwise once will unlock only the driver's door and the fuel filler flap. In this case, turn the key counterclockwise again within 5 seconds to unlock the other locks.
If the vehicle's electrical system is in good working order, the mechanical key can also be used to control the comfort opening and closing functions - hold the key in the "unlock" or "lock" position until the windows and sunroof are respectively open or closed (for the top hatch, only the comfort locking function is available).
When opening a single lock with a mechanical key, the anti-theft alarm is not automatically deactivated and must be deactivated (turn on the ignition) for no more than 15 seconds, so that it does not work.
When locking a single lock with a mechanical key, the anti-burglary function may not be activated (for example, so that people remaining in the car can exit the vehicle if necessary). To do this, turn the key in the driver's door lock clockwise twice at short intervals. This locking method activates the anti-theft alarm (only the anti-hacking function is not activated), therefore, to prevent it from triggering, you should disable the cabin volume control function (see Section 7). To open the door from the inside, pull the inside door opening handle twice.
Controlling a single lock from inside the vehicle
Note: If the automatic locking function is not used (see subsection above), it is recommended to lock the car from the inside during the trip to prevent intruders from entering the passenger compartment or luggage compartment (for example, when stopped at a traffic light or in a traffic jam). If the single lock is locked from the inside, then in the event of a collision of the car, the doors are automatically unlocked. The keys for unlocking (upper) and locking (lower) the single lock from inside the car are located on the driver's door (3 in illustration 14.1). These keys allow you to lock/unlock the doors and the luggage compartment simultaneously. When locking the single lock in this way, the anti-theft alarm is not activated and the fuel filler flap is not locked. The driver's door can only be locked from the inside if it is closed.
To unlock all doors locked from the inside, press the unlock button; to unlock only one door, pull its opening handle.