
Table of contents: 2.0L petrol engine ↓ Removal the primary and secondary… ↓ Installation of the exhaust system ↓ Installation of preliminary and… ↓ Replacing the end pipe ↓ Checking the exhaust system for leaks ↓
The exhaust system of a gasoline engine consists of an exhaust manifold, a downpipe, a catalytic converter(s), a center muffler, a connecting pipe, an additional muffler and an end pipe (end pipes).
2.0L petrol engine
Exhaust system. Engine 2.0 l ALT
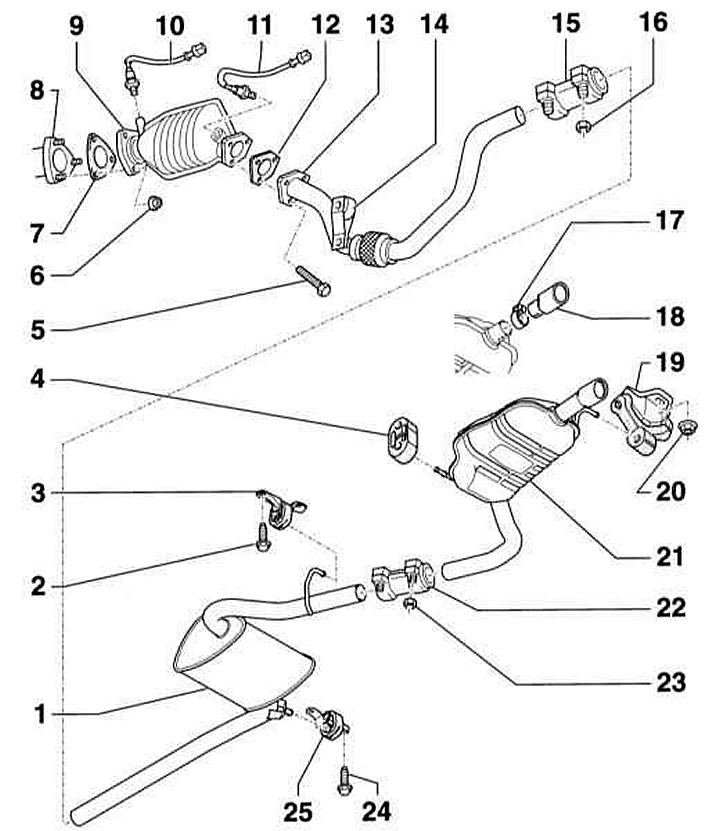
- 1 — Pre-silencer. In the original version together with the additional silencer. In case of repair it can be replaced separately
- 2 — Bolt*, 25Nm. Be sure to replace
- 3/4 - Suspension
- 5 - Bolt, 25Nm
- 6 — Nut*, 30Nm
- 7 — Sealing gasket*
- 8 — Exhaust manifold
- 9 - Catalytic converter. Do not drop
- 10 — Pre-catalytic lambda probe 1, 55Nm
- 11 — Post-catalytic lambda probe 2, 55Nm
Note: Lubricate only the threads of both sensors with high-temperature paste G 052 112 A3. The paste must not get into the groove of the sensor housing.
- 12 — Sealing gasket*
- 13 — Exhaust system inlet pipe with connecting element. Do not tilt the element at an angle greater than 10°
- 14 — Suspension
- 15 — Terminal sleeve
- 16 - Nut, 40Nm
- 17 - Clamp, 25Nm
- 18 — Tip
- 19 — Suspension
- 20 - Nut, 25Nm
- 21 — Additional muffler. In the original version together with the preliminary muffler. In case of repair it can be replaced separately
- 22 — Terminal sleeve
- 23 - Nut, 40Nm
- 24 - Bolt, 25Nm
- 25 — Suspension
*) Be sure to replace.
Warning: Exhaust system components can be replaced individually. In the original equipment, the pre-silencer and additional mufflers are a single unit. The central and additional mufflers can be separated from each other during repairs and are sold separately as spare parts.
The operation of lifting and installing the car on stands is associated with danger! Therefore, before carrying out the operation, read the Section Jacking and towing.
1. Raise and place the vehicle on stands, remove the lower engine cover, refer to Section Removal and installation the upper engine cover/lower engine compartment protection/subframe.
2. Spray all bolts and nuts of the exhaust system with rust dissolving agent and wait for some time.
3. Remove the bolts on the catalytic converter/downpipe connecting flange.
Caution: If the exhaust system is to be removed together with the catalytic converter, remove the mounting bolts on the exhaust manifold/catalytic converter flange and remove the lambda probes, refer to Section Removal and installation of the catalytic converter and lambda probes.
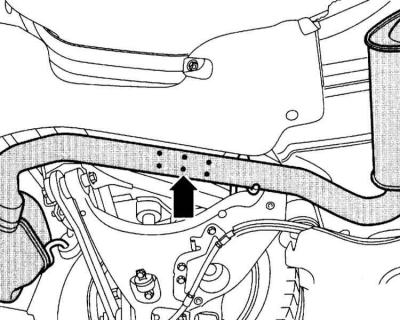
4. Disconnect the front cross member of the exhaust system mount.
Caution: Do not bend the flexible connector in the intake manifold more than 10°, otherwise it may be damaged. With the help of an assistant, disconnect and remove the exhaust system from the clamps.
Diesel engine 2.5 l
Removal the primary and secondary mufflers
Exhaust system. Diesel engine 2.5 l
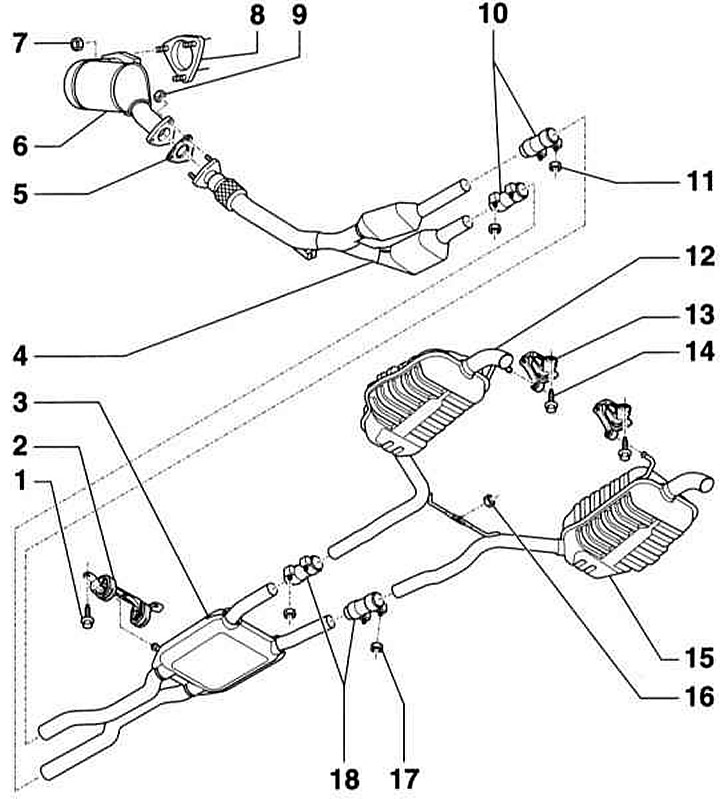
- 1 - Bolt, 23Nm
- 2 — Suspension. When installing, the arrow should point in the direction of vehicle movement
- 3 — Central muffler. In the original equipment of the car, the unit together with the additional muffler. In case of repair, it can be replaced separately
- 4 — Pre-muffler pipe with two catalytic converters, with connecting element. Do not bend the element at an angle greater than 10°
- 5 — Sealing gasket*
- 6 - Pre-catalytic converter
- 7 - Nut, 25Nm
- 8 - Turbocharger
- 9 - Nut, 25Nm
- 10 — Front terminal sleeve
- 11 - Nut, 40Nm
- 12 — Additional muffler. In the original version together with the central muffler. In case of repair it can be replaced separately
- 13 — Suspension
- 14 - Bolt, 23Nm
- 15 — Additional muffler. In the original version together with the central muffler. In case of repair it can be replaced separately
- 16 - Nut, 23Nm
- 17 - Nut, 40Nm
- 18 — Rear terminal sleeve. Before fixing, adjust the exhaust system so that it takes its position. The bolt connections should be facing to the right
*) be sure to replace.
If the pre- and additional mufflers have not yet been replaced, they must be sawn at certain points for separate replacement. The separation point is marked by small depressions on the muffler pipe.
1. Cut the pipe using a hacksaw along the marks. The side marks show how far the terminal sleeve can be moved.
2. Disconnect the muffler from the rubber holders and remove.
Installation of the exhaust system
Warning: Sealing gaskets, nuts and bolts must be replaced. To facilitate later disassembly of the exhaust system, it is recommended to lubricate the mounting bolts and nuts with a high-temperature paste, such as Liqui Moly LM-508-ASC.
Caution: Do not bend the flexible connection element of the intake pipe more than 10°, otherwise it may be damaged.
1. Install the exhaust system into the rubber holders with the help of an assistant.
2. Tighten the front cross member with torque 25Nm on the bottom of the car.
3. Secure the exhaust system to the flange with a new sealing ring, new bolts and nuts. Observe the tightening torques.
4. If the lambda probes were removed, install them, refer to Section Removal and installation of the catalytic converter and lambda probes.
Installation of preliminary and additional mufflers
If the pre-muffler or additional muffler has just been removed, secure the mufflers with new clamps.
1. Position the terminal sleeve (1) in the middle of the cut. The terminal sleeve (1) should be horizontal, the bolts should point to the left.

2. Install the terminal sleeve so that the end of the bolt does not protrude beyond its lower edge.
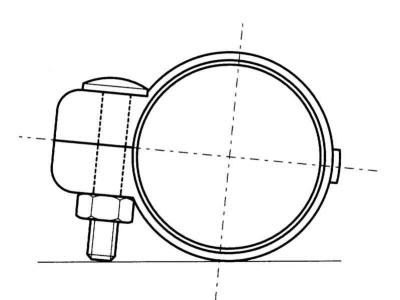
3. Tighten the bolts evenly to the specified torque 40Nm.
4. Adjust the exhaust system so that it is positioned freely, without stress or deformation.
5. Replace the lower engine cover.
Replacing the end pipe
1. Cut the end pipe (1) at the split (C) using a hacksaw.
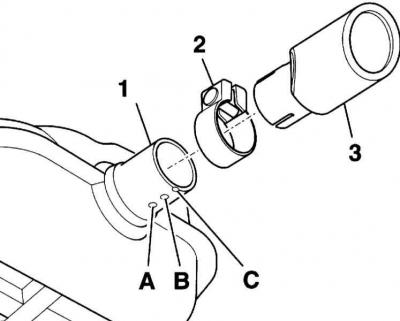
2. Slide the end pipe (3) to the mark (A). At the same time, align the slot on the end pipe with the mark (B). Tighten the clamp (2) to the torque 25Nm.
3. Position the end pipe.
Checking the exhaust system for leaks
In vehicles with a regulated catalytic converter, a leaky exhaust system can cause difficulty starting the engine. The engine stalls, shakes when idling, and jerks when revving.
1. Start the engine and while the engine is running, cover the exhaust system with a rag.
2. Listen to the exhaust system. If necessary, spray the cylinder head/exhaust manifold and exhaust manifold/head pipe connections with a leak detector. Check for bubbles.
3. Eliminate leaks.