
Table of contents: Removal ↓ Installation ↓ Adjustment ↓ Fog lights ↓ Replacing incandescent lamps ↓

Note: The design of the headlamp with a halogen lamp corresponds to the design of the headlamp with a xenon lamp. The headlamp with a halogen lamp lacks only the ignition unit (2). The low-beam incandescent lamp (8), as well as the electric motor for adjusting the beam range (11) are designed differently.
- 1 - Screw
- 2 — Xenon lamp ignition unit
- 3 — Headlight frame
- 4 — Headlight housing
- 5 - Two ventilation elements
- 6 — Low beam lamp
- 7 - Cover, back side of low beam
- 8 — Xenon low beam lamp
- 9 - Cover, reverse side of high beam
- 10 — High beam bulb
- 11 — Electric motor for adjusting the beam range
- 12 — Parking light bulb
- 13 — Sealing ring
- 14 - Screw, 6 Nm
- 15 - Stop screw, must be flush with the front panel to install the headlight
Removal
Warning: Be careful when replacing xenon bulbs in headlights. Risk of injury due to high voltage! To be safe, switch off the headlight and disconnect the battery. Then briefly switch the headlight switch on and off to discharge residual voltage. For safety reasons, wear shoes with rubber soles.
1. Disconnect the negative (-) battery cable.
Warning: Follow the instructions in Section Replacing the battery.
2. Remove the upper left or right engine cover, if installed.
3. Right headlight: Disconnect the air duct between the front panel and the air filter, refer to Section Setting the front panel to the maintenance position.
4. Protect the area under the headlight with adhesive tape to prevent damage to the paintwork.
5. Remove screws (1) and (5).
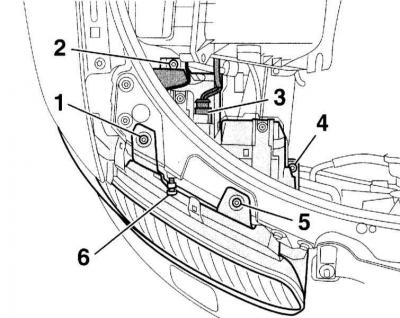
6. Loosen screws (2) and (4) a few turns without unscrewing them. (6) – stop screw.
7. Disconnect the cable and disconnect the connector (3).
8. Pull the headlight forward.
Installation
1. Insert the headlight as far as it will go. Make sure that the two ventilation elements (5) on the right and left at the bottom of the headlight are in place, refer to the illustration Headlight with xenon lamp.
2. If necessary, adjust the headlight with the stop screw (6) so that a uniform gap is maintained in relation to the adjacent body parts. In doing so, pay particular attention to the area adjacent to the wing.
3. Tighten the screws (1, 2, 4 and 5).
4. Further installation is carried out in the reverse order of removal.
5. Have your headlights adjusted at a service station as soon as possible.
Adjustment
1. The height position is adjusted with screws (1 and 2), the horizontal position with screw (2).
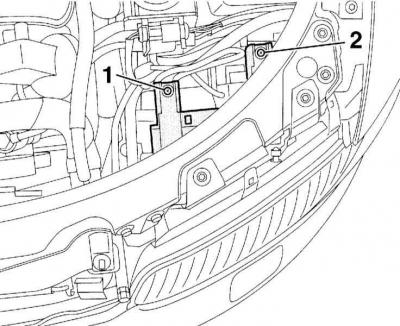
Warning: The correct position of the headlights can only be adjusted using special devices at a service station.
Fog lights
Removal
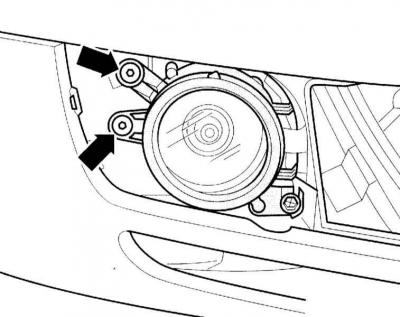
1. Remove the air intake grille from the bumper, refer to Section Removal and installation the front bumper.
2. Remove the screws (arrows in the accompanying illustration), disconnect the headlight from the inside of the bumper and remove it.
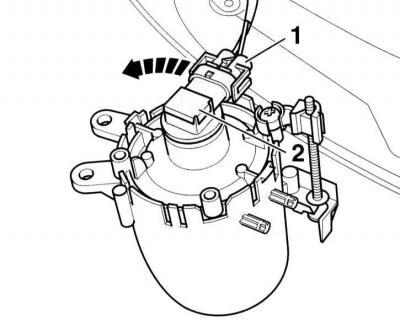
3. Disconnect the headlight connector (1).
Installation
1. Installation is performed in the reverse order of removal, making sure that the guide pins enter the holes.
Replacing incandescent lamps
1. Turn the bulb with the socket (2) counterclockwise (arrow) and remove it from the headlight housing.
(Information obtained from this resource AudiManual)