
Table of contents: There is a risk of injury! ↓ Low beam ↓ High beam/parking light ↓ Direction indicator ↓
The lighting system includes: headlights, fog lights, tail lights, brake lights, reversing lights, turn signals, fog lights, license plate lights and interior lights.
The failure of the incandescent lamp is indicated on the universal display. (Driver Information System (FIS)).
There is a risk of injury!
Be careful when replacing high-voltage xenon lamps in headlights! To be on the safe side, turn off the headlight and disconnect the battery. After replacement, briefly turn the headlight on and off to relieve residual voltage. For safety reasons, wear shoes with rubber soles.
Incandescent bulbs and bulb holders can be very hot. Therefore, wait until the light fixture has cooled down before replacing the bulbs.
Keep lamps out of reach of children.
Do not use dropped or scratched lamps as they may break.
Warning: Do not handle the glass bulb of the incandescent lamp with your hands. It is best to use napkins or cotton gloves for this purpose. Fingerprints evaporate and settle on the reflector, fogging it. Any accidental stains on the bulb should be removed with a clean, lint-free towel soaked in alcohol.
Warning: Incandescent lamps must only be replaced with lamps of the same type.
1. Turn off the ignition and headlight switch.
2. Disconnect the negative (-) battery cable.
Warning: Follow the instructions in Section Replacing the battery.
Low beam
1. Right headlight: Remove the top engine cover and the air duct between the front panel and the air filter.
2. Left headlight: Remove the headlight, refer to the appropriate Section.
3. Remove the cover from the back of the headlight. To do this, move the wire clip away from the cover.
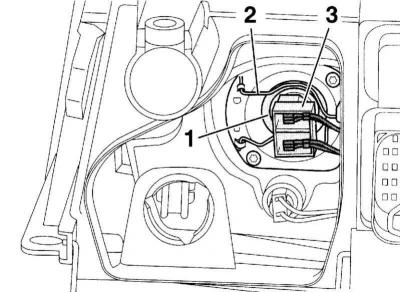
4. Halogen lamp: Disconnect the connector (2), move the wire clip and remove the lamp (3).
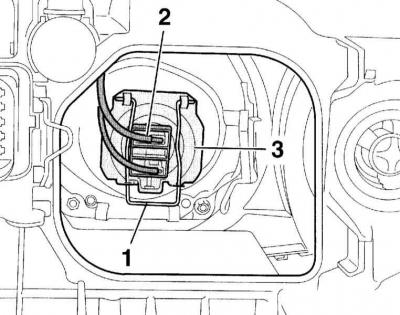
5. Xenon lamp: Turn the plug (1) counterclockwise and remove. Release the wire clips (arrows in the accompanying illustration) and remove the lamp from the housing.
6. Insert the new lamp into the housing, secure it with the bracket and connect the connector.
7. Install the cover on the back of the headlight and secure it with the bracket.
8. Further installation is carried out in the reverse order of removal.
High beam/parking light
1. Right headlight: Disconnect the upper engine cover and the air duct (subsection "Low beam").
2. Left headlight: Disconnect the connectors above the headlight, unlock the holder and remove it upwards.
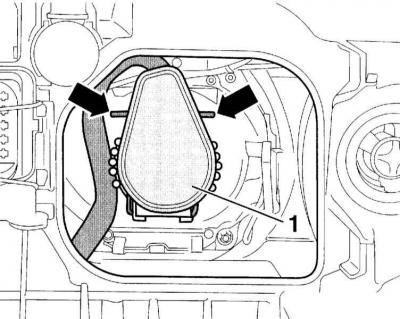
3. Remove the high beam cover from the back of the headlight by sliding the wire clip away from the cover.
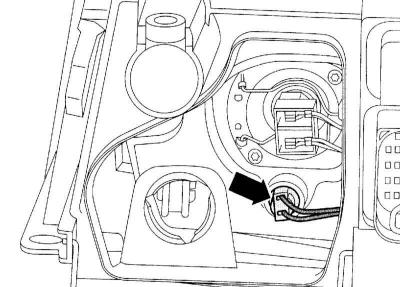
4. Halogen headlight: Turn the headlight range adjustment motor, remove it from the headlight and set it aside.
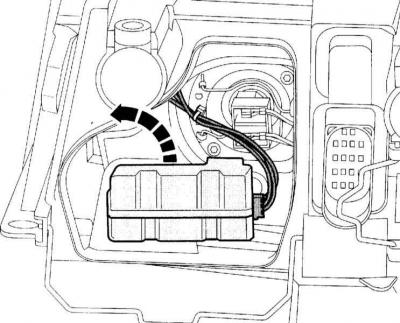
Warning: Turn counterclockwise for right headlight (arrow on the accompanying illustration), at the left headlight clockwise.
5. Parking light/xenon headlight: Turn the headlight range adjustment motor, remove it from the headlight and set it aside.
6. High beam: Disconnect the connector (3), release the bracket (2) and remove the lamp (1) from the housing. Insert a new lamp, secure it with the bracket and connect the connector.
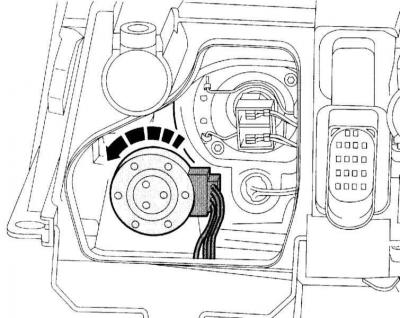
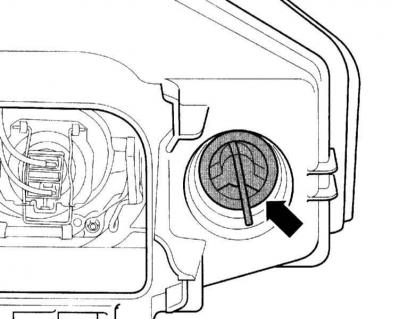
7. Parking light: Release the locking tabs and remove the cartridge (arrow on the accompanying illustration) from the housing. Remove the lamp from the socket, replace it with a new one and insert the socket into the housing.
8. Install the headlight range adjustment motor on the back of the headlight, replace the headlight cover and secure it with the bracket.
9. Further installation is carried out in the reverse order of removal.
Direction indicator
1. Remove the headlight, refer to Section Removal and installation headlights.
2. Turn the chuck (arrow on the accompanying illustration) counterclockwise and remove it from the housing.
3. Press the bulb into the socket, turn and remove.
4. Replace the lamp with a new one and insert the socket into the housing.
5. Reinstall the headlight, refer to Section Removal and installation headlights.