
Table of contents: Low and high beam ↓ Parking light ↓ Front direction indicator ↓ Side turn signal repeater ↓ Rear light ↓ License plate light ↓ Additional brake light ↓
1. Turn off the switch of the corresponding lamp.
2. Turn off the ignition.
Low and high beam
Warning: H7 bulbs are under pressure and may crack when replacing them. Therefore, gloves and safety glasses must be used when replacing H7 bulbs.
1. Open the hood.
2. Remove the cover at the rear of the headlight. To do this, press both strips –1– down and release them from the holders –2–. Fold the cover –3– back at the top and remove it from the lower guides.
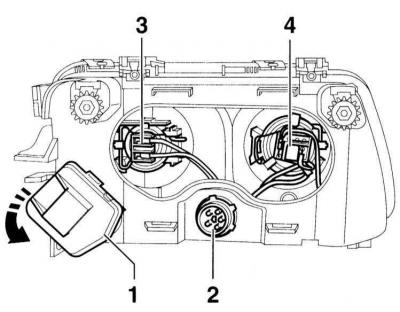
3. Disconnect the low beam lamp connector –3– or high beam lamp connector –4–. 1 – headlight range adjustment motor, 2 – headlight connector.
4. Lift the spring clip slightly in the center on the back of the headlight and tilt it in the direction of the arrow.
5. Disconnect the low beam lamp connector.
6. Press and release the spring clip above the locking tab.
7. Remove the lamp from the reflector.
Warning: Do not touch the lamp with bare fingers. Fingerprints evaporate and settle on the reflector, reducing the luminous flux of the lamp. Be sure to install a lamp of the same design. Stains on the lamp can be removed with a clean cloth soaked in alcohol.
8. Insert the new lamp so that the tabs fit into the corresponding grooves on the housing.
9. Fold back the spring clip and secure it in the paws.
10. Connect the connector to the cartridge.
11. Place the cover on the back of the headlight and secure it with the spring clip.
12. Check the headlight adjustment at a service station.
13. Close the hood.
Parking light
1. Open the hood.
2. Remove the cover at the back of the headlight. To do this, press down both plastic strips at the top and release them. Fold the cover back.
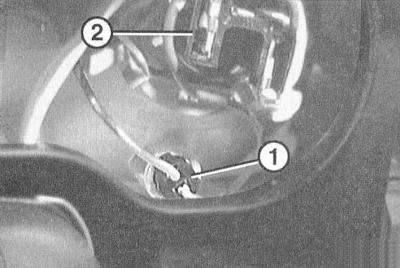
3. Remove the socket –1– with the bulb from the reflector. 2 – high beam plug.
4. Remove the lamp from the socket.
5. Insert a new bulb into the socket.
6. Press the socket with the lamp into the reflector until it stops.
7. Connect the cover on the back of the headlight at the bottom and fix it at the top.
8. Close the hood.
Front direction indicator
1. Remove the front turn signal, refer to subsection Removal and installation the front turn signal.
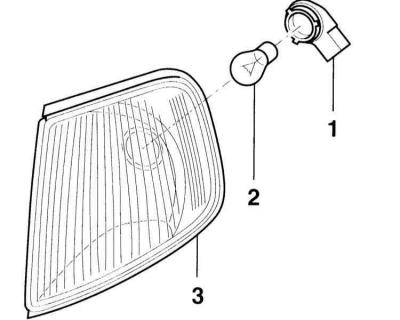
2. Turn the lamp holder –1– to the left and remove it from the housing –3–.
3. Lightly press the lamp –2– into the socket, turn it 90° (1/4 turn) to the left and remove the lamp.
Warning: Do not touch the new lamp bulb with your fingers. Use a clean cloth or wear thin gloves.
4. Insert the new bulb, press it lightly and turn it to the right.
5. Insert the socket with the lamp into the reflector and turn it to the right.
Warning: The chuck must lock into place.
6. Install the direction indicator, refer to the subsection Removal and installation the front turn signal.
Side turn signal repeater
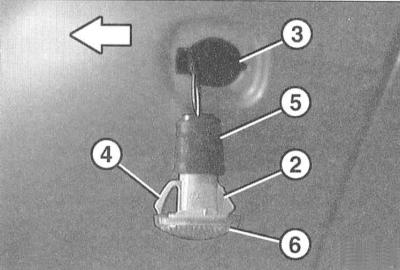
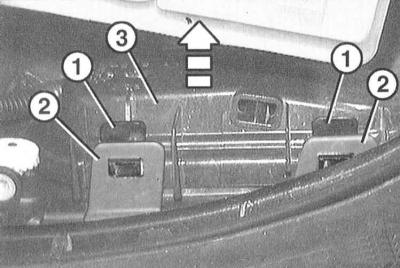
1. Press the turn signal forward with your fingers in the direction of the headlight (arrow on the illustration) and remove it from the rear part from the hole in the wing –3–. When removing, the lamp moves forward, overcoming the force of the plastic spring –4–.
2. Remove the lamp holder –5– from the housing –6–.
3. Remove the bulb from the socket and replace it.
4. Insert the socket with the lamp into the housing.
5. Insert the lamp from the back into the plastic hooks in the wing hole, and press and secure the plastic spring on the other side.
Rear light
1. Open the back door.
2. Open the trunk pocket on the left or right. To do this, turn the clamp at the top of the pocket cover to the left.
3. Disconnect connector –3– of the rear light.
4. Press the locking strips –2– together to release the lamp holder.
5. Remove the lamp holder –1–.
6. Press the damaged lamp slightly into the socket and turn it 90° (1/4 turn) to the left and remove.
Warning: Insert the new bulb, press it in slightly and turn it to the right.
7. Insert the bulb holder into the tail light, press and lock.
8. Connect the connector to the lamp holder.
9. Close the trunk pocket lid and secure the clip by turning it to the right.
10. Close the back cover.
License plate light
1. Open the back door.

2. Loosen two Phillips-head screws -3- in the strip -1-. The illustration shows the right license plate light.
3. Remove the lamp holder from the bar and disconnect the connector –2–.
4. Remove the lamp –4– from the socket and replace it. Make sure that the lamp is securely installed. If necessary, bend the clamps slightly.
5. Connect the connector.
6. Insert the lamp holder into the bar and secure with screws.
7. Close the back door.
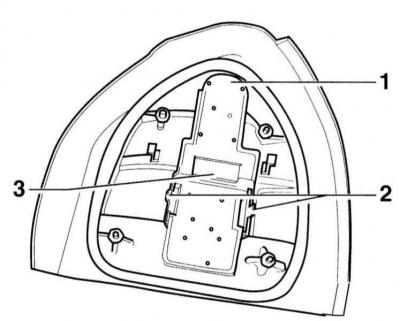
Additional brake light
The additional brake light is located at the top of the rear door behind the rear window.
1. Remove the upper inner trim of the rear door, refer to the subsection Removal and installation the tailgate trim.
2. Disconnect connector –6–.
3. Remove the fastening screw –4– from the expansion rivet –1–.
4. Disconnect the hook –7– from the opening and remove the brake light.
5. Remove the diffuser –3– from the lamp holder –2–.
6. Remove the damaged bulb –5– from the bulb holder –2– and insert a new bulb.
7. Insert the lamp holder with diffuser and secure it with screws.
8. Connect the connector.
9. Reinstall the rear door inner trim, refer to subsection Removal and installation the tailgate trim.
(The original material is located on the website: AudiManual)