Repair Chevrolet Repair Toyota Repair Honda Repair AvtoVAZ Repair Mercedes-Benz Repair BMW Repair Opel
Home  |  Contacts  |  Sitemap  |    
English Русский
Български
Беларускі
Український
Српски
Hrvatski
Română
Polski
Slovenský
Magyar
AudiManual.ru


  • AUDI 80
  • AUDI 100
  • AUDI A3
  • AUDI A4
  • AUDI A6
  • AUDI A8
  • AUDI Q
  • OTHER
  • ARTICLES
Type 8L (1996-2003)

Replacing interior light bulbs (Audi A3 8L)

  • Home
  • Audi A3
  • Type 8L (1996-2003)
  • Electrical equipment
  • Lighting and appliances
  • Replacing interior light bulbs
            0
Table of contents: Interior/reading light ↓ Lamp for lighting the prophetic box ↓ Rear compartment light ↓ Trunk light lamp ↓

Interior/reading light


Interior/reading light


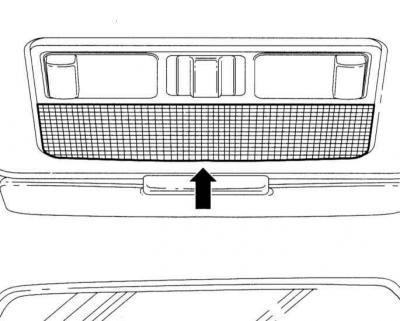
1. Carefully remove the three-piece diffuser from the front of the lamp using your fingers.

2. Remove the defective spotlight from the socket and replace it. Make sure that the lamp is securely positioned, bend the contacts if necessary.

3. Remove the defective reading light bulb and replace it.

Warning: If the new bulb does not fit into the socket, remove the housing. To do this, unscrew the housing mounting screws with a Phillips screwdriver. On the back of the housing, turn the backlight lamp socket 90° (1/4 turn) to the right and remove. Insert a new lamp into the socket. Insert the socket into the housing and secure it by turning it to the left. Secure the lamp housing.


4. Insert the diffuser and fix it.

Lamp for lighting the prophetic box


1. Open the glove compartment.

1. Open the glove compartment.


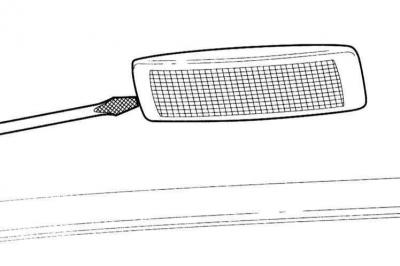
2. Insert a narrow screwdriver into the groove of the lamp and carefully remove the lamp.


3. Squeeze the plug lock and remove the lamp.

4. Remove the damaged spotlight from the socket and replace it. Make sure that the lamp is securely fixed, bend the contact clamps if necessary.

5. Bend the deformed spring of the lamp housing towards the outside of the housing.

6. Connect the connector and secure it.

7. Insert the lamp into the hole.

8. Close the glove compartment.

Rear compartment light


Rear compartment light


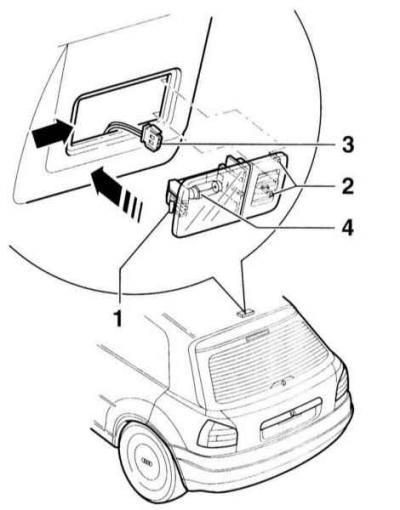
1. Insert a flat-head screwdriver from the side behind the lamp and press the stopper –1– on the ceiling of the passenger compartment (arrow on the illustration). Second option: press your fingers on the lamp from the switch side, compressing the spring –1–, and remove it from the switch side.

2. Remove the light fixture.

3. Disconnect connector –3–.

4. Remove the damaged sofit lamp –4– from the socket and replace it. In doing so, ensure that the lamp is securely fastened; bend the contact clamps if necessary.

5. If necessary, bend the retaining spring towards the outside of the housing.

6. Connect and secure the connector.

7. First insert the light with both hooks –2– into the opening in the passenger compartment ceiling. On the other side, press and fix the lamp (arrow).


Trunk light lamp


On the right and left sides of the trunk, one trunk light is located in the sidewalls.

1. Insert a flat-head screwdriver into the slot on the diffuser from behind. To protect against damage, place a rag between the screwdriver and the trim.

2. Carefully remove the lamp.

3. Disconnect the connector.

4. Remove the damaged spotlight from the socket and replace it. Make sure the lamp is securely fastened, bend the contact clamps if necessary.

5. If necessary, bend the retaining spring towards the outside of the housing.

6. Connect and secure the connector.

7. Insert the trunk light bulb with the electrical connections first into the hole in the side panel and then press it in from the other side.

The article was copied from the website AudiManual.ru
The article was checked by auto expert Nikita Rudakov
This article is available at russian, bulgarian, belarusian, ukrainian, serbian, croatian, romanian, polish, slovak, hungarian

Share information:
Previous articles
Audi A3 Type 8L: Lighting and appliances
Next articles

Replacement of outdoor lighting lamps
Lighting fixtures
Anti-theft lock
Replacement of battery / light key
Removal and installation headlights
Removal and installation the headlight range adjustment motor
Removal and installation the front turn signal
Removal and installation the rear light


Similar articles on other Audi car models:
External Light Bulbs — Replacement Audi 80 B4 (1991-1996)
Replacing the tail light bulbs on the trunk lid Audi 100 C3 (1982-1990)
Replacing license plate light bulbs Audi A4 B6 (2000-2006, petrol)
Replacing interior lighting bulbs Audi A6 C4 (1994-1997)
Rear light bulbs in the trunk lid Audi A8 D2 (1994-2002)
Comfort system control unit #2, rear interior light, closed… Audi Q7 Typ 4L (2005-2015, diesel)
Replacing the tail light bulbs Audi A2 (1999-2005)
Link to this page in different formats


Visitor comments

No comments yet


How much will 45 + 34 =


A3(8L, 1996-2003) 
  • General information
  • User manual
  • Maintenance
  • Power unit
  • Engine repair
  • Lubrication system
  • Cooling system
  • Supply system
  • Fuel injection system
  • Exhaust system
  • Ignition system
  • Transmission
  • Manual transmission
  • Automatic transmission
  • Clutch and drive shafts
  • Chassis
  • Brake system
  • Front suspension
  • Rear suspension
  • Steering
  • Body
  • Ventilation and heating
  • Exterior (external elements)
  • Interior (internal elements)
  • Doors, covers and windows
  • Electrical equipment
  • Power devices
  • Lighting and appliances
  • Electrical circuits
 
AudiManual.ru © 2017-2026 · Mobile version · Feedback · Sitemap: EN BG BY UA RS HR RO PL SK HU · Site search · News and articles
80 B2 · 80 B3 petrol · 80 B3 · 80 B4 · 100 C3 diesel · 100 C3 petrol · 100 C3 · 100 C4 petrol · 100 C4 · A3 Type 8L · A4 B5 petrol · A4 B5 · A4 B6 petrol · A4 B6 · A4 B7 · A4 B8 · A6 C4 · A6 C5 · A6 C5 Allroad · A8 D2 · Q5 Type 8R · Q7 Typ 4L · Audi A2 ·
This site uses cookies 🍪. Click the button to accept this fact.