Repair Chevrolet Repair Toyota Repair Honda Repair AvtoVAZ Repair Mercedes-Benz Repair BMW Repair Opel
Home  |  Contacts  |  Sitemap  |    
English Русский
Български
Беларускі
Український
Српски
Hrvatski
Română
Polski
Slovenský
Magyar
AudiManual.ru


  • AUDI 80
  • AUDI 100
  • AUDI A3
  • AUDI A4
  • AUDI A6
  • AUDI A8
  • AUDI Q
  • OTHER
  • ARTICLES
B4 (1991-1996) B3 (1986-1991) B3 (1986-1991, petrol) B2 (1979-1986)

Hydraulic booster unit — removal and installation (Audi 80 B3)

  • Home
  • Audi 80
  • B3 (1986-1991, petrol)
  • Chassis
  • Brake system
  • Hydraulic booster unit — removal and installation
            0
1. Relieve all pressure from the feedback hydraulic system by depressing the brake pedal with the engine off about twenty times.

2. Remove the master cylinder as described in Chapter 13.

3. Place a container under the booster unit, then unscrew the union nuts and disconnect the feed and return pipes. Seal the ends of the pipes.

4. Disconnect the wiring from the differential pressure indicator, unscrew the switch from the booster unit. Remove the washer.

5. From inside the vehicle, disconnect the return spring from the brake pedal and the booster pushrod clamp. Remove the bracket and remove the pin.

6. Remove the mounting nuts securing the booster unit to the pedal hanger and bulkhead.

7. Remove the amplifier unit into the engine compartment. Remove the gasket.

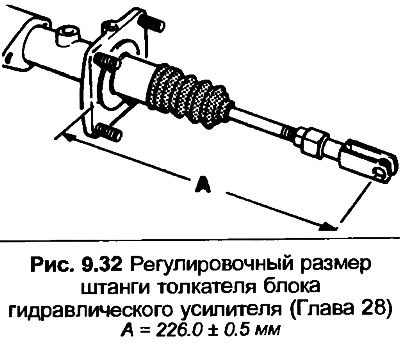
8. Before installing the block, check the size of the push rod, referring to Fig. 9.32. If necessary, loosen the lock nut, reinstall the clamp, then re-tighten the lock nut.

8. Before installing the block, check the size of the push rod, referring to Fig. 9.32. If…


9. Installation is carried out in the reverse order. Use a new gasket and tighten all nuts and bolts to the specified tightening torque Specification. Finally, top up the tank with the specified liquid (see Section 10 if necessary). Place the front wheels straight ahead and run the engine at idle speed for approximately two minutes. Turn off and immediately check the fluid level in the reservoir. Top up to the maximum mark, if necessary.
The article was checked by auto expert Timur Bazhenov
This article is available at russian, bulgarian, belarusian, ukrainian, serbian, croatian, romanian, polish, slovak, hungarian

Share information:
Previous articles
Audi 80 B3: Brake system
Next articles

Hydraulic booster unit — description
Vacuum Pump (with Automatic Transmission) — Removal and…
Vacuum booster — removal and installation
Vacuum booster — description and testing
Hydraulic booster pressure accumulator — removal and installation
Hydraulic booster system — check
Brake light switch — removal and installation
Handbrake cables — removal and installation


Similar articles on other Audi car models:
Hydraulic booster unit — removal and installation Audi 100 C3 (1982-1990, diesel)
Removal and installation the airbag unit Audi A3 Type 8L (1996-2003)
Removal and installation the heater/air conditioning control unit Audi A4 B6 (2000-2006)
Engine Control Unit — Removal and Installation Audi A6 C5 Allroad (1999-2005)
Removal and installation the engine Audi A8 D2 (1994-2002)
Removal and installation the oil pan and the electro-hydraulic… Audi Q7 Typ 4L (2005-2015, diesel)
Removal and installation of the hydraulic control unit Audi A2 (1999-2005)
Link to this page in different formats


Visitor comments

No comments yet


How much will 35 + 47 =


80(B4, 1991-1996) 
  • General information
  • User manual
  • Maintenance
  • Troubleshooting
  • Power unit
  • Engine
  • Cooling system
  • Heating and ventilation
  • Petrol injection
  • Diesel fuel system
  • Fuel system
  • Exhaust systems
  • Ignition system
  • Transmission
  • Clutch
  • Car gearbox
  • Chassis
  • Brake system
  • Suspension and steering wheel
  • Body
  • Body and trim
  • Electrical equipment
  • Electrical system
  • Electrical circuits
 
80(B3, 1986-1991) 
  • General information
  • Repair characteristics
  • Maintenance
  • Power unit
  • Gasoline engine
  • Diesel engine
  • Engine lubrication system
  • Fuel system (gasoline)
  • Injection system (gasoline)
  • Fuel system (diesel)
  • Ignition system
  • Cooling system
  • Heater
  • Exhaust system
  • Transmission
  • Clutch and gearbox
  • Chassis
  • Steering
  • Brake system
  • Car suspension
  • Body
  • Body elements
  • Electrical equipment
  • Power devices
  • Lighting and appliances
  • Electrical circuits
 
80(B3, 1986-1991, petrol) 
  • General information
  • User manual
  • Maintenance
  • Power unit
  • Engine 4-cylinder
  • Engine 5-cylinder
  • Cooling system
  • Fuel and exhaust systems
  • Ignition system
  • Transmission
  • Clutch
  • Mechanical transmission
  • Automatic transmission
  • Drive shafts
  • Chassis
  • Brake system
  • Suspension
  • Steering
  • Body
  • Exterior
  • Interior
  • Electrical equipment
  • Equipment and devices
  • Electrical circuits
 
80(B2, 1979-1986) 
  • General information
  • User manual
  • Power unit
  • Engine FZ
  • Engine EP, YP, YZ, DT, DS, DZ
  • Transmission
  • Clutch
  • 4 speed gearbox
  • 5 speed gearbox
  • Front wheel drive
  • Chassis
  • Front suspension
  • Rear suspension
  • Steering
  • Brake system
  • Electrical equipment
  • Equipment and devices
  • Electrical circuits
 
AudiManual.ru © 2017-2026 · Mobile version · Feedback · Sitemap: EN BG BY UA RS HR RO PL SK HU · Site search · News and articles
80 B2 · 80 B3 petrol · 80 B3 · 80 B4 · 100 C3 diesel · 100 C3 petrol · 100 C3 · 100 C4 petrol · 100 C4 · A3 Type 8L · A4 B5 petrol · A4 B5 · A4 B6 petrol · A4 B6 · A4 B7 · A4 B8 · A6 C4 · A6 C5 · A6 C5 Allroad · A8 D2 · Q5 Type 8R · Q7 Typ 4L · Audi A2 ·
This site uses cookies 🍪. Click the button to accept this fact.